Java web development as it stands today is dramatically more complicated than it needs to be. Most modern web frameworks in the Java space are over complicated and don't embrace the Don't Repeat Yourself (DRY) principles.
現在のJavaでのWeb開発は必要以上に複雑です。JavaのほとんどのWebフレームワークは複雑でDon't Repeat Yourself (DRY)ではありません。
Dynamic frameworks like Rails, Django and TurboGears helped pave the way to a more modern way of thinking about web applications. Grails builds on these concepts and dramatically reduces the complexity of building web applications on the Java platform. What makes it different, however, is that it does so by building on already established Java technologies like Spring and Hibernate.
Rails,Django,TurboGearsといったダイナミックフレームワークはWebアプリケーションの考え方をよりモダンな方へ導いてくれました。Grailsは、Spring、Hibernateといった既に確立したJavaテクノロジーで、それらのダイナミックフレームワーク概念に基づいてJava環境でのWebアプリケーション開発の複雑さを軽減させます。
Grails is a full stack framework and attempts to solve as many pieces of the web development puzzle through the core technology and its associated plugins. Included out the box are things like:
Grailsは、多くのコア・テクノロジーによるWeb開発でのパズルような断片をプラグインで連携させることで解決を試みたフルスタックフレームワークです。以下の内容をすぐに利用できます:
This documentation will take you through getting started with Grails and building web applications with the Grails framework.
This section covers the new features that are present in 2.0 and is broken down into sections covering the build system, core APIs, the web tier, persistence enhancements and improvements in testing. Note there are many more small enhancements and improvements, these sections just cover some of the highlights.
このセクションでは、現在2.0に存在する新機能、ビルドシステム、コアAPI、Web階層、永続化関連の強化等に分類し掘り下げて紹介します。他にも向上、強化した内容が多数ありますが、ここではハイライト的に紹介してます。
Grails 2.0 features brand new console output that is more concise and user friendly to consume. An example of the new output when running tests can be seen below:
コマンド実行の際に、重要な情報のみ1行を更新表示するようになりました。例えば、以前のバージョンまでは、warコマンドを実行すると大量のログが表示されていましたが、2.0からは1行だけで表示されます。
In addition simply typing 'grails' at the command line activates the new interactive mode which features TAB completion, command history and keeps the JVM running to ensure commands execute much quicker than otherwise
さらに、単にgrailsコマンドをコンソールで実行するだけで、新しいインタラクティブモードが開始され、JVMが起動したままとなりコマンドが迅速に実行でき、タブ補完、コマンド履歴も使用できます。
.
Grails 2.0からのリロード機能は、クラスローダを使用せずJVMエージェントを使用してクラスファイルのリロードを行います。その結果、変更保存されたクラスが確実にメモリにロードされようになり、変更時のリロードが大いに向上しました。今までより、cleanコマンドの実行回数を減らすことができます。
There are new templates for displaying test results that are clearer and more user friendly than the previous reports:
In addition, the Grails documentation engine has received a facelift with a new template for presenting Grails application and plugin documentation:
The old documentation engine relied on you putting section numbers into the gdoc filenames. Although convenient, this effectively made it difficult to restructure your user guide by inserting new chapters and sections. In addition, any such restructuring or renaming of section titles resulted in breaking changes to the URLs.
You can now use logical names for your gdoc files and define the structure and section titles in a YAML table-of-contents file, as described in the section on the
. The logical names appear in the URLs, so as long as you don't change those, your URLs will always remain the same no matter how much restructuring or changing of titles you do.
command to aid you in migrating existing gdoc user guides.
Error reporting and problem diagnosis has been greatly improved with a new errors view that analyses stack traces and recursively displays problem areas in your code:
In addition stack trace filtering has been further enhanced to display only relevant trace information:
Grails 2.0 now uses the H2 database instead of HSQLDB, and enables the H2 database console in development mode (at the URI /dbconsole) so that the in-memory database can be easily queried from the browser:
Grails 2.0では、今までのHSQLDBに代わりH2データベースを使用します。H2データベース付属のコンソール機能を開発モードで有効にしています。(URI /dbconsoleで表示可能) メモリ動作のデータベースでも簡単にブラウザからクエリ実行することができます:
To enhance community awareness of the most popular plugins an opt-in plugin usage tracking system has been included where users can participate in providing feedback to the plugin community on which plugins are most popular.
どのプラグインが人気があるのか等の情報を収集する。プラグイン使用レポートを収集する機能が実装されました。今後のプラグインサポートや、人気の無いプラグインの今後の努力などに役立てます。
This will help drive the roadmap and increase support of key plugins while reducing the need to support older or less popular plugins thus helping plugin development teams focus their efforts.
There are numerous improvements to dependency resolution handling via Ivy including:
* It is now possible to completely disable resolution from inherited repositories (repositories defined by other plugins):
Grails' existing environment support has been bridged into the Spring 3.1 profile support. For example when running with a custom Grails environment called "production", a Spring profile of "production" is activated so that you can use Spring's bean configuration APIs to configure beans for a specific profile.
Grailsの環境サポートがSpring 3.1プロフィールサポートとブリッジできます。例えば、Grailsの環境で"production"で動作している場合、Springプロフィール"production"がアクティベートされます。これによって、Springビーン定義APIでのビーン定義でプロフィールを指定できます。
It is now possible to define controller actions as methods instead of using closures as in previous versions of Grails. In fact this is now the preferred way of expressing an action. For example:
It is now possible to bind form parameters to action arguments where the name of the form element matches the argument name. For example given the following form:
You can define an action that declares arguments for each input and automatically converts the parameters to the appropriate type:
Grails now supports Servlet 3.0 including the Asynchronous programming model defined by the specification:
クラスが追加されました。コントローラのコンテキスト以外のどこからでも使用できます。例としてサービス、バックグラウンド処理、非同期タスク、リクエスト以外の場所でリンクが生成できます。
Filters may now express controller, action and uri exclusions to offer more options for expressing to which requests a particular filter should be applied.
Performance of GSP page rendering has once again been improved by optimizing the GSP compiler to inline method calls where possible.
jQueryプラグインがデフォルトのJavaScriptライブラリとしてGrailsアプリケーションにインストールされます。 下位互換として、Prototypeはプラグインとして提供しています。 Prototypeついてはプラグインのドキュメントを参考にしてください。
The default URL Mapping mechanism supports camel case names in the URLs. The default URL for accessing an action named
. Grails allows for the customization of this pattern and provides an implementation which replaces the camel case convention with a hyphenated convention that would support URLs like
. To enable hyphenated URLs assign a value of "hyphenated" to the
.
Arbitrary strategies may be plugged in by providing a class which implements the
interface and adding an instance of that class to the Spring application context with the bean name of
. If Grails finds a bean in the context with that name, it will be used as the default converter and there is no need to assign a value to the
config property.
というクラスに置き換えられたことによって、全てのドメインのバイトコードレベルに注入されます。この実装でIDEでのコード補完、Javaとの統合、様々なデータストアへのGORM実装への可能性が向上しました。
which are criteria queries that are not associated with any session or connection and thus can be more easily reused and composed:
method and DSL has been introduced to greatly reduce the complexity of criteria queries:
for more information.
Domain classes have support for the findOrCreateWhere, findOrSaveWhere, findOrCreateBy and findOrSaveBy query methods which behave just like findWhere and findBy methods except that they should never return null. If a matching instance cannot be found in the database then a new instance is created, populated with values represented in the query parameters and returned. In the case of findOrSaveWhere and findOrSaveBy, the instance is saved before being returned.
ドメインクラスに、findWhereやfindByメソッドに似た、nullを返さない、findOrCreateWhere, findOrSaveWhere, findOrCreateBy, findOrSaveByのクエリーをサポートしました。実行結果にインスタンスが見つからない場合は、指定された値で、新規にインスタンスを作成して返します。findOrSaveWhereとfindOrSaveByの場合はインスタンスを保存してからインスタンスを返します。
GORM now supports abstract inheritance trees which means you can define queries and associations linking to abstract classes:
If multiple datasources are specified for a domain then you can use the name of a particular datasource as a namespace in front of any regular GORM method:
データベースマイグレーションを行うプラグインが、Grails 2.0用にデザイン構築されました。現行の状況との違いや、変更のロールバックがデータベースマイグレーションで可能になります。
データベースリバースエンジニアリングを行うプラグインが、Grails 2.0用にデザイン構築されました。既存のデータベーススキーマからドメインクラスを生成可能とします。
SetのユニークまたはListの順序必要としない場合でにおいて、大きなコレクションロードのメモリーとパフォーマンス問題を回避できるコレクションマッピング、Hibernate
There is a new unit testing API based on mixins that supports JUnit 3, 4 and Spock style tests (with Spock 0.6 and above). Example:
A new in-memory GORM implementation is present that supports many more features of the GORM API making unit testing of criteria queries, named queries and other previously unsupported methods possible.
メモリ上で動作するGORM実装により、今までにサポートされていなかった、クライテリアクエリ、名前付きクエリなど、様々なGORM APIのテストがUnitテストで可能になりました。
The new interactive mode (activated by typing 'grails') greatly improves the execution time of running unit and integration tests.
Before installing Grails you will as a minimum need a Java Development Kit (JDK) installed version 1.6 or above and environment variable called JAVA_HOME pointing to the location of this installation. On some platforms (for example OS X) the Java installation is automatically detected. However in many cases you will want to manually configure the location of Java. For example:
が指定されている必要があります。一部のプラットフォームでは(OS Xの例で言うと)、自動的にJavaのインストール先を認識します。手動で定義する場合等、必要に応じて次のようにJavaの設定を行ってください。
Note that although JDK 1.6 is required to use Grails at development time it is possible to deploy Grails to JDK 1.5 VMs by setting the grails.project.source.level and grails.project.target.level settings to "1.5" in grails-app/conf/BuildConfig.groovy:
In addition, Grails supports Servlet versions 2.5 and above. If you wish to use newer features of the Servlet API (such as 3.0) you should configure the grails.servlet.version in BuildConfig.groovy appropriately:
The first step to getting up and running with Grails is to install the distribution. To do so follow these steps:
Although the Grails development team have tried to keep breakages to a minimum there are a number of items to consider when upgrading a Grails 1.0.x, 1.1.x, 1.2.x, or 1.3.x applications to Grails 2.0. The major changes are described in more detail below, but here's a brief summary of what you might encounter when upgrading from Grails 1.3.x:
Grails開発チームではできる限りの下位互換を心がけていますが、Grails 2.0へ更新する際に、下位バージョンから考慮しなくてはならない内容が幾つか存在します。大きな変更点を以下にまとめます。
* Logging by convention packages have changed, so you may not see the logging output you expect. Update your logging configuration as described below.
* HSQLDB has been replaced with H2 as default in-memory database. If you use the former, either change your data source to H2 or add HSQLDB as a runtime dependency.
* Adaptive AJAX tags using Prototype will break. In this situation you must install the new Prototype plugin.
* Resources adds a '/static' URL, so you may have to update your access control rules accordingly.
* Some plugins may fail to install because one or more of their dependencies can not be found. If this happens, the plugin probably has a custom repository URL that you need to add to your project's BuildConfig.groovy.
* The behaviour of abstract domain classes has changed, so if you use them you will either have to move the abstract classes to 'src/groovy' or migrate your database schema and data.
* Criteria queries default to INNER_JOIN for associations rather than OUTER_JOIN. This may affect some of your result data.
* Constraints declared for non-existent properties will now throw an exception.
* Public methods in controllers will now be treated as actions. If you don't want this, make them protected or private.
* Output from Ant tasks is now hidden by default. If your scripts are using ant.echo(), ant.input(), etc. you might want to use alternative mechanisms for output.
* Domain properties of type java.net.URL may no longer work with your existing data. The serialisation mechanism for them appears to have changed. Consider migrating your data and domain models to String.
* The Ivy cache location has changed. If you want to use the old location, configure the appropriate global setting (see below) but be aware that you may run into problems running Grails 1.3.x and 2.x projects side by side.
* With new versions of various dependencies, some APIs (such as the Servlet API) may have changed. If you have code that implements any of those APIs, you will need to update it. Problems will typically manifest as compilation errors.
Groovy 1.8 is a little stricter in terms of compilation so you may be required to fix compilation errors in your application that didn't occur under Grails 1.3.x.
Groovy 1.8 also requires that you update many of the libraries that you may be using in your application. Libraries known to require an upgrade include:
さらに、Groovy 1.8では、アプリケーションで使用している幾つかのライブラリを更新する必要があります。解っている更新が必要なライブラリは以下になります。
HSQLDB is still bundled with Grails but is not configured as a default runtime dependency. Upgrade options include replacing HSQLDB references in DataSource.groovy with H2 references or adding HSQLDB as a runtime dependency for the application.
HSQLDBは現在もGrailsにバンドルされていますが、デフォルトでは依存定義されていません。アップグレードした場合はDataSource.groovyのHSQLDB定義をH2に変更するか、依存管理にHSQLDBを追加する必要があります。
If you want to run an application with different versions of Grails, it's simplest to add HSQLDB as a runtime dependency, which you can do in BuildConfig.groovy:
もしアプリケーションを他のバージョンのGrailsと平行して動作させたい場合は、単純にBuildConfig.groovyの依存定義にHSQLDBを追加しましょう:
の扱いです。HSQLDBでのBLOBのデフォルトサイズは、大きいので大抵最大サイズを定義する必要が無かったかと思います。H2では最大サイズの初期値が255バイトになっているので、調整する必要があります。調整するには、 制約の
This constraint influences schema generation, so in the above example H2 will have the data column set to BINARY(2097152) by Hibernate.
に存在する抽象クラスは、永続化対象として扱われませんでした。今後は違うため、アプリケーション更新には重大な影響を与えます。例として以下のようなドメインモデルをGrails-1.3.xで持っていたとします。
The previous default of LEFT JOIN for criteria queries across associations is now INNER JOIN.
Previously if you defined a constraint on a property that doesn't exist no error would be thrown:
The packages that you should use for Grails artifacts have mostly changed. In particular:
The Protoype Javascript library has been removed from Grails core and now new Grails applications have the jQuery plugin configured by default. This will only impact you if you are using Prototype with the adaptive AJAX tags in your application, e.g. <g:remoteLink/> etc, because those tags will break as soon as you upgrade.
JavascriptライブラリPrototypeはGrailsのコアから削除されました。今後はjQueryがデフォルトとして定義されます。この変更では、ProtoypeベースのAJAXライブラリを使用してる場合に影響を受けます。例えば<g:remoteLink/>などは、アップデートをしたら直ちに影響を受けます。
をインストールすることで解決できます。Prototypeはプラグイン内から参照するようになるので、不用になるweb-app/js/prototypeディレクトリは削除できます。
The Resources plugin is a great new feature of Grails that allows you to manage static web resources better than before, but you do need to be aware that it adds an extra URL at
. If you have access control in your application, this may mean that the static resources require an authenticated user to load them! Make sure your access rules take account of the
URL.
As of Grails 2.0, public methods of controllers are now treated as actions in addition to actions defined as traditional Closures. If you were relying on the use of methods for privacy controls or as helper methods then this could result in unexpected behavior. To resolve this issue you should mark all methods of your application that are not to be exposed as actions as private methods.
Grails 2.0からは、今までのクロージャに加えて、コントローラのパブリックメソッドもアクションとして扱われるようになりました。もし補助機能や内部機能としてメソッドを使用している場合は必ずメソッドを
Another side-effect of the changes to the redirect method is that it now always uses the grails.serverURL configuration option if it's set. Previous versions of Grails included default values for all the environments, but when upgrading to Grails 2.0 those values more often than not break redirection. So, we recommend you remove the development and test settings for grails.serverURL or replace them with something appropriate for your application.
が設定されていれば常に使用するという点です。以前のバージョンのGrailsではデフォルトの値を保持していました、Grails 2.0に更新するとそれらを参照するために問題が発生します。したがって、test、developmentの定義から
Grails 2 introduces a new unit testing framework that is simpler and behaves more consistently than the old one. The old framework based on the GrailsUnitTestCase class hierarchy is still available for backwards compatibility, but it does not work with the new annotations.
Migrating unit tests to the new approach is non-trivial, but recommended. Here are a set of mappings from the old style to the new:
Note that the Grails annotations don't need to be imported in your test cases to run them from the command line, but your IDE may need them. So, here are the relevant classes with packages:
Grailsのアノテーションはコマンドラインで実行する場合はインポートする必要が有りませんが、IDEは必要とします。ここに関連するクラスとパッケージを列挙します。
Note that you're only ever likely to use the first two explicitly. The rest are there for reference.
Ant output is now hidden by default to keep the noise in the terminal to a minimum. That means if you use ant.echo in your scripts to communicate messages to the user, we recommend switching to an alternative mechanism.
さらなる制御として、api:grails.build.logging.GrailsConsoleインスタンスにアクセスするスクリプト変数 GrailsConsole|api:grails.build.logging.GrailsConsole] を使用することもできます。特に情報のログをとるための、
Many plugins have dependencies, both other plugins and straight JAR libraries. These are often located in Maven Central, the Grails core repository or the Grails Central Plugin Repository in which case applications are largely unaffected if they upgrade to Grails 2. But sometimes such dependencies are located elsewhere and Grails must be told where they can be found.
Due to changes in the way Grails handles the resolution of dependencies, Grails 2.0 requires you to add any such
to your project if an affected plugin is to install properly.
The default Ivy cache location for Grails has changed. If the thought of yet another cache of JARs on your disk horrifies you, then you can change this in your
If you do this, be aware that you may run into problems running Grails 2 and earlier versions of Grails side-by-side. These problems can be avoided by excluding "xml-apis" and "commons-digester" from the inherited global dependencies in Grails 1.3 and earlier projects.
, they may cease to work once you upgrade to Grails 2. It seems that the default mapping of
to database column has changed with the new version of Hibernate. This is a tricky problem to solve, but in the long run it's best if you migrate your
properties to strings. One technique is to use the
(using Grails 1.3.x or earlier) to fetch each row of the table as a domain instance, convert the
properties to string URLs, and then write those values to the new column.
Grails 2.0 contains updated dependencies including Servlet 3.0, Tomcat 7, Spring 3.1, Hibernate 3.6 and Groovy 1.8. This means that certain plugins and applications that depend on earlier versions of these APIs may no longer work. For example the Servlet 3.0 HttpServletRequest interface includes new methods, so if a plugin implements this interface for Servlet 2.5 but not for Servlet 3.0 then said plugin will break. The same can be said of any Spring interface.
Grails 2.0では、Servlet 3.0、Tomcat 7、Spring 3.1、Hibernate 3.6、Groovy 1.8などのライブラリを更新しました。以前のバージョンのプラグインなどでこれらのライブラリに依存がある場合動作しなくなります。例としてServlet 3.0の
インターフェイスは新しい物を多く含んでいます。この逆もあり得るので、Servlet 2.5のインターフェイスで実装され、Servlet 3.0に存在しない機能を持っているプラグインは動作しません。もちろんこの事はSpringなど他のライブラリにも同じ事が言えます。注意しましょう。
Additionally the above example will no longer link to an application image from a plugin view. To do so change the above to:
この変更により、上記の例ではプラグイン内のビューからアプリケーション本体の/imagesなどへのパスを生成しません。従って、アプリケーション本体へのパスを生成するためには、次のようにする必要があります:
which is semantically different from the one used in earlier versions of Grails. However, if your application depends on the older semantics you can still use the deprecated implementation by setting the following property to
Grails now executes validation routines when the underlying Hibernate session is flushed to ensure that no invalid objects are persisted. If one of your constraints (such as a custom validator) executes a query then this can cause an additional flush, resulting in a
. For example:
in Grails 1.2. The solution is to run the query in a new Hibernate
(which is recommended in general as doing Hibernate work during flushing can cause other issues):
Grails 1.1 and above ship with Groovy 1.6 and no longer supports code compiled against Groovy 1.5. If you have a library that was compiled with Groovy 1.5 you must recompile it against Groovy 1.6 or higher before using it with Grails 1.1.
Grails 1.1 now no longer supports JDK 1.4, if you wish to continue using Grails then it is recommended you stick to the Grails 1.0.x stream until you are able to upgrade your JDK.
for consistency.
option is no longer supported, since Java 5.0 is now the baseline (see above).
4) The use of jsessionid (now considered harmful) is disabled by default. If your application requires jsessionid you can re-enable its usage by adding the following to
5) The syntax used to configure Log4j has changed. See the user guide section on
for more information.
directory by default. This may result in compilation errors in your application unless you either re-install all your plugins or set the following property in
1) If you were previously using Grails 1.0.3 or below the following syntax is no longer support for importing scripts from GRAILS_HOME:
.
3) The root directory of the project is no longer on the classpath, so loading a resource like this will no longer work:
1) Enum types are now mapped using their String value rather than the ordinal value. You can revert to the old behavior by changing your mapping as follows:
2) Bidirectional one-to-one associations are now mapped with a single column on the owning side and a foreign key reference. You shouldn't need to change anything; however you should drop column on the inverse side as it contains duplicate data.
Incoming XML requests are now no longer automatically parsed. To enable parsing of REST requests you can do so using the
To create a Grails application you first need to familiarize yourself with the usage of the grails command which is used in the following manner:
This will create a new directory inside the current one that contains the project. Navigate to this directory in your console:
このコマンドを実行することにより、現在のディレクトリ内にプロジェクトが含まれる新しいディレクトリが作成されます。コンソールで、このディレクトリに移動してください。
Grails' interactive mode will be activated and you should see a prompt that looks like the following:
Controllers are capable of dealing with web requests and to fulfil the "hello world!" use case our implementation needs to look like the following:
This will start-up a server on port 8080 and you should now be able to access your application with the URL: http://localhost:8080/helloworld
ファイルによって描写されたアプリケーションの初期画面です。画面にはコントローラへのリンクが表示されています。このリンクをクリックすることで、画面に"Hello World!"が表示されます。
Grails 2.0 features an interactive mode which makes command execution faster since the JVM doesn't have to be restarted for each command. To use interactive mode simple type 'grails' from the root of any projects and use TAB completion to get a list of available commands. See the screenshot below for an example:
Grails 2.0では、コマンドの起動を速くするために、コマンド毎にJVMに再起動が必要無いインタラクティブモードを提供しています。インタラクティブモードを使用するには、プロジェクトルートで単に'grails'と入力するだけです。使用可能なコマンドをタブ補完することもできます。例としてスクリーンショットを参照してください:
To integrate Grails with IntelliJ run the following command to generate appropriate project files:
を探して取得することをお勧めします。それは自動クラスパス管理機能、GSPエディタやGrailsコマンドへの迅速なアクセス機能を含んだGrailsのためのサポートが組み込まれて提供されています。概要については、
他にも良好なオープンソースのIDEとしてSunのNetBeansがあります。NetBeansはGroovy/Grailsプラグインで自動的にGrailsプロジェクトを認識します。また、IDEでのGrailsアプリケーションの実行、コード補完、SunのGlassfishサーバとの連携などの機能も提供しています。機能概要については、NetBeansチームによって記述されたGrails公式サイト上の
To integrate Grails with TextMate run the following command to generate appropriate project files:
Alternatively TextMate can easily open any project with its command line integration by issuing the following command from the root of your project:
Grails uses "convention over configuration" to configure itself. This typically means that the name and location of files is used instead of explicit configuration, hence you need to familiarize yourself with the directory structure provided by Grails.
Grailsは、"convention over configuration"を使用して、自動的に設定をおこないます。一般的に、名前とファイルの位置が明確な構成の代わりに使われることを意味します。それゆえに、Grailsによって提供されるディレクトリ構造に慣れ親む必要があります。
Note that it is better to start up the application in interactive mode since a container restart is much quicker:
Grails runs on any container that supports Servlet 2.5 and above and is known to work on the following specific container products:
It may seem odd that in a framework that embraces "convention-over-configuration" that we tackle this topic now, but since what configuration there is typically a one-off, it is best to get it out the way.
With Grails' default settings you can actually develop an application without doing any configuration whatsoever. Grails ships with an embedded servlet container and in-memory H2 database, so there isn't even a database to set up.
However, typically you should configure a more robust database at some point and that is described in the following section.
. This file uses Groovy's
which is very similar to Java properties files except it is pure Groovy hence you can reuse variables and use proper Java types!
Then later in your application you can access these settings in one of two ways. The most common is from the
Grails uses its common configuration mechanism to provide the settings for the underlying
.
This says that for loggers whose name starts with 'org.codehaus.groovy.grails.web.servlet' or 'org.codehaus.groovy.grails.web.pages', only messages logged at 'error' level and above will be shown. Loggers with names starting with 'org.apache.catalina' logger only show messages at the 'warn' level and above. What does that mean? First of all, you have to understand how levels work.
The are several standard logging levels, which are listed here in order of descending priority:
When you log a message, you implicitly give that message a level. For example, the method
will log a message at the 'error' level. Likewise,
will log it at 'debug'. Each of the above levels apart from 'off' and 'all' have a corresponding log method of the same name.
level combined with the configuration for the logger (see next section) to determine whether the message gets written out. For example, if you have an 'org.example.domain' logger configured like so:
then messages with a level of 'warn', 'error', or 'fatal' will be written out. Messages at other levels will be ignored.
Before we go on to loggers, a quick note about those 'off' and 'all' levels. These are special in that they can only be used in the configuration; you can't log messages at these levels. So if you configure a logger with a level of 'off', then no messages will be written out. A level of 'all' means that you will see all messages. Simple.
Loggers are fundamental to the logging system, but they are a source of some confusion. For a start, what are they? Are they shared? How do you configure them?
). These loggers are cached and uniquely identified by name, so if two separate classes use loggers with the same name, those loggers are actually the same instance.
property, then the name of the logger is 'grails.app.<type>.<className>', where
is the fully qualified name of the artifact. For example, if you have this service:
then the name of the logger will be 'grails.app.service.org.example.MyService'.
For other classes, the typical approach is to store a logger based on the class name in a constant static field:
This will create a logger with the name 'org.other.MyClass' - note the lack of a 'grails.app.' prefix since the class isn't an artifact. You can also pass a name to the
method, such as "myLogger", but this is less common because the logging system treats names with dots ('.') in a special way.
This example configures loggers with names starting with 'org.codehaus.groovy.grails.web.servlet' to ignore any messages sent to them at a level of 'warn' or lower. But is there a logger with this name in the application? No. So why have a configuration for it? Because the above rule applies to any logger whose name
'org.codehaus.groovy.grails.servlet.' as well. For example, the rule applies to both the
one.
In other words, loggers are hierarchical. This makes configuring them by package much simpler than it would otherwise be.
The most common things that you will want to capture log output from are your controllers, services, and other artifacts. Use the convention mentioned earlier to do that:
. In particular the class name must be fully qualifed, i.e. with the package if there is one:
Grails itself generates plenty of logging information and it can sometimes be helpful to see that. Here are some useful loggers from Grails internals that you can use, especially when tracking down problems with your application:
So far, we've only looked at explicit configuration of loggers. But what about all those loggers that
have an explicit configuration? Are they simply ignored? The answer lies with the root logger.
All logger objects inherit their configuration from the root logger, so if no explicit configuration is provided for a given logger, then any messages that go to that logger are subject to the rules defined for the root logger. In other words, the root logger provides the default configuration for the logging system.
Grails automatically configures the root logger to only handle messages at 'error' level and above, and all the messages are directed to the console (stdout for those with a C background). You can customise this behaviour by specifying a 'root' section in your logging configuration like so:
The above example configures the root logger to log messages at 'info' level and above to the default console appender. You can also configure the root logger to log to one or more named appenders (which we'll talk more about shortly):
In the above example, the root logger will log to two appenders - the default 'stdout' (console) appender and a custom 'file' appender.
For power users there is an alternative syntax for configuring the root logger: the root
instance is passed as an argument to the log4j closure. This lets you work with the logger directly:
instance, refer to the Log4j API documentation.
Those are the basics of logging pretty well covered and they are sufficient if you're happy to only send log messages to the console. But what if you want to send them to a file? How do you make sure that messages from a particular logger go to a file but not the console? These questions and more will be answered as we look into appenders.
Loggers are a useful mechanism for filtering messages, but they don't physically write the messages anywhere. That's the job of the appender, of which there are various types. For example, there is the default one that writes messages to the console, another that writes them to a file, and several others. You can even create your own appender implementations!
As you can see, a single logger may have several appenders attached to it. In a standard Grails configuration, the console appender named 'stdout' is attached to all loggers through the default root logger configuration. But that's the only one. Adding more appenders can be done within an 'appenders' block:
implementation. So the previous example sets the
instance.
You can have as many appenders as you like - just make sure that they all have unique names. You can even have multiple instances of the same appender type, for example several file appenders that log to different files.
If you prefer to create the appender programmatically or if you want to use an appender implementation that's not available in the above syntax, simply declare an
, and more.
Once you have declared your extra appenders, you can attach them to specific loggers by passing the name as a key to one of the log level methods from the previous section:
This will ensure that the 'grails.app.controller.BookController' logger sends log messages to 'myAppender' as well as any appenders configured for the root logger. To add more than one appender to the logger, then add them to the same level declaration:
The above example also shows how you can configure more than one logger at a time for a given appender (
) by using a list.
Be aware that you can only configure a single level for a logger, so if you tried this code:
you'd find that only 'fatal' level messages get logged for 'grails.app.controller.BookController'. That's because the last level declared for a given logger wins. What you probably want to do is limit what level of messages an appender writes.
An appender that is attached to a logger configured with the 'all' level will generate a lot of logging information. That may be fine in a file, but it makes working at the console difficult. So we configure the console appender to only write out messages at 'info' level or above:
argument which determines the cut-off for log messages. This argument is available for all appenders, but do note that you currently have to specify a
instance - a string such as "info" will not work.
. However, there are other layouts available including:
, you can put it inside an environment-specific block. However, there is a problem with this approach: you have to provide the full logging configuration each time you define the
setting. In other words, you cannot selectively override parts of the configuration - it's all or nothing.
To get around this, the logging DSL provides its own environment blocks that you can put anywhere in the configuration:
definition inside an environment block.
When exceptions occur, there can be an awful lot of noise in the stacktrace from Java and Groovy internals. Grails filters these typically irrelevant details and restricts traces to non-core Grails/Groovy class packages.
. As with other loggers though, you can change its behaviour in the configuration. For example if you prefer full stack traces to go to the console, add this entry:
This won't stop Grails from attempting to create the stacktrace.log file - it just redirects where stack traces are written to. An alternative approach is to change the location of the 'stacktrace' appender's file:
or, if you don't want to the 'stacktrace' appender at all, configure it as a 'null' appender:
You can of course combine this with attaching the 'stdout' appender to the 'StackTrace' logger if you want all the output in the console.
When Grails logs a stacktrace, the log message may include the names and values of all of the request parameters for the current request. To mask out the values of secure request parameters, specify the parameter names in the
. The default value is
for all other modes.
Earlier, we mentioned that all loggers inherit from the root logger and that loggers are hierarchical based on '.'-separated terms. What this means is that unless you override a parent setting, a logger retains the level and the appenders configured for that parent. So with this configuration:
all loggers in the application will have a level of 'debug' and will log to both the 'stdout' and 'file' appenders. What if you only want to log to 'stdout' for a particular logger? Change the 'additivity' for a logger in that case.
Additivity simply determines whether a logger inherits the configuration from its parent. If additivity is false, then its not inherited. The default for all loggers is true, i.e. they inherit the configuration. So how do you change this setting? Here's an example:
So when you specify a log level, add an 'additivity' named argument. Note that you when you specify the additivity, you must configure the loggers for a named appender. The following syntax will
Stacktraces in general and those generated when using Groovy in particular are quite verbose and contain many stack frames that aren't interesting when diagnosing problems. So Grails uses a implementation of the
interface to filter out irrelevant stack frames. To customize the approach used for filtering, implement that interface in a class in src/groovy or src/java and register it in
In addition, Grails customizes the display of the filtered stacktrace to make the information more readable. To customize this, implement the
Finally, to render error information in the error GSP, an HTML-generating printer implementation is needed. The default implementation is
and it's registered as a Spring bean. To use your own implementation, either implement the
By default, Grails uses Log4J to do its logging. For most people this is absolutely fine, and many users don't even care what logging library is used. But if you're not one of those and want to use an alternative, such as the
, you can do so by simply excluding a couple of dependencies from the global set and adding your own:
If you do this, you will get unfiltered, standard Java stacktraces in your log files and you won't be able to use the logging configuration DSL that's just been described. Instead, you will have to use the standard configuration mechanism for the library you choose.
Grails supports the concept of per environment configuration. The
.
has built in capabilities to execute any command within the context of a specific environment. The format is:
. For example to create a WAR for the
Within your code, such as in a Gant script or a bootstrap class you can detect the environment using the
Its often desirable to run code when your application starts up on a per-environment basis. To do so you can use the
class internally to execute. You can also use this class yourself to execute your own environment specific logic:
Since Grails is built on Java technology setting up a data source requires some knowledge of JDBC (the technology that doesn't stand for Java Database Connectivity).
If you use a database other than H2 you need a JDBC driver. For example for MySQL you would need
Drivers typically come in the form of a JAR archive. It's best to use Ivy to resolve the jar if it's available in a Maven repository, for example you could add a dependency for the MySQL driver like this:
repository is included here since that's a reliable location for this library.
directory.
Once you have the JAR resolved you need to get familiar Grails' DataSource descriptor file located at
. This file contains the dataSource definition which includes the following settings:
Hibernate can automatically create the database tables required for your domain model. You have some control over when and how it does this through the
setting completely, which is recommended once your schema is relatively stable and definitely when your application and database are deployed in production. Database changes are then managed through proper migrations, either with SQL scripts or a migration tool like
The previous example configuration assumes you want the same config for all environments: production, test, development etc.
(JNDI). Grails supports the definition of JNDI data sources as follows:
The format on the JNDI name may vary from container to container, but the way you define the
in Grails remains the same.
The way in which you configure JNDI data sources at development time is plugin dependent. Using the
definition is important as it dictates what Grails should do at runtime with regards to automatically generating the database tables from
classes. The options are described in the
is by default set to "create-drop", but at some point in development (and certainly once you go to production) you'll need to stop dropping and re-creating the database every time you start up your server.
so you retain existing data and only update the schema when your code changes, but Hibernate's update support is very conservative. It won't make any changes that could result in data loss, and doesn't detect renamed columns or tables, so you'll be left with the old one and will also have the new one.
and and provides access to all of its functionality, and also has support for GORM (for example generating a change set by comparing your domain classes to a database).
bean is wrapped in a transaction-aware proxy so you will be given the connection that's being used by the current transaction or Hibernate
if one is active.
would be a new connection, and you wouldn't be able to see changes that haven't been committed yet (assuming you have a sensible transaction isolation setting, e.g.
or better).
.
You can access this bean like any other Spring bean, i.e. using dependency injection:
is a convenient feature of H2 that provides a web-based interface to any database that you have a JDBC driver for, and it's very useful to view the database you're developing against. It's especially useful when running against an in-memory database.
in a browser. The URI can be configured using the
.
The console is enabled by default in development mode and can be disabled or enabled in other environments by using the
attribute in Config.groovy. For example you could enable the console in production using
By default the console is configured for an H2 database which will work with the default settings if you haven't configured an external database - you just need to change the JDBC URL to
. If you've configured an external database (e.g. MySQL, Oracle, etc.) then you can use the Saved Settings dropdown to choose a settings template and fill in the url and username/password information from your DataSource.groovy.
and a single database, but you have the option to partition your domain classes into two or more
s.
. To configure extra
block (at the top level, in an environment block, or both, just like the standard
definition) with a custom name, separated by an underscore. For example, this configuration adds a second
You can use the same or different databases as long as they're supported by Hibernate.
. Set the
. For example, if you want to use the
s. Use the
. For example, consider this class which uses two
specified is the default when not using an explicit namespace, so in this case we default to 'lookup'. But you can call GORM methods on the 'auditing'
to the method call in both the static case and the instance case.
You can also partition annotated Java classes into separate datasources. Classes using the default datasource are registered in
. To specify that an annotated class uses a non-default datasource, create a
file for that datasource with the file name prefixed with the datasource name.
The process is the same for classes mapped with hbm.xml files - just list them in the appropriate hibernate.cfg.xml file.
. To configure a Service to use a different
is the same as the Service.
Note that the datasource specified in a service has no bearing on which datasources are used for domain classes; that's determined by their declared datasources in the domain classes themselves. It's used to declare which transaction manager to use.
What you'll see is that if you have a Foo domain class in dataSource1 and a Bar domain class in dataSource2, and WahooService uses dataSource1, a service method that saves a new Foo and a new Bar will only be transactional for Foo since they share the datasource. The transaction won't affect the Bar instance. If you want both to be transactional you'd need to use two services and XA datasources for two-phase commit, e.g. with the Atomikos plugin.
makes it easy. See the plugin documentation for the simple changes needed in your
s.
Some deployments require that configuration be sourced from more than one place and be changeable without requiring a rebuild of the application. In order to support deployment scenarios such as these the configuration can be externalized. To do so, point Grails at the locations of the configuration files that should be used by adding a
In the above example we're loading configuration files (both Java Properties files and
.
It is also possible to load config by specifying a class that is a config script.
This can be useful in situations where the config is either coming from a plugin or some other part of your application. A typical use for this is re-using configuration provided by plugins across multiple applications.
object and are hence obtainable from there.
Values that have the same name as previously defined values will overwrite the existing values, and the pointed to configuration sources are loaded in the order in which they are defined.
file which may not be what you want. You may want to have a set of
file or in a named config location. For this you can use the
property.
property (i.e. paths to config scripts, property files or classes), but the config described by
all other values and can therefore be overridden. Some plugins use this mechanism to supply one or more sets of default configuration that you can choose to include in your application config.
Grails has built in support for application versioning. The version of the application is set to
command. The version is stored in the application meta data file
in the root of the project.
To change the version of your application you can edit the file manually, or run the
command which will append the application version to the end of the created WAR file.
You can detect the application version using Grails' support for application metadata using the
class. For example within
Since Grails 1.2, the documentation engine that powers the creation of this documentation has been available for your own Grails projects.
syntax to automatically create project documentation with smart linking, formatting etc.
To use the engine you need to follow a few conventions. First, you need to create a
directory where your documentation source files will go. Then, you need to create the source docs themselves. Each chapter should have its own gdoc file as should all numbered sub-sections. You will end up with something like:
Note that you can have all your gdoc files in the top-level directory if you want, but you can also put sub-sections in sub-directories named after the parent section - as the above example shows.
Once you have your source files, you still need to tell the documentation engine what the structure of your user guide is going to be. To do that, you add a
file that contains the structure and titles for each section. This file is in
format and basically represents the structure of the user guide in tree form. For example, the above files could be represented as:
The format is pretty straightforward. Any section that has sub-sections is represented with the corresponding filename (minus the .gdoc extension) followed by a colon. The next line should contain
plus the title of the section as seen by the end user. Every sub-section then has its own line after the title. Leaf nodes, i.e. those without any sub-sections, declare their title on the same line as the section name but after the colon.
That's it. You can easily add, remove, and move sections within the
to restructure the generated user guide. You should also make sure that all section names, i.e. the gdoc filenames, should be unique since they are used for creating internal links and for the HTML filenames. Don't worry though, the documentation engine will warn you of duplicate section names.
Reference items appear in the Quick Reference section of the documentation. Each reference item belongs to a category and a category is a directory located in the
directory. For example, suppose you have defined a new controller method called
. That belongs to the
Other properties such as the version are pulled from your project itself. If a title is not specified, the application name is used.
Once you have created some documentation (refer to the syntax guide in the next chapter) you can generate an HTML version of the documentation using the command:
which can be opened in a browser to view your documentation.
As mentioned the syntax is largely similar to Textile or Confluence style wiki markup. The following sections walk you through the syntax basics.
There are several ways to create links with the documentation generator. A basic external link can either be defined using confluence or textile style markup:
The section name comes from the corresponding gdoc filename. The documentation engine will warn you if any links to sections in your guide break.
In this case the category of the reference item is on the left hand side of the | and the name of the reference item on the right.
prefix. For example:
The documentation engine will automatically create the appropriate javadoc link in this case. To add additional APIs to the engine you can configure them in
. For example:
package to link to the Hibernate website's API docs.
Headings can be created by specifying the letter 'h' followed by a number and then a dot:
The example above provides syntax highlighting for Java and Groovy code, but you can also highlight XML markup:
Grails features a dependency resolution DSL that lets you control how plugins and JAR dependencies are resolved.
The details of the above will be explained in the next few sections.
block you can specify a dependency that falls into one of these configurations by calling the equivalent method. For example if your application requires the MySQL driver to function at
. You can also use a Map-based syntax:
.
By default, Grails will not only get the JARs and plugins that you declare, but it will also get their transitive dependencies. This is usually what you want, but there are occasions where you want a dependency without all its baggage. In such cases, you can disable transitive dependency resolution on a case-by-case basis:
A far more common scenario is where you want the transitive dependencies, but some of them cause issues with your own dependencies or are unnecessary. For example, many Apache projects have 'commons-logging' as a transitive dependency, but it shouldn't be included in a Grails project (we use SLF4J). That's where the
As you can see, you can either exclude dependencies by their artifact ID (also known as a module name) or any combination of group and artifact IDs (if you use the Map notation). You may also come across
If you use Ivy module configurations and wish to depend on a specific configuration of a module, you can use the
method to specify the configuration to use.
will be used (which is also the correct value for dependencies coming from Maven style repositories).
With all these declarative dependencies, you may wonder where all the JARs end up. They have to go somewhere after all. By default Grails puts them into a directory, called the dependency cache, that resides on your local file system at
/.grails/ivy-cache. You can change this either via the
Initially your BuildConfig.groovy does not use any remote public Maven repositories. There is a default
repository that will locate the JAR files Grails needs from your Grails installation. To use a public repository, specify it in the
In this case the default public Maven repository is specified. To use the SpringSource Enterprise Bundle Repository you can use the
so that you can easily identify it in logs.
A plugin you have installed may define a reference to a remote repository just as an application can. By default your application will inherit this repository definition when you install the plugin.
If you do not wish to inherit repository definitions from plugins then you can disable repository inheritance:
In this case your application will not inherit any repository definitions from plugins and it is down to you to provide appropriate (possibly internal) repository definitions.
There are times when it is not desirable to connect to any remote repositories (whilst working on the train for example!). In this case you can use the
flag to execute Grails commands and Grails will not connect to any remote repositories:
If you do not wish to use a public Maven repository you can specify a flat file repository:
If all else fails since Grails builds on Apache Ivy you can specify an Ivy resolver:
It's also possible to pull dependencies from a repository using SSH. Ivy comes with a dedicated resolver that you can configure and include in your project like so:
JAR and add it to Grails' classpath to use the SSH resolver. You can do this by passing the path in the Grails command line:
environment variable but be aware this it affects many Java applications. An alternative on Unix is to create an alias for
so that you don't have to type the extra arguments each time.
If you are having trouble getting a dependency to resolve you can enable more verbose debugging from the underlying engine using the
A common issue is that the checksums for a dependency don't match the associated JAR file, and so Ivy rejects the dependency. This helps ensure that the dependencies are valid. But for a variety of reasons some dependencies simply don't have valid checksums in the repositories, even if they are valid JARs. To get round this, you can disable Ivy's dependency checks like so:
By default every Grails application inherits several framework dependencies. This is done through the line:
file. To exclude specific inherited dependencies you use the
Most Grails applications have runtime dependencies on several jar files that are provided by the Grails framework. These include libraries like Spring, Sitemesh, Hibernate etc. When a war file is created, all of these dependencies will be included in it. But, an application may choose to exclude these jar files from the war. This is useful when the jar files will be provided by the container, as would normally be the case if multiple Grails applications are deployed to the same container.
The dependency resolution DSL provides a mechanism to express that all of the default dependencies will be provided by the container. This is done by invoking the
As mentioned in the previous section a Grails application consists of dependencies inherited from the framework, the plugins installed and the application dependencies itself.
directory. You can specify which configuration (scope) you want a report for by passing an argument containing the configuration name:
is identical to how you specify dependencies in an application. When a plugin is installed into an application the application automatically inherits the dependencies of the plugin.
In this case the Spock dependency will be available only to the plugin and not resolved as an application dependency. Alternatively, if you're using the Map syntax:
If a plugin is using a JAR which conflicts with another plugin, or an application dependency then you can override how a plugin resolves its dependencies inside an application using exclusions. For example:
In this case the application explicitly declares a dependency on the "hibernate" plugin and specifies an exclusion using the
When using the Grails Maven plugin, Grails' dependency resolution mechanics are disabled as it is assumed that you will manage dependencies with Maven's
file.
and so on then you can tell Grails' command line to load dependencies from the Maven
file instead.
If you use Maven to build your Grails project, you can use the standard Maven targets
.
If not, you can deploy a Grails project or plugin to a Maven repository using the
plugin.
The plugin provides the ability to publish Grails projects and plugins to local and remote Maven repositories. There are two key additional targets added by the plugin:
file will be used.
command will install the Grails project or plugin artifact into your local Maven cache:
In the case of plugins, the plugin zip file will be installed, whilst for application the application WAR file will be installed.
argument specifies the 'id' for the repository. Configure the details of the repository specified by this 'id' within your
element in the Ant Maven tasks. For example the following XML:
By default the plugin will try to detect the protocol to use from the URL of the repository (ie "http" from "http://.." etc.), however to specify a different protocol you can do:
Maven defines the notion of a 'groupId', 'artifactId' and a 'version'. This plugin pulls this information from the Grails project conventions or plugin descriptor.
For applications this plugin will use the Grails application name and version provided by Grails when generating the
file. To change the version you can run the
will be the same as the project name, unless you specify a different one in Config.groovy:
The 'artifactId' is taken from the plugin name. For example if you have a plugin called
will be "feeds". If your plugin does not specify a
As of Grails 1.3 you can declaratively specify plugins as dependencies via the dependency DSL instead of using the
is used. You can specify to use the latest version of a particular plugin by using "latest.integration" as the version number:
The "latest.integration" version label will also include resolving snapshot versions. To not include snapshot versions then use the "latest.release" label:
And of course if you use a Maven repository with an alternative group id you can specify a group id:
You can control how plugins transitively resolves both plugin and JAR dependencies using exclusions. For example:
Here we have defined a dependency on the "weceem" plugin which transitively depends on the "searchable" plugin. By using the
to transitively install the searchable plugin. You can combine this technique to specify an alternative version of a plugin:
You can also completely disable transitive plugin installs, in which case no transitive dependencies will be resolved:
Grails will also convert command names that are in lower case form such as run-app into camel case. So typing
If multiple matches are found Grails will give you a choice of which one to execute.
When Grails executes a Gant script, it invokes the "default" target defined in that script. If there is no default, Grails will quit with an error.
GrailsがGantスクリプトを実行するとき、デフォルトとして設定されたターゲットを起動します。デフォルト指定(setDefaultTarget(main)など)がない場合、Grailsはエラーで終了します。
It's often useful to provide custom arguments to the JVM when running Grails commands, in particular with
where you may for example want to set a higher maximum heap size. The Grails command will use any JVM options provided in the general
environment variable, but you can also specify a Grails-specific environment variable too:
When you run a script manually and it prompts you for information, you can answer the questions and continue running the script. But when you run a script as part of an automated process, for example a continuous integration build server, there's no way to "answer" the questions. So you can pass the
switch to the script command to tell Grails to accept the default answer for any questions, for example whether to install a missing plugin.
Interactive mode is the a feature of the Grails command line which keeps the JVM running and allows for quicker execution of commands. To activate interactive mode type 'grails' at the command line and then use TAB completion to get a list of commands:
command understands the logical aliases 'test-report' and 'dep-report', which will open the most recent test and dependency reports respectively. In other words, to open the test report in a browser simply execute
. You can event open multiple files at once:
source file in your text editor.
If you need to run an external process whilst interactive mode is running you can do so by starting the command with a !:
Note that with ! (bang) commands, you get file path auto completion - ideal for external commands that operate on the file system such as 'ls', 'cat', 'git', etc.
というスクリプトが作成されます。Gantスクリプト自身は通常のGroovyスクリプトと似ていますが、ターゲットという概念とそれぞれのターゲットの依存関係をサポートしています。
In the example above, we specified a target with the explicit name "default". This is one way of defining the default target for a script. An alternative approach is to use the setDefaultTarget() method:
上記の例では"default"と明示的にターゲットを指定しました。これは、スクリプトでデフォルトターゲットを定義する方法の一つです。(最新のバージョンでは使用できません)代わりに
This lets you call the default target directly from other scripts if you wish. Also, although we have put the call to setDefaultTarget() at the end of the script in this example, it can go anywhere as long as it comes after the target it refers to ("clean-compile" in this case).
Which approach is better? To be honest, you can use whichever you prefer - there don't seem to be any major advantages in either case. One thing we would say is that if you want to allow other scripts to call your "default" target, you should move it into a shared script that doesn't have a default target at all. We'll talk some more about this in the next section.
どちらのアプローチが良いのでしょうか?正直なところ、あなたは好みで使い分けて使用することができます。どちらの場合も、王道の利点があるわけではありません。一つ言えることは、他のスクリプトからデフォルトターゲットを呼び出せるようにしたい場合は、デフォルトターゲットを持っていない共有スクリプトにそれを移動する必要があるということです。これについては次のセクションでも詳しく説明します。
Grailsは独自のスクリプトでも使用できる便利なコマンドライン機能を提供しています(コマンドに関する詳細はリファレンスガイド内のコマンドラインリファレンスを参照してください)。特に
Gant lets you pull in all targets (except "default") from another Gant script. You can then depend upon or invoke those targets as if they had been defined in the current script. The mechanism for doing this is the includeTargets property. Simply "append" a file or class to it using the left-shift operator:
Gantはターゲットを他のGantスクリプトから取り込むことができます。取り込んだターゲットは、あたかも現在のスクリプトで定義されているかのように実行することができます。この仕組みは
Don't worry too much about the syntax using a class, it's quite specialised. If you're interested, look into the Gant documentation.
As you saw in the example at the beginning of this section, you use neither the File- nor the class-based syntax for includeTargets when including core Grails targets. Instead, you should use the special grailsScript() method that is provided by the Grails command launcher (note that this is not available in normal Gant scripts, just Grails ones).
There are many more scripts provided by Grails, so it is worth digging into the scripts themselves to find out what kind of targets are available. Anything that starts with an "_" is designed for reuse.
"で始まっているものはすべて再利用されることを考慮してデザインされています。スクリプトアーキテクチャ
Script architecture
You maybe wondering what those underscores are doing in the names of the Grails scripts. That is Grails' way of determining that a script is _internal , or in other words that it has not corresponding "command". So you can't run "grails _grails-settings" for example. That is also why they don't have a default target.
アンダースコアで始まるGrailsスクリプトは、何を示しているものかを説明すると、それらはコマンドではなく、他のスクリプトから利用されるスクリプト群として認識されます。なので、それらのスクリプト(内部スクリプト)はデフォルトターゲットを持っておらず、スクリプトは実行できません。Internal scripts are all about code sharing and reuse. In fact, we recommend you take a similar approach in your own scripts: put all your targets into an internal script that can be easily shared, and provide simple command scripts that parse any command line arguments and delegate to the targets in the internal script. For example if you have a script that runs some functional tests, you can split it like this:
内部スクリプトは共有して再利用するために存在します。実際に独自のスクリプトを書く場合は、同等の手法をとることをお勧めします。簡単に共有できるターゲットは内部スクリプトにすべて置き、コマンドライン引数を解析して、内部スクリプト内のターゲットを呼び出すだけのコマンドスクリプトを提供します。例えば、いくつかのファンクショナルテストを行うスクリプトがあるという場合、以下のように分割できます。./scripts/FunctionalTests.groovy:includeTargets << new File("${basedir}/scripts/_FunctionalTests.groovy")target(default: "Runs the functional tests for this project.") {
depends(runFunctionalTests)
}./scripts/_FunctionalTests.groovy:includeTargets << grailsScript("_GrailsTest")target(runFunctionalTests: "Run functional tests.") {
depends(...)
…
}Here are a few general guidelines on writing scripts:
以下にスクリプトを書く際のガイドラインを示します:
- Split scripts into a "command" script and an internal one.
- Put the bulk of the implementation in the internal script.
- Put argument parsing into the "command" script.
- To pass arguments to a target, create some script variables and initialise them before calling the target.
- Avoid name clashes by using closures assigned to script variables instead of targets. You can then pass arguments direct to the closures.
- スクリプトを"コマンドスクリプト"と"内部スクリプト"に分割します。
- 実装の大部分は"内部スクリプト"で行います。
- 引数の解析は"コマンドスクリプト"で行います。
- ターゲットに引数を渡すには、いくつかのスクリプト変数を作成し、ターゲットを呼び出す前にそれらを初期化します。
- ターゲットの代わりにスクリプト変数に割り当てられているクロージャを使用して名前の衝突を避けるようにします。そうすれば、引数をクロージャに直接渡すことができます。
4.4 イベントを取得する
Grails provides the ability to hook into scripting events. These are events triggered during execution of Grails target and plugin scripts.
Grailsはスクリプトのイベントフックを提供しています。イベントフックとは、Grailsターゲット実行時やプラグインスクリプト実行時に発行されるイベントを取得して処理を行うことができる機能です。The mechanism is deliberately simple and loosely specified. The list of possible events is not fixed in any way, so it is possible to hook into events triggered by plugin scripts, for which there is no equivalent event in the core target scripts.
仕組みはわざと単純でゆるく明記できるようになっています。起こりうるイベントは予測できないからです。なので、コアターゲットと同等のイベントが無い場合はプラグインスクリプトからトリガーされたイベントにフックする事も可能です。イベントハンドラを定義する
Defining event handlers
Event handlers are defined in scripts called _Events.groovy. Grails searches for these scripts in the following locations:
イベントハンドラは_Events.groovyという名称のスクリプトで定義します。Grailsは次の場所からスクリプトを検索します:
USER_HOME/.grails/scripts - user-specific event handlersPROJECT_HOME/scripts - applicaton-specific event handlersPLUGINS_HOME/*/scripts - plugin-specific event handlersGLOBAL_PLUGINS_HOME/*/scripts - event handlers provided by global plugins
USER_HOME/.grails/scripts - ユーザー固有のイベントハンドラPROJECT_HOME/scripts - アプリケーション固有のイベントハンドラPLUGINS_HOME/*/scripts - プラグイン固有のイベントハンドラGLOBAL_PLUGINS_HOME/*/scripts - グローバルプラグインによって提供されているイベントハンドラ
Whenever an event is fired, all the registered handlers for that event are executed. Note that the registration of handlers is performed automatically by Grails, so you just need to declare them in the relevant _Events.groovy file.
イベントが発生するたびに登録されている すべての ハンドラが実行されます。ハンドラの登録はGrailsによって自動的に行われることに注意してください。なので、必要な作業は関連する_Events.groovyファイルにそれらを宣言するだけです。Event handlers are blocks defined in _Events.groovy, with a name beginning with "event". The following example can be put in your /scripts directory to demonstrate the feature:
イベントハンドラは _Events.groovy で定義されている名前が "event" で始まっているブロックです。次の例のように_Events.groovyを記述して、/scripts ディレクトリに配置することによって、イベントハンドラを実装することができます:eventCreatedArtefact = { type, name ->
println "Created $type $name"
}eventStatusUpdate = { msg ->
println msg
}eventStatusFinal = { msg ->
println msg
}You can see here the three handlers
eventCreatedArtefact,
eventStatusUpdate,
eventStatusFinal. Grails provides some standard events, which are documented in the command line reference guide. For example the
compile command fires the following events:
eventCreatedArtefact、eventStatusUpdate、eventStatusFinal。Grailsはいくつかの標準的なイベントを提供しています。詳細はコマンドラインリファレンスガイドを参照してください。たとえば、 compileコマンドは、次のようなイベントを発行させます。
CompileStart - Called when compilation starts, passing the kind of compile - source or testsCompileEnd - Called when compilation is finished, passing the kind of compile - source or tests
CompileStart - sourceまたはtestsコンパイル開始時に発行されます。CompileEnd - sourceまたはtestsコンパイル終了時に発行されます。
イベントトリガー
Triggering events
To trigger an event simply include the Init.groovy script and call the event() closure:
イベントを発行するには _GrailsEvents.groovy スクリプトをインクルードしてevent()クロージャを使用します:includeTargets << grailsScript("_GrailsEvents")event("StatusFinal", ["Super duper plugin action complete!"])共通イベント
Common Events
Below is a table of some of the common events that can be leveraged:
以下はいくつかの利用可能な共通イベントの一覧です:
| Event | Parameters | Description |
|---|
| StatusUpdate | message | Passed a string indicating current script status/progress |
| StatusError | message | Passed a string indicating an error message from the current script |
| StatusFinal | message | Passed a string indicating the final script status message, i.e. when completing a target, even if the target does not exit the scripting environment |
| CreatedArtefact | artefactType,artefactName | Called when a create-xxxx script has completed and created an artefact |
| CreatedFile | fileName | Called whenever a project source filed is created, not including files constantly managed by Grails |
| Exiting | returnCode | Called when the scripting environment is about to exit cleanly |
| PluginInstalled | pluginName | Called after a plugin has been installed |
| CompileStart | kind | Called when compilation starts, passing the kind of compile - source or tests |
| CompileEnd | kind | Called when compilation is finished, passing the kind of compile - source or tests |
| DocStart | kind | Called when documentation generation is about to start - javadoc or groovydoc |
| DocEnd | kind | Called when documentation generation has ended - javadoc or groovydoc |
| SetClasspath | rootLoader | Called during classpath initialization so plugins can augment the classpath with rootLoader.addURL(...). Note that this augments the classpath after event scripts are loaded so you cannot use this to load a class that your event script needs to import, although you can do this if you load the class by name. |
| PackagingEnd | none | Called at the end of packaging (which is called prior to the Tomcat server being started and after web.xml is generated) |
| イベント | パラメータ | 説明 |
|---|
| StatusUpdate | message | 実行されているスクリプトのステータス、進捗メッセージを知らせる |
| StatusError | message | 実行されているスクリプトのエラーメッセージを 知らせる |
| StatusFinal | message | スクリプトの終了時に最終メッセージを知らせる。 スクリプトによっては完全終了時ではなく、コマ ンドの終了時に動作する |
| CreatedArtefact | artefactType,artefactName | create-xxxxなどのアーティファクト生成スクリプトが、アーティファクトの生成完了時にアーティ ファクトタイプとアーティファクト名を知らせる |
| CreatedFile | fileName | ファイルがスクリプトによって生成されたときに ファイル名を知らせる |
| Exiting | returnCode | スクリプトが正常に終了したときに終了コードを 知らせる |
| PluginInstalled | pluginName | プラグインのインストールが終了した後にプラグイン 名を知らせる |
| CompileStart | kind | コンパイル開始時にコンパイルする種類(source または tests)を知らせる |
| CompileEnd | kind | コンパイル終了時にコンパイルした種類(source または tests)を知らせる |
| DocStart | kind | ドキュメント生成時に、どのドキュメント生成(javadoc または groovydoc)が開始するかを知らせる |
| DocEnd | kind | ドキュメント生成完了時に、どのドキュメント生成(javadoc または groovydoc)が完了したかを知らせる |
| SetClasspath | rootLoader | クラスパス初期化中にGrailsRootLoader が渡されるので、「rootLoader.addURL( … )」でクラスをGrailsRootLoader に追加できる |
| PackagingEnd | none | Grailsアプリケーションのパッケージング完了時 (web.xml生成後、Tomcatサーバ起動前)に呼び出される |
4.5 ビルドのカスタマイズ
Grails is most definitely an opinionated framework and it prefers convention to configuration, but this doesn't mean you can't configure it. In this section, we look at how you can influence and modify the standard Grails build.
Grailsは確かにものすごく固執したフレームワークであり、設定よりも規約という方式を主張していますが、それは様々な設定をできないという意味ではありません。このセクションでは、どのようにGrailsの標準的なビルドをカスタマイズする方法を解説します。初期値
The defaults
The core of the Grails build configuration is the grails.util.BuildSettings class, which contains quite a bit of useful information. It controls where classes are compiled to, what dependencies the application has, and other such settings.
ビルド設定の中心部分は、ビルド時に有用な情報が含まれている grails.util.BuildSettingsクラスです。このクラスは、どこにコンパイルされるのか、アプリケーションが何に依存関係を持っているのか、どのような設定を保持しているのか、を制御します。Here is a selection of the configuration options and their default values:
設定オプションと初期値は以下のようになります:
| Property | Config option | Default value |
|---|
| grailsWorkDir | grails.work.dir | $USER_HOME/.grails/<grailsVersion> |
| projectWorkDir | grails.project.work.dir | <grailsWorkDir>/projects/<baseDirName> |
| classesDir | grails.project.class.dir | <projectWorkDir>/classes |
| testClassesDir | grails.project.test.class.dir | <projectWorkDir>/test-classes |
| testReportsDir | grails.project.test.reports.dir | <projectWorkDir>/test/reports |
| resourcesDir | grails.project.resource.dir | <projectWorkDir>/resources |
| projectPluginsDir | grails.project.plugins.dir | <projectWorkDir>/plugins |
| globalPluginsDir | grails.global.plugins.dir | <grailsWorkDir>/global-plugins |
| verboseCompile | grails.project.compile.verbose | false |
| プロパティ | 設定オプション | 初期値 |
|---|
| grailsWorkDir | grails.work.dir | $USER_HOME/.grails/<grailsVersion> |
| projectWorkDir | grails.project.work.dir | <grailsWorkDir>/projects/<baseDirName> |
| classesDir | grails.project.class.dir | <projectWorkDir>/classes |
| testClassesDir | grails.project.test.class.dir | <projectWorkDir>/test-classes |
| testReportsDir | grails.project.test.reports.dir | <projectWorkDir>/test/reports |
| resourcesDir | grails.project.resource.dir | <projectWorkDir>/resources |
| projectPluginsDir | grails.project.plugins.dir | <projectWorkDir>/plugins |
| globalPluginsDir | grails.global.plugins.dir | <grailsWorkDir>/global-plugins |
| verboseCompile | grails.project.compile.verbose | false |
The BuildSettings class has some other properties too, but they should be treated as read-only:
BuildSettingsクラスは、他にもいくつかの読み取り専用のプロパティを持っています:
| Property | Description |
|---|
| baseDir | The location of the project. |
| userHome | The user's home directory. |
| grailsHome | The location of the Grails installation in use (may be null). |
| grailsVersion | The version of Grails being used by the project. |
| grailsEnv | The current Grails environment. |
| compileDependencies | A list of compile-time project dependencies as File instances. |
| testDependencies | A list of test-time project dependencies as File instances. |
| runtimeDependencies | A list of runtime-time project dependencies as File instances. |
| プロパティ | 説明 |
|---|
| baseDir | プロジェクトの場所。 |
| userHome | ユーザーのホームディレクトリ。 |
| grailsHome | 使用中のGrailsのインストール先(nullの場合あり)。 |
| grailsVersion | プロジェクトで使用されているGrailsのバージョン。 |
| grailsEnv | 現在のGrails環境。 |
| compileDependencies | コンパイル時のプロジェクト依存関係のFileインスタンスのリスト。 |
| testDependencies | テスト時のプロジェクト依存関係のFileインスタンスのリスト。 |
| runtimeDependencies | 実行時のプロジェクト依存関係のFileインスタンスのリスト。 |
Of course, these properties aren't much good if you can't get hold of them. Fortunately that's easy to do: an instance of BuildSettings is available to your scripts as the grailsSettings script variable. You can also access it from your code by using the grails.util.BuildSettingsHolder class, but this isn't recommended.
もちろんこれらのプロパティがぴったり合うとは限りません。幸いなことに、BuildSettingsのインスタンスのgrailsSettingspスクリプト変数を介して利用可能です。他のコードからもgrails.util.BuildSettingsHolder@クラスを使用してアクセスすることができます。でもこれは推奨されません。初期値を上書きする
Overriding the defaults
All of the properties in the first table can be overridden by a system property or a configuration option - simply use the "config option" name. For example, to change the project working directory, you could either run this command:
1つめの表内のすべてのプロパティは、システムプロパティや設定オプションで上書きすることができます。たとえば、プロジェクトの作業ディレクトリ(projectWorkDir)を変更するには、このようにコマンドを実行することができます:
grails -Dgrails.project.work.dir=work compile
or add this option to your grails-app/conf/BuildConfig.groovy file:
grails-app/conf/BuildConfig.groovyに記述します:
grails.project.work.dir = "work"
Note that the default values take account of the property values they depend on, so setting the project working directory like this would also relocate the compiled classes, test classes, resources, and plugins.
注意点として、プロパティが依存しているプロパティのデフォルト値にも影響するので、このようにプロジェクトの作業ディレクトリを設定すると、コンパイルされたクラス、テストクラス、リソース、およびプラグインの場所を変更することにもなります。What happens if you use both a system property and a configuration option? Then the system property wins because it takes precedence over the BuildConfig.groovy file, which in turn takes precedence over the default values.
システムプロパティと設定オプションの両方を指定した場合、システムプロパティはBuildConfig.groovyファイルの設定よりも優先順位が高いので、システムプロパティの値が設定されます。The BuildConfig.groovy file is a sibling of grails-app/conf/Config.groovy - the former contains options that only affect the build, whereas the latter contains those that affect the application at runtime. It's not limited to the options in the first table either: you will find build configuration options dotted around the documentation, such as ones for specifying the port that the embedded servlet container runs on or for determining what files get packaged in the WAR file.
BuildConfig.groovyファイルは、grails-app/conf/Config.groovyと兄妹関係にあります。前者は、ビルド時にのみ影響を及ぼすオプションを含んでいるのに対して、後者はアプリケーションの実行時に影響を与えるオプションを含んでいます。設定オプションは、1つめの表で示したオプション以外にも、サーブレットコンテナを動かすポート指定や、WARファイルにどのファイルを格納するかを決定する指定など、他にも指定可能なビルド設定が存在します。使用可能なビルド設定
Available build settings
| Name | Description |
|---|
| grails.server.port.http | Port to run the embedded servlet container on ("run-app" and "run-war"). Integer. |
| grails.server.port.https | Port to run the embedded servlet container on for HTTPS ("run-app --https" and "run-war --https"). Integer. |
| grails.config.base.webXml | Path to a custom web.xml file to use for the application (alternative to using the web.xml template). |
| grails.compiler.dependencies | Legacy approach to adding extra dependencies to the compiler classpath. Set it to a closure containing "fileset()" entries. These entries will be processed by an AntBuilder so the syntax is the Groovy form of the corresponding XML elements in an Ant build file, e.g. fileset(dir: "$basedir/lib", include: "**/*.class). |
| grails.testing.patterns | A list of Ant path patterns that let you control which files are included in the tests. The patterns should not include the test case suffix, which is set by the next property. |
| grails.testing.nameSuffix | By default, tests are assumed to have a suffix of "Tests". You can change it to anything you like but setting this option. For example, another common suffix is "Test". |
| grails.project.war.file | A string containing the file path of the generated WAR file, along with its full name (include extension). For example, "target/my-app.war". |
| grails.war.dependencies | A closure containing "fileset()" entries that allows you complete control over what goes in the WAR's "WEB-INF/lib" directory. |
| grails.war.copyToWebApp | A closure containing "fileset()" entries that allows you complete control over what goes in the root of the WAR. It overrides the default behaviour of including everything under "web-app". |
| grails.war.resources | A closure that takes the location of the staging directory as its first argument. You can use any Ant tasks to do anything you like. It is typically used to remove files from the staging directory before that directory is jar'd up into a WAR. |
| grails.project.web.xml | The location to generate Grails' web.xml to |
| 名前 | 説明 |
|---|
| grails.server.port.http | 組み込みのサーブレットコンテナを実行するポート番号。("run-app" と "run-war") |
| grails.server.port.https | HTTPS用の組み込みのサーブレットコンテナを実行するポート番号。("run-app --https"と"run-war --https") |
| grails.config.base.webXml | アプリケーションで使用するカスタムのweb.xmlファイルへのパス。(web.xmlテンプレートを使用しない場合) |
| grails.compiler.dependencies | コンパイラのクラスパスに依存関係を追加する。"fileset()"を含んでいるクロージャに設定。 |
| grails.testing.patterns | テストに含まれるファイルを制御するためのAntパスのパターンリスト。パターンは、次のgrails.testing.nameSuffixに設定されているテストケースのサフィックス以外。 |
| grails.testing.nameSuffix | デフォルトでは、テストは"Tests"のサフィックスが設定されていますが、好きなようにオプション設定を変更することができます。 |
| grails.project.war.file | 生成されるWARファイルの名称(拡張子を含む)のファイルパス。例として、"target/my-app.war" 等。 |
| grails.war.dependencies | WARファイルの"WEB-INF/lib"階層に含む内容を、クロージャ内の"fileset()"でコントロール。 |
| grails.war.copyToWebApp | WARのルートディレクトリ階層に含む内容を、クロージャ内の"fileset()"でコントロール。 |
| grails.war.resources | 最初の引数としてステージングディレクトリの場所を受け取れるクロージャを指定。クロージャ内でAntタスクを使用することで、WAR化される前にステージングディレクトリの内容を変更する事ができます。 |
| grails.project.web.xml | Grailsがweb.xmlを生成する場所の指定。 |
4.6 AntとMaven
If all the other projects in your team or company are built using a standard build tool such as Ant or Maven, you become the black sheep of the family when you use the Grails command line to build your application. Fortunately, you can easily integrate the Grails build system into the main build tools in use today (well, the ones in use in Java projects at least).
もし、あなたのプロジェクトチームや会社でAntやMavenなどのような標準的なビルドツールを利用している場合は、アプリケーションをビルドする時にGrailsのコマンドラインを使っていると一家の厄介者にされてしまいます。幸いなことに、Grailsビルドシステムは今日使われている主なビルドツールに簡単に統合することができます。(少なくともJavaプロジェクトで使用されているものへ)Antへの統合
Ant Integration
When you create a Grails application with the
create-app command, Grails doesn't automatically create an Ant
build.xml file but you can generate one with the
integrate-with command:
build.xmlを生成しません。integrate-withコマンドを使用して生成することが可能です。
grails integrate-with --ant
This creates a build.xml file containing the following targets:
作成されたbuild.xmlファイルには、次のターゲットが含まれています:
clean - Cleans the Grails applicationcompile - Compiles your application's source codetest - Runs the unit testsrun - Equivalent to "grails run-app"war - Creates a WAR filedeploy - Empty by default, but can be used to implement automatic deployment
clean - Grailsアプリケーションをクリーンします。compile - アプリケーションのソースコードをコンパイルします。test - Unitテストを実行します。run - Grailsの"run-app"コマンド相当を実行します。war - WARファイルを作成します。deploy - デフォルトでは空ですが、自動配備を実装することができます。
Each of these can be run by Ant, for example:
これらは例えば、以下のようなAntコマンドで実行できます。The build file is configured to use
Apache Ivy for dependency management, which means that it will automatically download all the requisite Grails JAR files and other dependencies on demand. You don't even have to install Grails locally to use it! That makes it particularly useful for continuous integration systems such as
CruiseControl or
Jenkins.
It uses the Grails
Ant task to hook into the existing Grails build system. The task lets you run any Grails script that's available, not just the ones used by the generated build file. To use the task, you must first declare it:
<taskdef name="grailsTask"
classname="grails.ant.GrailsTask"
classpathref="grails.classpath"/>This raises the question: what should be in "grails.classpath"? The task itself is in the "grails-bootstrap" JAR artifact, so that needs to be on the classpath at least. You should also include the "groovy-all" JAR. With the task defined, you just need to use it! The following table shows you what attributes are available:
ここで疑問が生じます。どれが"grails.classpath"でしょうか。タスク自体は"grails-bootstrap"JARの一部です。なので、少なくともクラスパス上にある必要があります。また、"groovy-all" JARを含める必要があります。タスク宣言ではこれらを仕使用する必要があります!次の表は、どんな属性が利用可能かを示しています。
| Attribute | Description | Required |
|---|
| home | The location of the Grails installation directory to use for the build. | Yes, unless classpath is specified. |
| classpathref | Classpath to load Grails from. Must include the "grails-bootstrap" artifact and should include "grails-scripts". | Yes, unless home is set or you use a classpath element. |
| script | The name of the Grails script to run, e.g. "TestApp". | Yes. |
| args | The arguments to pass to the script, e.g. "-unit -xml". | No. Defaults to "". |
| environment | The Grails environment to run the script in. | No. Defaults to the script default. |
| includeRuntimeClasspath | Advanced setting: adds the application's runtime classpath to the build classpath if true. | No. Defaults to true. |
| 属性 | 説明 | 必須 |
|---|
| home | ビルドに使用するGrailsのインストールディレクトリの場所。 | パスが指定されている場合を除き必須です。 |
| classpathref | Grailsがロードする基点となるクラスパス。"grails-bootstrap"を含めなければなりません。また、"grails-scripts"を含めるべきです。 | homeが設定されていなかったり、classpath要素を使う場合は必須です。 |
| script | Grailsスクリプトの実行名。例えば "TestApp"。 | 必須です。 |
| args | スクリプトに渡す引数。例えば "-unix -xml"。 | 必須ではありません。デフォルトは "" です。 |
| environment | スクリプト実行時のGrails環境変数。 | 必須ではありません。デフォルトはスクリプトのデフォルトになります。 |
| includeRuntimeClasspath | 高度な設定です。 trueの場合、アプリケーション実行時クラスパスをクラスパスに追加します。 | 必須ではありません。 デフォルトはtrueです。 |
The task also supports the following nested elements, all of which are standard Ant path structures:
タスクネスト要素をサポートします。こられの全ては標準的なAntの構造となっています。
classpath - The build classpath (used to load Gant and the Grails scripts).compileClasspath - Classpath used to compile the application's classes.runtimeClasspath - Classpath used to run the application and package the WAR. Typically includes everything in @compileClasspath.testClasspath - Classpath used to compile and run the tests. Typically includes everything in runtimeClasspath.
classpath - ビルド時のクラスパス。(GantとGrailsスクリプトロード時に使用)compileClasspath - アプリケーションコンパイル時のクラスパス。runtimeClasspath - アプリケーションとWARパッケージ実行時のクラスパス。通常compileClasspathに全てが含まれます。testClasspath - コンパイル時と、テスト実行時のクラスパス。通常runtimeClasspathに全てが含まれます。
How you populate these paths is up to you. If you use the home attribute and put your own dependencies in the lib directory, then you don't even need to use any of them. For an example of their use, take a look at the generated Ant build file for new apps.
どうやってパスを追加するかはあなた次第です。もし、homeを利用しており、自分自身の依存関係をlibディレクトリに設定している場合は、これらを使う必要はありません。こららの利用例としては、生成された新しいアプリケーションのAntビルドファイルを見てみましょう。Mavenの統合
Maven Integration
Grails provides integration with
Maven 2 with a Maven plugin. The current Maven plugin is based on but supersedes the version created by
Octo, who did a great job with the original.
準備
Preparation
In order to use the new plugin, all you need is Maven 2 installed and set up. This is because you no longer need to install Grails separately to use it with Maven!
新しいプラグインを使用するのに必要なことは、Maven2をインストールし設定することです。なぜなら、Grailsを別途インストールする必要はないからです!
The Maven 2 integration for Grails has been designed and tested for Maven 2.0.9 and above. It will not work with earlier versions.
GrailsのMaven2統合は、Maven 2.0.9以上を対象として設計・テストされています。それ以前のバージョンでは動作しません。
The default mvn setup DOES NOT supply sufficient memory to run the Grails environment. We recommend that you add the following environment variable setting to prevent poor performance:
既定のmvnコマンド設定ではGrails環境で実行するための十分なメモリを供給できません。パフォーマンス低下を防止するため、次の環境変数を追加することをお勧めします:export MAVEN_OPTS="-Xmx512m -XX:MaxPermSize=256"
GrailsのMavenのプロジェクトを作成する
Creating a Grails Maven Project
To create a Mavenized Grails project simply run the following command:
Maven化されたGrailsプロジェクトを作成するには、単に以下のコマンドを実行します:mvn archetype:generate -DarchetypeGroupId=org.grails \
-DarchetypeArtifactId=grails-maven-archetype \
-DarchetypeVersion=1.3.2 \
-DgroupId=example -DartifactId=my-appChoose whichever grails version, group ID and artifact ID you want for your application, but everything else must be as written. This will create a new Maven project with a POM and a couple of other files. What you won't see is anything that looks like a Grails application. So, the next step is to create the project structure that you're used to.
アプリケーションで使用するGrailsバージョン、グループID、アーティファクトIDを指定するだけで必要な内容が書き込まれます。このコマンドで新規にMavenプロジェクトのPOMと他のファイルが生成されます。生成された内容を見るとGrailsアプリケーションで必要なものが見つかりません。次のステップでいつも通りの物が出来上がります。
But first, to set target JDK to Java 6, do that now. Open my-app/pom.xml and change
はじめに、ターゲットJDKをJava 6にセットします。my-app/pom.xmlを開いて、次のように変更します:
<plugin>
<artifactId>maven-compiler-plugin</artifactId>
<configuration>
<source>1.5</source>
<target>1.5</target>
</configuration>
</plugin>to
上記を、以下のように変更します。
<plugin>
<artifactId>maven-compiler-plugin</artifactId>
<configuration>
<source>1.6</source>
<target>1.6</target>
</configuration>
</plugin>Then you're ready to create the project structure:
これでプロジェクト構造を作成する環境が整いました。
if you see a message similar to this:
以下のようなメッセージが出る場合:Resolving plugin JAR dependencies …
:: problems summary ::
:::: WARNINGS
module not found: org.hibernate#hibernate-core;3.3.1.GAyou need to add the plugins manually to application.properties:
application.properties に手動でプラグインを追加する必要があります:plugins.hibernate=2.0.0
plugins.tomcat=2.0.0
then run
そして実行します。and the hibernate and tomcat plugins will be installed.
これで、hibernateとtomcatプラグインがインストールされます。
Now you have a Grails application all ready to go. The plugin integrates into the standard build cycle, so you can use the standard Maven phases to build and package your app: mvn clean , mvn compile , mvn test , mvn package , mvn install .
これで、Grailsアプリケーションのすべての準備が整いました。プラグインは標準ビルドサイクルに統合され、Mavenの標準的なアプリケーションのビルドやパッケージングのフェーズで利用できるようになります: mvn clean、mvn compile、mvn test、mvn package、mvn install。You can also use some of the Grails commands that have been wrapped as Maven goals:
また、MavenのゴールとしてラッピングされたGrailsコマンドを使うこともできるようになっています:
For a complete, up to date list, run mvn grails:help
完全なリストはmvn grails:helpで確認して下さい。既存プロジェクトをMaven化する
Mavenizing an existing project
Creating a new project is great way to start, but what if you already have one? You don't want to create a new project and then copy the contents of the old one over. The solution is to create a POM for the existing project using this Maven command (substitute the version number with the grails version of your existing project):
新しく始めるには、プロジェクトを新規作成するのが最善の方法ですが、既にプロジェクトが存在する場合はどうしたらいいでしょうか?新しくプロジェクトを作成したくないし、内容を上書きコピーもしたくないでしょう。解決策は以下のMavenコマンドを使用して既存プロジェクトにPOMファイルを作ることです。(バージョン番号は既存のGrailsプロジェクトのバージョンで置き換えて下さい)mvn org.grails:grails-maven-plugin:1.3.2:create-pom -DgroupId=com.mycompany
When this command has finished, you can immediately start using the standard phases, such as mvn package. Note that you have to specify a group ID when creating the POM.
コマンドが完了したら、すぐにmvn packageのような標準フェーズで使い始めることができます。POMファイルを作成する際はグループIDを指定する必要があることに注意してください。You may also want to set target JDK to Java 6; see above.
また、対象JDKバージョンをJDK6に設定したい場合は、上記を参照して下さい。Grailsコマンドをフェーズに追加する
Adding Grails commands to phases
The standard POM created for you by Grails already attaches the appropriate core Grails commands to their corresponding build phases, so "compile" goes in the "compile" phase and "war" goes in the "package" phase. That doesn't help though when you want to attach a plugin's command to a particular phase. The classic example is functional tests. How do you make sure that your functional tests (using which ever plugin you have decided on) are run during the "integration-test" phase?
Grailsが作成した標準のPOMファイルは、Grailsのビルドフェーズに対応したコアコマンドに適切に付属しています。"compile" は "compile"フェーズに、"war" は "package"フェーズに。特定のフェーズにプラグインコマンドを付属させたい場合には役立ちません。古典的な例は、機能テストです。どうやって機能テストが統合テストフェーズの間に(あなた使用しているどんなプラグインを使った場合でも)実行されるのかを確かめるのでしょうか?Fear not: all things are possible. In this case, you can associate the command to a phase using an extra "execution" block:
恐れる必要はありません、すべて可能です。この場合には、"execution"ブロックを追加してフェーズに関連付けることができます。
<plugin>
<groupId>org.grails</groupId>
<artifactId>grails-maven-plugin</artifactId>
<version>1.3.2</version>
<extensions>true</extensions>
<executions>
<execution>
<goals>
…
</goals>
</execution>
<execution>
<id>functional-tests</id>
<phase>integration-test</phase>
<goals>
<goal>exec</goal>
</goals>
<configuration>
<command>functional-tests</command>
</configuration>
</execution>
</executions>
</plugin>This also demonstrates the grails:exec goal, which can be used to run any Grails command. Simply pass the name of the command as the command system property, and optionally specify the arguments with the args property:
またこれは grails:exec goal の実演にもなっています。Grailsのどんなコマンドも実行できるのです。単にコマンド名を渡すcommandシステムプロパティと、オプションで引数を渡すargsプロパティがあります:mvn grails:exec -Dcommand=create-webtest -Dargs=Book
GrailsのMavenプロジェクトのデバッグ
Debugging a Grails Maven Project
Maven can be launched in debug mode using the "mvnDebug" command. To launch your Grails application in debug, simply run:
Mavenは "mvnDebug" コマンドを使用して、デバッグモードで起動することができます。デバッグでGrailsアプリケーションを起動するには、単純に以下のコマンドを実行します:The process will be suspended on startup and listening for a debugger on port 8000.
プロセスは起動時に停止して、デバッガをポート8000上で待ち受けます。If you need more control of the debugger, this can be specified using the MAVEN_OPTS environment variable, and launch Maven with the default "mvn" command:
デバッガのより詳細に制御する必要がある場合は、環境変数のMAVEN_OPTSを指定して標準の "mvn" コマンドを使用してMavenを起動させます。MAVEN_OPTS="-Xdebug -Xrunjdwp:transport=dt_socket,server=y,suspend=y,address=5005"
mvn grails:run-app
問題提起
Raising issues
If you come across any problems with the Maven integration, please raise a JIRA issue as a sub-task of
GRAILS-3547.
5 O/Rマッピング (GORM)
Domain classes are core to any business application. They hold state about business processes and hopefully also implement behavior. They are linked together through relationships; one-to-one, one-to-many, or many-to-many.GORM is Grails' object relational mapping (ORM) implementation. Under the hood it uses Hibernate 3 (a very popular and flexible open source ORM solution) and thanks to the dynamic nature of Groovy with its static and dynamic typing, along with the convention of Grails, there is far less configuration involved in creating Grails domain classes.You can also write Grails domain classes in Java. See the section on Hibernate Integration for how to write domain classes in Java but still use dynamic persistent methods. Below is a preview of GORM in action:def book = Book.findByTitle("Groovy in Action")book
.addToAuthors(name:"Dierk Koenig")
.addToAuthors(name:"Guillaume LaForge")
.save()5.1 クイックスタートガイド
A domain class can be created with the create-domain-class command:grails create-domain-class helloworld.Person
If no package is specified with the create-domain-class script, Grails automatically uses the application name as the package name.
This will create a class at the location grails-app/domain/helloworld/Person.groovy such as the one below:package helloworldclass Person {
}
If you have the dbCreate property set to "update", "create" or "create-drop" on your DataSource, Grails will automatically generate/modify the database tables for you.
You can customize the class by adding properties:class Person {
String name
Integer age
Date lastVisit
}5.1.1 基本CRUD
Try performing some basic CRUD (Create/Read/Update/Delete) operations.Create
To create a domain class use Map constructor to set its properties and call save:def p = new Person(name: "Fred", age: 40, lastVisit: new Date())
p.save()
Read
Grails transparently adds an implicit id property to your domain class which you can use for retrieval:def p = Person.get(1)
assert 1 == p.id
Person object back from the database.
You can also load an object in a read-only state by using the read method:In this case the underlying Hibernate engine will not do any dirty checking and the object will not be persisted. Note that
if you explicitly call the save method then the object is placed back into a read-write state.In addition, you can also load a proxy for an instance by using the load method:This incurs no database access until a method other than getId() is called. Hibernate then initializes the proxied instance, or
throws an exception if no record is found for the specified id.Update
To update an instance, change some properties and then call save again:def p = Person.get(1)
p.name = "Bob"
p.save()
Delete
To delete an instance use the delete method:def p = Person.get(1)
p.delete()
5.2 GORMでのドメインモデリング
When building Grails applications you have to consider the problem domain you are trying to solve. For example if you were building an Amazon-style bookstore you would be thinking about books, authors, customers and publishers to name a few.These are modeled in GORM as Groovy classes, so a Book class may have a title, a release date, an ISBN number and so on. The next few sections show how to model the domain in GORM.To create a domain class you run the create-domain-class command as follows:grails create-domain-class org.bookstore.Book
grails-app/domain/org/bookstore/Book.groovy:package org.bookstoreclass Book {
}book (the same name as the class). This behaviour is customizable through the ORM Domain Specific LanguageNow that you have a domain class you can define its properties as Java types. For example:package org.bookstoreclass Book {
String title
Date releaseDate
String ISBN
}releaseDate maps onto a column release_date. The SQL types are auto-detected from the Java types, but can be customized with Constraints or the ORM DSL.
5.2.1 GORMでのアソシエーション
Relationships define how domain classes interact with each other. Unless specified explicitly at both ends, a relationship exists only in the direction it is defined.
5.2.1.1 多対1、1対1 Many-to-One One-to-one
A many-to-one relationship is the simplest kind, and is defined with a property of the type of another domain class. Consider this example:Example A
In this case we have a unidirectional many-to-one relationship from Face to Nose. To make this relationship bidirectional define the other side as follows:Example B
class Nose {
static belongsTo = [face:Face]
}belongsTo setting to say that Nose "belongs to" Face. The result of this is that we can create a Face, attach a Nose instance to it and when we save or delete the Face instance, GORM will save or delete the Nose. In other words, saves and deletes will cascade from Face to the associated Nose:new Face(nose:new Nose()).save()
Face:new Nose(face:new Face()).save() // will cause an error
Face instance, the Nose will go too:def f = Face.get(1)
f.delete() // both Face and Nose deleted
hasOne property on the owning side, e.g. Face:Example C
class Face {
static hasOne = [nose:Nose]
}nose table inside a column called face_id. Also, hasOne only works with bidirectional relationships.Finally, it's a good idea to add a unique constraint on one side of the one-to-one relationship:class Face {
static hasOne = [nose:Nose] static constraints = {
nose unique: true
}
}5.2.1.2 1対多 One-to-many
A one-to-many relationship is when one class, example Author, has many instances of a another class, example Book. With Grails you define such a relationship with the hasMany setting:class Author {
static hasMany = [books: Book] String name
}class Book {
String title
}
The ORM DSL allows mapping unidirectional relationships using a foreign key association instead
Grails will automatically inject a property of type java.util.Set into the domain class based on the hasMany setting. This can be used to iterate over the collection:def a = Author.get(1)for (book in a.books) {
println book.title
}
The default fetch strategy used by Grails is "lazy", which means that the collection will be lazily initialized on first access. This can lead to the n+1 problem if you are not careful.If you need "eager" fetching you can use the ORM DSL or specify eager fetching as part of a query
The default cascading behaviour is to cascade saves and updates, but not deletes unless a belongsTo is also specified:class Author {
static hasMany = [books: Book] String name
}class Book {
static belongsTo = [author: Author]
String title
}mappedBy to specify which the collection is mapped:class Airport {
static hasMany = [flights: Flight]
static mappedBy = [flights: "departureAirport"]
}class Flight {
Airport departureAirport
Airport destinationAirport
}class Airport {
static hasMany = [outboundFlights: Flight, inboundFlights: Flight]
static mappedBy = [outboundFlights: "departureAirport",
inboundFlights: "destinationAirport"]
}class Flight {
Airport departureAirport
Airport destinationAirport
}5.2.1.3 多対多 Many-to-many
Grails supports many-to-many relationships by defining a hasMany on both sides of the relationship and having a belongsTo on the owned side of the relationship:class Book {
static belongsTo = Author
static hasMany = [authors:Author]
String title
}class Author {
static hasMany = [books:Book]
String name
}Author, takes responsibility for persisting the relationship and is the only side that can cascade saves across.For example this will work and cascade saves:new Author(name:"Stephen King")
.addToBooks(new Book(title:"The Stand"))
.addToBooks(new Book(title:"The Shining"))
.save()Book and not the authors!new Book(name:"Groovy in Action")
.addToAuthors(new Author(name:"Dierk Koenig"))
.addToAuthors(new Author(name:"Guillaume Laforge"))
.save()
Grails' Scaffolding feature does not currently support many-to-many relationship and hence you must write the code to manage the relationship yourself
5.2.1.4 基本コレクション型
As well as associations between different domain classes, GORM also supports mapping of basic collection types.
For example, the following class creates a nicknames association that is a Set of String instances:class Person {
static hasMany = [nicknames: String]
}joinTable argument:class Person { static hasMany = [nicknames: String] static mapping = {
hasMany joinTable: [name: 'bunch_o_nicknames',
key: 'person_id',
column: 'nickname',
type: "text"]
}
}---------------------------------------------
| person_id | nickname |
---------------------------------------------
| 1 | Fred |
---------------------------------------------
5.2.2 GORMでのコンポジション
As well as association, Grails supports the notion of composition. In this case instead of mapping classes onto separate tables a class can be "embedded" within the current table. For example:class Person {
Address homeAddress
Address workAddress
static embedded = ['homeAddress', 'workAddress']
}class Address {
String number
String code
}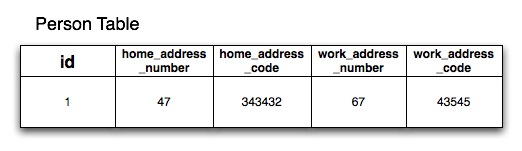
If you define the Address class in a separate Groovy file in the grails-app/domain directory you will also get an address table. If you don't want this to happen use Groovy's ability to define multiple classes per file and include the Address class below the Person class in the grails-app/domain/Person.groovy file
5.2.3 GORMでの継承
GORM supports inheritance both from abstract base classes and concrete persistent GORM entities. For example:class Content {
String author
}class BlogEntry extends Content {
URL url
}class Book extends Content {
String ISBN
}class PodCast extends Content {
byte[] audioStream
}Content class and then various child classes with more specific behaviour.Considerations
At the database level Grails by default uses table-per-hierarchy mapping with a discriminator column called class so the parent class (Content) and its subclasses (BlogEntry, Book etc.), share the same table.Table-per-hierarchy mapping has a down side in that you cannot have non-nullable properties with inheritance mapping. An alternative is to use table-per-subclass which can be enabled with the ORM DSLHowever, excessive use of inheritance and table-per-subclass can result in poor query performance due to the use of outer join queries. In general our advice is if you're going to use inheritance, don't abuse it and don't make your inheritance hierarchy too deep.Polymorphic Queries
The upshot of inheritance is that you get the ability to polymorphically query. For example using the list method on the Content super class will return all subclasses of Content:def content = Content.list() // list all blog entries, books and podcasts
content = Content.findAllByAuthor('Joe Bloggs') // find all by authordef podCasts = PodCast.list() // list only podcasts5.2.4 セット、リスト、マップ
Set オブジェクトのセット
Sets of Objects
By default when you define a relationship with GORM it is a java.util.Set which is an unordered collection that cannot contain duplicates. In other words when you have:class Author {
static hasMany = [books: Book]
}java.util.Set. Sets guarantee uniquenes but not order, which may not be what you want. To have custom ordering you configure the Set as a SortedSet:class Author { SortedSet books static hasMany = [books: Book]
}java.util.SortedSet implementation is used which means you must implement java.lang.Comparable in your Book class:class Book implements Comparable { String title
Date releaseDate = new Date() int compareTo(obj) {
releaseDate.compareTo(obj.releaseDate)
}
}List オブジェクトのリスト
Lists of Objects
To keep objects in the order which they were added and to be able to reference them by index like an array you can define your collection type as a List:class Author { List books static hasMany = [books: Book]
}author.books[0] // get the first book
books_idx column where it saves the index of the elements in the collection to retain this order at the database level.When using a List, elements must be added to the collection before being saved, otherwise Hibernate will throw an exception (org.hibernate.HibernateException: null index column for collection):// This won't work!
def book = new Book(title: 'The Shining')
book.save()
author.addToBooks(book)// Do it this way instead.
def book = new Book(title: 'Misery')
author.addToBooks(book)
author.save()
Bagオブジェクトのコレクション
Bags of Objects
If ordering and uniqueness aren't a concern (or if you manage these explicitly) then you can use the Hibernate
Bag type to represent mapped collections.
The only change required for this is to define the collection type as a Collection:
この場合はコレクションの型をCollection型として定義します。class Author { Collection books static hasMany = [books: Book]
}Since uniqueness and order aren't managed by Hibernate, adding to or removing from collections mapped as a Bag don't trigger a load of all existing instances from the database, so this approach will perform better and require less memory than using a Set or a List.
Hibernateでユニークとオーダーが管理されないので、Bagにマップされたコレクションは、追加削除時に既存のインスタンスをデータベースからロードしません。このためSetまたは@Listよりメモリ使用量が少なくパフォーマンスが良くなります。Mapオブジェクトのマップ
Maps of Objects
If you want a simple map of string/value pairs GORM can map this with the following:
文字列/値のような、単純なマップを使用する場合、GORMでは次のように定義します。class Author {
Map books // map of ISBN:book names
}def a = new Author()
a.books = ["1590597583":"Grails Book"]
a.save()In this case the key and value of the map MUST be strings.
このケースでは、 キーと値は必ず文字列である必要があります。If you want a Map of objects then you can do this:
オブジェクトのマップが必要な場合は次のように:class Book { Map authors static hasMany = [authors: Author]
}def a = new Author(name:"Stephen King")def book = new Book()
book.authors = [stephen:a]
book.save()The static hasMany property defines the type of the elements within the Map. The keys for the map must be strings.
hasManyプロパティで、Mapのエレメントの型を定義します。マップのキーは必ず文字列にしてください。コレクション型とパフォーマンスについて
A Note on Collection Types and Performance
The Java Set type doesn't allow duplicates. To ensure uniqueness when adding an entry to a Set association Hibernate has to load the entire associations from the database. If you have a large numbers of entries in the association this can be costly in terms of performance.The same behavior is required for List types, since Hibernate needs to load the entire association to maintain order. Therefore it is recommended that if you anticipate a large numbers of records in the association that you make the association bidirectional so that the link can be created on the inverse side. For example consider the following code:def book = new Book(title:"New Grails Book")
def author = Author.get(1)
book.author = author
book.save()
Author with a large number of associated Book instances if you were to write code like the following you would see an impact on performance:def book = new Book(title:"New Grails Book")
def author = Author.get(1)
author.addToBooks(book)
author.save()
5.3 永続化の基礎
A key thing to remember about Grails is that under the surface Grails is using Hibernate for persistence. If you are coming from a background of using ActiveRecord or iBatis Hibernate's "session" model may feel a little strange.Grails automatically binds a Hibernate session to the currently executing request. This lets you use the save and delete methods as well as other GORM methods transparently.Transactional Write-Behind
A useful feature of Hibernate over direct JDBC calls and even other frameworks is that when you call save or delete it does not necessarily perform any SQL operations at that point. Hibernate batches up SQL statements and executes them as late as possible, often at the end of the request when flushing and closing the session. This is typically done for you automatically by Grails, which manages your Hibernate session.Hibernate caches database updates where possible, only actually pushing the changes when it knows that a flush is required, or when a flush is triggered programmatically. One common case where Hibernate will flush cached updates is when performing queries since the cached information might be included in the query results. But as long as you're doing non-conflicting saves, updates, and deletes, they'll be batched until the session is flushed. This can be a significant performance boost for applications that do a lot of database writes.Note that flushing is not the same as committing a transaction. If your actions are performed in the context of a transaction, flushing will execute SQL updates but the database will save the changes in its transaction queue and only finalize the updates when the transaction commits.
5.3.1 保存と更新
An example of using the save method can be seen below:def p = Person.get(1)
p.save()
def p = Person.get(1)
p.save(flush: true)
def p = Person.get(1)
try {
p.save(flush: true)
}
catch (org.springframework.dao.DataIntegrityViolationException e) {
// deal with exception
}save() will simply return null in this case, but if you would prefer it to throw an exception you can use the failOnError argument:def p = Person.get(1)
try {
p.save(failOnError: true)
}
catch (ValidationException e) {
// deal with exception
}Config.groovy, as described in the section on configuration. Just remember that when you are saving domain instances that have been bound with data provided by the user, the likelihood of validation exceptions is quite high and you won't want those exceptions propagating to the end user.You can find out more about the subtleties of saving data in this article - a must read!
5.3.2 オブジェクトの削除
An example of the delete method can be seen below:def p = Person.get(1)
p.delete()
flush argument:def p = Person.get(1)
p.delete(flush: true)
flush argument lets you catch any errors that occur during a delete. A common error that may occur is if you violate a database constraint, although this is normally down to a programming or schema error. The following example shows how to catch a DataIntegrityViolationException that is thrown when you violate the database constraints:def p = Person.get(1)try {
p.delete(flush: true)
}
catch (org.springframework.dao.DataIntegrityViolationException e) {
flash.message = "Could not delete person ${p.name}"
redirect(action: "show", id: p.id)
}deleteAll method as deleting data is discouraged and can often be avoided through boolean flags/logic.If you really need to batch delete data you can use the executeUpdate method to do batch DML statements:Customer.executeUpdate("delete Customer c where c.name = :oldName",
[oldName: "Fred"])5.3.3 カスケード更新削除を理解する
It is critical that you understand how cascading updates and deletes work when using GORM. The key part to remember is the belongsTo setting which controls which class "owns" a relationship.Whether it is a one-to-one, one-to-many or many-to-many, defining belongsTo will result in updates cascading from the owning class to its dependant (the other side of the relationship), and for many-/one-to-one and one-to-many relationships deletes will also cascade.If you do not define belongsTo then no cascades will happen and you will have to manually save each object (except in the case of the one-to-many, in which case saves will cascade automatically if a new instance is in a hasMany collection).Here is an example:class Airport {
String name
static hasMany = [flights: Flight]
}class Flight {
String number
static belongsTo = [airport: Airport]
}Airport and add some Flights to it I can save the Airport and have the updates cascaded down to each flight, hence saving the whole object graph:new Airport(name: "Gatwick")
.addToFlights(new Flight(number: "BA3430"))
.addToFlights(new Flight(number: "EZ0938"))
.save()Airport all Flights associated with it will also be deleted:def airport = Airport.findByName("Gatwick")
airport.delete()belongsTo then the above cascading deletion code would not work. To understand this better take a look at the summaries below that describe the default behaviour of GORM with regards to specific associations. Also read part 2 of the GORM Gotchas series of articles to get a deeper understanding of relationships and cascading.Bidirectional one-to-many with belongsTo
class A { static hasMany = [bees: B] }class B { static belongsTo = [a: A] }belongsTo then the cascade strategy is set to "ALL" for the one side and "NONE" for the many side.Unidirectional one-to-many
class A { static hasMany = [bees: B] }Bidirectional one-to-many, no belongsTo
class A { static hasMany = [bees: B] }belongsTo then the cascade strategy is set to "SAVE-UPDATE" for the one side and "NONE" for the many side.Unidirectional one-to-one with belongsTo
class B { static belongsTo = [a: A] }belongsTo then the cascade strategy is set to "ALL" for the owning side of the relationship (A->B) and "NONE" from the side that defines the belongsTo (B->A)Note that if you need further control over cascading behaviour, you can use the ORM DSL.
5.3.4 EagerとLazyフェッチング
Associations in GORM are by default lazy. This is best explained by example:class Airport {
String name
static hasMany = [flights: Flight]
}class Flight {
String number
Location destination
static belongsTo = [airport: Airport]
}class Location {
String city
String country
}def airport = Airport.findByName("Gatwick")
for (flight in airport.flights) {
println flight.destination.city
}Airport instance, another to get its flights, and then 1 extra query for each iteration over the flights association to get the current flight's destination. In other words you get N+1 queries (if you exclude the original one to get the airport).Configuring Eager Fetching
An alternative approach that avoids the N+1 queries is to use eager fetching, which can be specified as follows:class Airport {
String name
static hasMany = [flights: Flight]
static mapping = {
flights lazy: false
}
}flights association will be loaded at the same time as its Airport instance, although a second query will be executed to fetch the collection. You can also use fetch: 'join' instead of lazy: false , in which case GORM will only execute a single query to get the airports and their flights. This works well for single-ended associations, but you need to be careful with one-to-manys. Queries will work as you'd expect right up to the moment you add a limit to the number of results you want. At that point, you will likely end up with fewer results than you were expecting. The reason for this is quite technical but ultimately the problem arises from GORM using a left outer join.So, the recommendation is currently to use fetch: 'join' for single-ended associations and lazy: false for one-to-manys.Be careful how and where you use eager loading because you could load your entire database into memory with too many eager associations. You can find more information on the mapping options in the section on the ORM DSL.Using Batch Fetching
Although eager fetching is appropriate for some cases, it is not always desirable. If you made everything eager you could quite possibly load your entire database into memory resulting in performance and memory problems. An alternative to eager fetching is to use batch fetching. You can configure Hibernate to lazily fetch results in "batches". For example:class Airport {
String name
static hasMany = [flights: Flight]
static mapping = {
flights batchSize: 10
}
}batchSize argument, when you iterate over the flights association, Hibernate will fetch results in batches of 10. For example if you had an Airport that had 30 flights, if you didn't configure batch fetching you would get 1 query to fetch the Airport and then 30 queries to fetch each flight. With batch fetching you get 1 query to fetch the Airport and 3 queries to fetch each Flight in batches of 10. In other words, batch fetching is an optimization of the lazy fetching strategy. Batch fetching can also be configured at the class level as follows:class Flight {
…
static mapping = {
batchSize 10
}
}5.3.5 悲観的(Pessimistic)と楽観的(Optimistic)ロック
Optimistic Locking
By default GORM classes are configured for optimistic locking. Optimistic locking is a feature of Hibernate which involves storing a version value in a special version column in the database that is incremented after each update.The version column gets read into a version property that contains the current versioned state of persistent instance which you can access:def airport = Airport.get(10)println airport.version
def airport = Airport.get(10)try {
airport.name = "Heathrow"
airport.save(flush: true)
}
catch (org.springframework.dao.OptimisticLockingFailureException e) {
// deal with exception
}
The version will only be updated after flushing the session.
Pessimistic Locking
Pessimistic locking is equivalent to doing a SQL "SELECT * FOR UPDATE" statement and locking a row in the database. This has the implication that other read operations will be blocking until the lock is released.In Grails pessimistic locking is performed on an existing instance with the lock method:def airport = Airport.get(10)
airport.lock() // lock for update
airport.name = "Heathrow"
airport.save()
get() and the call to lock().To get around this problem you can use the static lock method that takes an id just like get:def airport = Airport.lock(10) // lock for update
airport.name = "Heathrow"
airport.save()
def airport = Airport.findByName("Heathrow", [lock: true])def airport = Airport.createCriteria().get {
eq('name', 'Heathrow')
lock true
}5.3.6 変更確認
Once you have loaded and possibly modified a persistent domain class instance, it isn't straightforward to retrieve the original values. If you try to reload the instance using get Hibernate will return the current modified instance from its Session cache. Reloading using another query would trigger a flush which could cause problems if your data isn't ready to be flushed yet. So GORM provides some methods to retrieve the original values that Hibernate caches when it loads the instance (which it uses for dirty checking).isDirty
You can use the isDirty method to check if any field has been modified:def airport = Airport.get(10)
assert !airport.isDirty()airport.properties = params
if (airport.isDirty()) {
// do something based on changed state
}
isDirty() does not currently check collection associations, but it does check all other persistent properties and associations.
You can also check if individual fields have been modified:def airport = Airport.get(10)
assert !airport.isDirty()airport.properties = params
if (airport.isDirty('name')) {
// do something based on changed name
}getDirtyPropertyNames
You can use the getDirtyPropertyNames method to retrieve the names of modified fields; this may be empty but will not be null:def airport = Airport.get(10)
assert !airport.isDirty()airport.properties = params
def modifiedFieldNames = airport.getDirtyPropertyNames()
for (fieldName in modifiedFieldNames) {
// do something based on changed value
}getPersistentValue
You can use the getPersistentValue method to retrieve the value of a modified field:def airport = Airport.get(10)
assert !airport.isDirty()airport.properties = params
def modifiedFieldNames = airport.getDirtyPropertyNames()
for (fieldName in modifiedFieldNames) {
def currentValue = airport."$fieldName"
def originalValue = airport.getPersistentValue(fieldName)
if (currentValue != originalValue) {
// do something based on changed value
}
}5.4 GORMでクエリー
GORM supports a number of powerful ways to query from dynamic finders, to criteria to Hibernate's object oriented query language HQL. Depending on the complexity of the query you have the following options in order of flexibility and power:
- Dynamic Finders
- Where Queries
- Criteria Queries
- Hibernate Query Language (HQL)
In addition, Groovy's ability to manipulate collections with GPath and methods like sort, findAll and so on combined with GORM results in a powerful combination.However, let's start with the basics.Listing instances
Use the list method to obtain all instances of a given class:The list method supports arguments to perform pagination:def books = Book.list(offset:10, max:20)
def books = Book.list(sort:"title", order:"asc")
sort argument is the name of the domain class property that you wish to sort on, and the order argument is either asc for ascending or desc for descending.Retrieval by Database Identifier
The second basic form of retrieval is by database identifier using the get method:You can also obtain a list of instances for a set of identifiers using getAll:def books = Book.getAll(23, 93, 81)
5.4.1 ダイナミックファインダー
GORM supports the concept of dynamic finders. A dynamic finder looks like a static method invocation, but the methods themselves don't actually exist in any form at the code level.Instead, a method is auto-magically generated using code synthesis at runtime, based on the properties of a given class. Take for example the Book class:class Book {
String title
Date releaseDate
Author author
}class Author {
String name
}Book class has properties such as title, releaseDate and author. These can be used by the findBy and findAllBy methods in the form of "method expressions":def book = Book.findByTitle("The Stand")book = Book.findByTitleLike("Harry Pot%")book = Book.findByReleaseDateBetween(firstDate, secondDate)book = Book.findByReleaseDateGreaterThan(someDate)book = Book.findByTitleLikeOrReleaseDateLessThan("%Something%", someDate)Method Expressions
A method expression in GORM is made up of the prefix such as findBy followed by an expression that combines one or more properties. The basic form is:Book.findBy([Property][Comparator][Boolean Operator])?[Property][Comparator]
def book = Book.findByTitle("The Stand")book = Book.findByTitleLike("Harry Pot%")Like comparator, is equivalent to a SQL like expression.The possible comparators include:
InList - In the list of given valuesLessThan - less than a given valueLessThanEquals - less than or equal a give valueGreaterThan - greater than a given valueGreaterThanEquals - greater than or equal a given valueLike - Equivalent to a SQL like expressionIlike - Similar to a Like, except case insensitiveNotEqual - Negates equalityBetween - Between two values (requires two arguments)IsNotNull - Not a null value (doesn't take an argument)IsNull - Is a null value (doesn't take an argument)
Notice that the last three require different numbers of method arguments compared to the rest, as demonstrated in the following example:def now = new Date()
def lastWeek = now - 7
def book = Book.findByReleaseDateBetween(lastWeek, now)books = Book.findAllByReleaseDateIsNull()
books = Book.findAllByReleaseDateIsNotNull()
Boolean logic (AND/OR)
Method expressions can also use a boolean operator to combine two or more criteria:def books = Book.findAllByTitleLikeAndReleaseDateGreaterThan(
"%Java%", new Date() - 30)And in the middle of the query to make sure both conditions are satisfied, but you could equally use Or:def books = Book.findAllByTitleLikeOrReleaseDateGreaterThan(
"%Java%", new Date() - 30)And or all Or. If you need to combine And and Or or if the number of criteria creates a very long method name, just convert the query to a Criteria or HQL query.Querying Associations
Associations can also be used within queries:def author = Author.findByName("Stephen King")def books = author ? Book.findAllByAuthor(author) : []Author instance is not null we use it in a query to obtain all the Book instances for the given Author.Pagination and Sorting
The same pagination and sorting parameters available on the list method can also be used with dynamic finders by supplying a map as the final parameter:def books = Book.findAllByTitleLike("Harry Pot%",
[max: 3, offset: 2, sort: "title", order: "desc"])5.4.2 Whereクエリー
The where method, introduced in Grails 2.0, builds on the support for Detached Criteria by providing an enhanced, compile-time checked query DSL for common queries. The where method is more flexible than dynamic finders, less verbose than criteria and provides a powerful mechanism to compose queries.Basic Querying
The where method accepts a closure that looks very similar to Groovy's regular collection methods. The closure should define the logical criteria in regular Groovy syntax, for example:def query = Person.where {
firstName == "Bart"
}
Person bart = query.find()DetachedCriteria instance, which means it is not associated with any particular database connection or session. This means you can use the where method to define common queries at the class level:class Person {
static simpsons = where {
lastName == "Simpson"
}
…
}
…
Person.simpsons.each {
println it.firstname
}findAll and find methods to accomplish this:def results = Person.findAll {
lastName == "Simpson"
}
def results = Person.findAll(sort:"firstName") {
lastName == "Simpson"
}
Person p = Person.find { firstName == "Bart" }| Operator | Criteria Method | Description |
|---|
| == | eq | Equal to |
| != | ne | Not equal to |
| > | gt | Greater than |
| < | lt | Less than |
| >= | ge | Greater than or equal to |
| <= | le | Less than or equal to |
| in | inList | Contained within the given list |
| ==~ | like | Like a given string |
| =~ | ilike | Case insensitive like |
It is possible use regular Groovy comparison operators and logic to formulate complex queries:def query = Person.where {
(lastName != "Simpson" && firstName != "Fred") || (firstName == "Bart" && age > 9)
}
def results = query.list(sort:"firstName")Pattern object, in which case they map onto an rlike query:def query = Person.where {
firstName ==~ ~/B.+/
}
Note that rlike queries are only supported if the underlying database supports regular expressions
A between criteria query can be done by combining the in keyword with a range:def query = Person.where {
age in 18..65
}isNull and isNotNull style queries by using null with regular comparison operators:def query = Person.where {
middleName == null
}Query Composition
Since the return value of the where method is a DetachedCriteria instance you can compose new queries from the original query:def query = Person.where {
lastName == "Simpson"
}
def bartQuery = query.where {
firstName == "Bart"
}
Person p = bartQuery.find()where method unless it has been explicitly cast to a DetachedCriteria instance. In other words the following will produce an error:def callable = {
lastName == "Simpson"
}
def query = Person.where(callable)import grails.gorm.DetachedCriteriadef callable = {
lastName == "Simpson"
} as DetachedCriteria<Person>
def query = Person.where(callable)as keyword) to a DetachedCriteria instance targeted at the Person class.Conjunction, Disjunction and Negation
As mentioned previously you can combine regular Groovy logical operators (|| and &&) to form conjunctions and disjunctions:def query = Person.where {
(lastName != "Simpson" && firstName != "Fred") || (firstName == "Bart" && age > 9)
}!:def query = Person.where {
firstName == "Fred" && !(lastName == 'Simpson')
}Property Comparison Queries
If you use a property name on both the left hand and right side of a comparison expression then the appropriate property comparison criteria is automatically used:def query = Person.where {
firstName == lastName
}| Operator | Criteria Method | Description |
|---|
| == | eqProperty | Equal to |
| != | neProperty | Not equal to |
| > | gtProperty | Greater than |
| < | ltProperty | Less than |
| >= | geProperty | Greater than or equal to |
| <= | leProperty | Less than or equal to |
Querying Associations
Associations can be queried by using the dot operator to specify the property name of the association to be queried:def query = Pet.where {
owner.firstName == "Joe" || owner.firstName == "Fred"
}def query = Person.where {
pets { name == "Jack" || name == "Joe" }
}def query = Person.where {
pets { name == "Jack" } || firstName == "Ed"
}def query = Person.where {
pets.size() == 2
}| Operator | Criteria Method | Description |
|---|
| == | sizeEq | The collection size is equal to |
| != | sizeNe | The collection size is not equal to |
| > | sizeGt | The collection size is greater than |
| < | sizeLt | The collection size is less than |
| >= | sizeGe | The collection size is greater than or equal to |
| <= | sizeLe | The collection size is less than or equal to |
Subqueries
It is possible to execute subqueries within where queries. For example to find all the people older than the average age the following query can be used:final query = Person.where {
age > avg(age)
}| Method | Description |
|---|
| avg | The average of all values |
| sum | The sum of all values |
| max | The maximum value |
| min | The minimum value |
| count | The count of all values |
| property | Retrieves a property of the resulting entities |
You can apply additional criteria to any subquery by using the of method and passing in a closure containing the criteria:def query = Person.where {
age > avg(age).of { lastName == "Simpson" } && firstName == "Homer"
}property subquery returns multiple results, the criterion used compares all results. For example the following query will find all people younger than people with the surname "Simpson":Person.where {
age < property(age).of { lastName == "Simpson" }
}Other Functions
There are several functions available to you within the context of a query. These are summarized in the table below:| Method | Description |
|---|
| second | The second of a date property |
| minute | The minute of a date property |
| hour | The hour of a date property |
| day | The day of the month of a date property |
| month | The month of a date property |
| year | The year of a date property |
| lower | Converts a string property to upper case |
| upper | Converts a string property to lower case |
| length | The length of a string property |
| trim | Trims a string property |
Currently functions can only be applied to properties or associations of domain classes. You cannot, for example, use a function on a result of a subquery.
For example the following query can be used to find all pet's born in 2011:def query = Pet.where {
year(birthDate) == 2011
}def query = Person.where {
year(pets.birthDate) == 2009
}Batch Updates and Deletes
Since each where method call returns a DetachedCriteria instance, you can use where queries to execute batch operations such as batch updates and deletes. For example, the following query will update all people with the surname "Simpson" to have the surname "Bloggs":def query = Person.where {
lastName == 'Simpson'
}
int total = query.updateAll(lastName:"Bloggs")
Note that one limitation with regards to batch operations is that join queries (queries that query associations) are not allowed.
To batch delete records you can use the deleteAll method:def query = Person.where {
lastName == 'Simpson'
}
int total = query.deleteAll()5.4.3 クライテリア
Criteria is an advanced way to query that uses a Groovy builder to construct potentially complex queries. It is a much better approach than building up query strings using a StringBuffer.Criteria can be used either with the createCriteria or withCriteria methods. The builder uses Hibernate's Criteria API. The nodes on this builder map the static methods found in the Restrictions class of the Hibernate Criteria API. For example:def c = Account.createCriteria()
def results = c {
between("balance", 500, 1000)
eq("branch", "London")
or {
like("holderFirstName", "Fred%")
like("holderFirstName", "Barney%")
}
maxResults(10)
order("holderLastName", "desc")
}Account objects in a List matching the following criteria:
balance is between 500 and 1000branch is 'London'holderFirstName starts with 'Fred' or 'Barney'
The results will be sorted in descending order by holderLastName.If no records are found with the above criteria, an empty List is returned.Conjunctions and Disjunctions
As demonstrated in the previous example you can group criteria in a logical OR using an or { } block:or {
between("balance", 500, 1000)
eq("branch", "London")
}and {
between("balance", 500, 1000)
eq("branch", "London")
}not {
between("balance", 500, 1000)
eq("branch", "London")
}Querying Associations
Associations can be queried by having a node that matches the property name. For example say the Account class had many Transaction objects:class Account {
…
static hasMany = [transactions: Transaction]
…
}transaction as a builder node:def c = Account.createCriteria()
def now = new Date()
def results = c.list {
transactions {
between('date', now - 10, now)
}
}Account instances that have performed transactions within the last 10 days.
You can also nest such association queries within logical blocks:def c = Account.createCriteria()
def now = new Date()
def results = c.list {
or {
between('created', now - 10, now)
transactions {
between('date', now - 10, now)
}
}
}Querying with Projections
Projections may be used to customise the results. Define a "projections" node within the criteria builder tree to use projections. There are equivalent methods within the projections node to the methods found in the Hibernate Projections class:def c = Account.createCriteria()def numberOfBranches = c.get {
projections {
countDistinct('branch')
}
}Using SQL Restrictions
You can access Hibernate's SQL Restrictions capabilities.def c = Person.createCriteria()def peopleWithShortFirstNames = c.list {
sqlRestriction "char_length(first_name) <= 4"
}def c = Person.createCriteria()def peopleWithShortFirstNames = c.list {
sqlRestriction "char_length(first_name) < ? AND char_length(first_name) > ?", [maxValue, minValue]
}
Note that the parameter there is SQL. The first_name attribute referenced in the example refers to the persistence model, not the object model like in HQL queries. The Person property named firstName is mapped to the first_name column in the database and you must refer to that in the sqlRestriction string.Also note that the SQL used here is not necessarily portable across databases.
Using Scrollable Results
You can use Hibernate's ScrollableResults feature by calling the scroll method:def results = crit.scroll {
maxResults(10)
}
def f = results.first()
def l = results.last()
def n = results.next()
def p = results.previous()def future = results.scroll(10)
def accountNumber = results.getLong('number')
A result iterator that allows moving around within the results by arbitrary increments. The Query / ScrollableResults pattern is very similar to the JDBC PreparedStatement/ ResultSet pattern and the semantics of methods of this interface are similar to the similarly named methods on ResultSet.
Contrary to JDBC, columns of results are numbered from zero.Setting properties in the Criteria instance
If a node within the builder tree doesn't match a particular criterion it will attempt to set a property on the Criteria object itself. This allows full access to all the properties in this class. This example calls setMaxResults and setFirstResult on the Criteria instance:import org.hibernate.FetchMode as FM
…
def results = c.list {
maxResults(10)
firstResult(50)
fetchMode("aRelationship", FM.JOIN)
}Querying with Eager Fetching
In the section on Eager and Lazy Fetching we discussed how to declaratively specify fetching to avoid the N+1 SELECT problem. However, this can also be achieved using a criteria query:def criteria = Task.createCriteria()
def tasks = criteria.list{
eq "assignee.id", task.assignee.id
join 'assignee'
join 'project'
order 'priority', 'asc'
}join method: it tells the criteria API to use a JOIN to fetch the named associations with the Task instances. It's probably best not to use this for one-to-many associations though, because you will most likely end up with duplicate results. Instead, use the 'select' fetch mode:
import org.hibernate.FetchMode as FM
…
def results = Airport.withCriteria {
eq "region", "EMEA"
fetchMode "flights", FM.SELECT
}flights association, you will get reliable results - even with the maxResults option.
fetchMode and join are general settings of the query and can only be specified at the top-level, i.e. you cannot use them inside projections or association constraints.
An important point to bear in mind is that if you include associations in the query constraints, those associations will automatically be eagerly loaded. For example, in this query:
def results = Airport.withCriteria {
eq "region", "EMEA"
flights {
like "number", "BA%"
}
}flights collection would be loaded eagerly via a join even though the fetch mode has not been explicitly set.Method Reference
If you invoke the builder with no method name such as:The build defaults to listing all the results and hence the above is equivalent to:| Method | Description |
|---|
| list | This is the default method. It returns all matching rows. |
| get | Returns a unique result set, i.e. just one row. The criteria has to be formed that way, that it only queries one row. This method is not to be confused with a limit to just the first row. |
| scroll | Returns a scrollable result set. |
| listDistinct | If subqueries or associations are used, one may end up with the same row multiple times in the result set, this allows listing only distinct entities and is equivalent to DISTINCT_ROOT_ENTITY of the CriteriaSpecification class. |
| count | Returns the number of matching rows. |
5.4.4 Detachedクライテリア
Detached Criteria are criteria queries that are not associated with any given database session/connection. Supported since Grails 2.0, Detached Criteria queries have many uses including allowing you to create common reusable criteria queries, execute subqueries and execute batch updates/deletes.
Building Detached Criteria Queries
The primary point of entry for using the Detached Criteria is the grails.gorm.DetachedCriteria class which accepts a domain class as the only argument to its constructor:import grails.gorm.*
…
def criteria = new DetachedCriteria(Person)
build method:def criteria = new DetachedCriteria(Person).build {
eq 'lastName', 'Simpson'
}DetachedCriteria instance do not mutate the original object but instead return a new query. In other words, you have to use the return value of the build method to obtain the mutated criteria object:def criteria = new DetachedCriteria(Person).build {
eq 'lastName', 'Simpson'
}
def bartQuery = criteria.build {
eq 'firstName', 'Bart'
}Executing Detached Criteria Queries
Unlike regular criteria, Detached Criteria are lazy, in that no query is executed at the point of definition. Once a Detached Criteria query has been constructed then there are a number of useful query methods which are summarized in the table below:| Method | Description |
|---|
| list | List all matching entities |
| get | Return a single matching result |
| count | Count all matching records |
| exists | Return true if any matching records exist |
| deleteAll | Delete all matching records |
| updateAll(Map) | Update all matching records with the given properties |
As an example the following code will list the first 4 matching records sorted by the firstName property:def criteria = new DetachedCriteria(Person).build {
eq 'lastName', 'Simpson'
}
def results = criteria.list(max:4, sort:"firstName")def results = criteria.list(max:4, sort:"firstName") {
gt 'age', 30
}get or find methods (which are synonyms):Person p = criteria.find() // or criteria.get()
DetachedCriteria class itself also implements the Iterable interface which means that it can be treated like a list:def criteria = new DetachedCriteria(Person).build {
eq 'lastName', 'Simpson'
}
criteria.each {
println it.firstName
}each method is called. The same applies to all other Groovy collection iteration methods.You can also execute dynamic finders on DetachedCriteria just like on domain classes. For example:def criteria = new DetachedCriteria(Person).build {
eq 'lastName', 'Simpson'
}
def bart = criteria.findByFirstName("Bart")Using Detached Criteria for Subqueries
Within the context of a regular criteria query you can use DetachedCriteria to execute subquery. For example if you want to find all people who are older than the average age the following query will accomplish that:def results = Person.withCriteria {
gt "age", new DetachedCriteria(Person).build {
projections {
avg "age"
}
}
order "firstName"
}Person) and hence the query can be shortened to:def results = Person.withCriteria {
gt "age", {
projections {
avg "age"
}
}
order "firstName"
}gtAll query can be used:def results = Person.withCriteria {
gtAll "age", {
projections {
property "age"
}
between 'age', 18, 65
} order "firstName"
}| Method | Description |
|---|
| gtAll | greater than all subquery results |
| geAll | greater than or equal to all subquery results |
| ltAll | less than all subquery results |
| leAll | less than or equal to all subquery results |
| eqAll | equal to all subquery results |
| neAll | not equal to all subquery results |
Batch Operations with Detached Criteria
The DetachedCriteria class can be used to execute batch operations such as batch updates and deletes. For example, the following query will update all people with the surname "Simpson" to have the surname "Bloggs":def criteria = new DetachedCriteria(Person).build {
eq 'lastName', 'Simpson'
}
int total = criteria.updateAll(lastName:"Bloggs")
Note that one limitation with regards to batch operations is that join queries (queries that query associations) are not allowed within the DetachedCriteria instance.
To batch delete records you can use the deleteAll method:def criteria = new DetachedCriteria(Person).build {
eq 'lastName', 'Simpson'
}
int total = criteria.deleteAll()5.4.5 Hibernateクエリー言語 (HQL)
GORM classes also support Hibernate's query language HQL, a very complete reference for which can be found in the Hibernate documentation of the Hibernate documentation.GORM provides a number of methods that work with HQL including find, findAll and executeQuery. An example of a query can be seen below:def results =
Book.findAll("from Book as b where b.title like 'Lord of the%'")Positional and Named Parameters
In this case the value passed to the query is hard coded, however you can equally use positional parameters:def results =
Book.findAll("from Book as b where b.title like ?", ["The Shi%"])def author = Author.findByName("Stephen King")
def books = Book.findAll("from Book as book where book.author = ?",
[author])def results =
Book.findAll("from Book as b " +
"where b.title like :search or b.author like :search",
[search: "The Shi%"])def author = Author.findByName("Stephen King")
def books = Book.findAll("from Book as book where book.author = :author",
[author: author])Multiline Queries
Use the line continuation character to separate the query across multiple lines:def results = Book.findAll("\
from Book as b, \
Author as a \
where b.author = a and a.surname = ?", ['Smith'])
Triple-quoted Groovy multiline Strings will NOT work with HQL queries.
Pagination and Sorting
You can also perform pagination and sorting whilst using HQL queries. To do so simply specify the pagination options as a Map at the end of the method call and include an "ORDER BY" clause in the HQL:def results =
Book.findAll("from Book as b where " +
"b.title like 'Lord of the%' " +
"order by b.title asc",
[max: 10, offset: 20])5.5 高度なGORMの機能
The following sections cover more advanced usages of GORM including caching, custom mapping and events.
このセクションからはキャッシング、カスタムマッピング、イベントなどのもっと高度なGORMの使用方法を紹介していきます。
5.5.1 イベントと自動タイムスタンプ
GORM supports the registration of events as methods that get fired when certain events occurs such as deletes, inserts and updates. The following is a list of supported events:
beforeInsert - Executed before an object is initially persisted to the databasebeforeUpdate - Executed before an object is updatedbeforeDelete - Executed before an object is deletedbeforeValidate - Executed before an object is validatedafterInsert - Executed after an object is persisted to the databaseafterUpdate - Executed after an object has been updatedafterDelete - Executed after an object has been deletedonLoad - Executed when an object is loaded from the database
To add an event simply register the relevant closure with your domain class.
Do not attempt to flush the session within an event (such as with obj.save(flush:true)). Since events are fired during flushing this will cause a StackOverflowError.
Event types
The beforeInsert event
Fired before an object is saved to the databaseclass Person {
Date dateCreated def beforeInsert() {
dateCreated = new Date()
}
}The beforeUpdate event
Fired before an existing object is updatedclass Person {
Date dateCreated
Date lastUpdated def beforeInsert() {
dateCreated = new Date()
}
def beforeUpdate() {
lastUpdated = new Date()
}
}The beforeDelete event
Fired before an object is deleted.class Person {
String name
Date dateCreated
Date lastUpdated def beforeDelete() {
ActivityTrace.withNewSession {
new ActivityTrace(eventName:"Person Deleted",data:name).save()
}
}
}withNewSession method above. Since events are triggered whilst Hibernate is flushing using persistence methods like save() and delete() won't result in objects being saved unless you run your operations with a new Session.Fortunately the withNewSession method lets you share the same transactional JDBC connection even though you're using a different underlying Session.The beforeValidate event
Fired before an object is validated.class Person {
String name static constraints = {
name size: 5..45
} def beforeValidate() {
name = name?.trim()
}
}beforeValidate method is run before any validators are run.GORM supports an overloaded version of beforeValidate which accepts a List parameter which may include
the names of the properties which are about to be validated. This version of beforeValidate will be called
when the validate method has been invoked and passed a List of property names as an argument.class Person {
String name
String town
Integer age static constraints = {
name size: 5..45
age range: 4..99
} def beforeValidate(List propertiesBeingValidated) {
// do pre validation work based on propertiesBeingValidated
}
}def p = new Person(name: 'Jacob Brown', age: 10)
p.validate(['age', 'name'])
Note that when validate is triggered indirectly because of a call to the save method that
the validate method is being invoked with no arguments, not a List that includes all of
the property names.
Either or both versions of beforeValidate may be defined in a domain class. GORM will
prefer the List version if a List is passed to validate but will fall back on the
no-arg version if the List version does not exist. Likewise, GORM will prefer the
no-arg version if no arguments are passed to validate but will fall back on the
List version if the no-arg version does not exist. In that case, null is passed to beforeValidate.The onLoad/beforeLoad event
Fired immediately before an object is loaded from the database:class Person {
String name
Date dateCreated
Date lastUpdated def onLoad() {
log.debug "Loading ${id}"
}
}beforeLoad() is effectively a synonym for onLoad(), so only declare one or the other.The afterLoad event
Fired immediately after an object is loaded from the database:class Person {
String name
Date dateCreated
Date lastUpdated def afterLoad() {
name = "I'm loaded"
}
}Custom Event Listeners
You can also register event handler classes in an application's grails-app/conf/spring/resources.groovy or in the doWithSpring closure in a plugin descriptor by registering a Spring bean named hibernateEventListeners. This bean has one property, listenerMap which specifies the listeners to register for various Hibernate events.The values of the Map are instances of classes that implement one or more Hibernate listener interfaces. You can use one class that implements all of the required interfaces, or one concrete class per interface, or any combination. The valid Map keys and corresponding interfaces are listed here:For example, you could register a class AuditEventListener which implements PostInsertEventListener, PostUpdateEventListener, and PostDeleteEventListener using the following in an application:beans = { auditListener(AuditEventListener) hibernateEventListeners(HibernateEventListeners) {
listenerMap = ['post-insert': auditListener,
'post-update': auditListener,
'post-delete': auditListener]
}
}def doWithSpring = { auditListener(AuditEventListener) hibernateEventListeners(HibernateEventListeners) {
listenerMap = ['post-insert': auditListener,
'post-update': auditListener,
'post-delete': auditListener]
}
}Automatic timestamping
The examples above demonstrated using events to update a lastUpdated and dateCreated property to keep track of updates to objects. However, this is actually not necessary. By defining a lastUpdated and dateCreated property these will be automatically updated for you by GORM.If this is not the behaviour you want you can disable this feature with:class Person {
Date dateCreated
Date lastUpdated
static mapping = {
autoTimestamp false
}
}
If you put nullable: false constraints on either dateCreated or lastUpdated, your domain instances will fail validation - probably not what you want. Leave constraints off these properties unless you have disabled automatic timestamping.
5.5.2 カスタムORマッピング
Grails domain classes can be mapped onto many legacy schemas with an Object Relational Mapping DSL (domain specific language). The following sections takes you through what is possible with the ORM DSL.
None of this is necessary if you are happy to stick to the conventions defined by GORM for table names, column names and so on. You only needs this functionality if you need to tailor the way GORM maps onto legacy schemas or configures caching
Custom mappings are defined using a a static mapping block defined within your domain class:class Person {
…
static mapping = { }
}5.5.2.1 テーブル名、カラム名
Table names
The database table name which the class maps to can be customized using the table method:class Person {
…
static mapping = {
table 'people'
}
}people instead of the default name of person.Column names
It is also possible to customize the mapping for individual columns onto the database. For example to change the name you can do:class Person { String firstName static mapping = {
table 'people'
firstName column: 'First_Name'
}
}firstName is a dynamic method within the mapping Closure that has a single Map parameter. Since its name corresponds to a domain class persistent field, the parameter values (in this case just "column") are used to configure the mapping for that property.Column type
GORM supports configuration of Hibernate types with the DSL using the type attribute. This includes specifing user types that implement the Hibernate org.hibernate.usertype.UserType interface, which allows complete customization of how a type is persisted. As an example if you had a PostCodeType you could use it as follows:class Address { String number
String postCode static mapping = {
postCode type: PostCodeType
}
}class Address { String number
String postCode static mapping = {
postCode type: 'text'
}
}postCode column map to the default large-text type for the database you're using (for example TEXT or CLOB).See the Hibernate documentation regarding Basic Types for further information.Many-to-One/One-to-One Mappings
In the case of associations it is also possible to configure the foreign keys used to map associations. In the case of a many-to-one or one-to-one association this is exactly the same as any regular column. For example consider the following:class Person { String firstName
Address address static mapping = {
table 'people'
firstName column: 'First_Name'
address column: 'Person_Address_Id'
}
}address association would map to a foreign key column called address_id. By using the above mapping we have changed the name of the foreign key column to Person_Adress_Id.One-to-Many Mapping
With a bidirectional one-to-many you can change the foreign key column used by changing the column name on the many side of the association as per the example in the previous section on one-to-one associations. However, with unidirectional associations the foreign key needs to be specified on the association itself. For example given a unidirectional one-to-many relationship between Person and Address the following code will change the foreign key in the address table:class Person { String firstName static hasMany = [addresses: Address] static mapping = {
table 'people'
firstName column: 'First_Name'
addresses column: 'Person_Address_Id'
}
}address table, but instead some intermediate join table you can use the joinTable parameter:class Person { String firstName static hasMany = [addresses: Address] static mapping = {
table 'people'
firstName column: 'First_Name'
addresses joinTable: [name: 'Person_Addresses',
key: 'Person_Id',
column: 'Address_Id']
}
}Many-to-Many Mapping
Grails, by default maps a many-to-many association using a join table. For example consider this many-to-many association:class Group {
…
static hasMany = [people: Person]
}class Person {
…
static belongsTo = Group
static hasMany = [groups: Group]
}group_person containing foreign keys called person_id and group_id referencing the person and group tables. To change the column names you can specify a column within the mappings for each class.class Group {
…
static mapping = {
people column: 'Group_Person_Id'
}
}
class Person {
…
static mapping = {
groups column: 'Group_Group_Id'
}
}class Group {
…
static mapping = {
people column: 'Group_Person_Id',
joinTable: 'PERSON_GROUP_ASSOCIATIONS'
}
}
class Person {
…
static mapping = {
groups column: 'Group_Group_Id',
joinTable: 'PERSON_GROUP_ASSOCIATIONS'
}
}5.5.2.2 キャッシングストラテジー
Setting up caching
Hibernate features a second-level cache with a customizable cache provider. This needs to be configured in the grails-app/conf/DataSource.groovy file as follows:hibernate {
cache.use_second_level_cache=true
cache.use_query_cache=true
cache.provider_class='org.hibernate.cache.EhCacheProvider'
}
For further reading on caching and in particular Hibernate's second-level cache, refer to the Hibernate documentation on the subject.
Caching instances
Call the cache method in your mapping block to enable caching with the default settings:class Person {
…
static mapping = {
table 'people'
cache true
}
}class Person {
…
static mapping = {
table 'people'
cache usage: 'read-only', include: 'non-lazy'
}
}Caching associations
As well as the ability to use Hibernate's second level cache to cache instances you can also cache collections (associations) of objects. For example:class Person { String firstName static hasMany = [addresses: Address] static mapping = {
table 'people'
version false
addresses column: 'Address', cache: true
}
}class Address {
String number
String postCode
}addresses collection. You can also use:cache: 'read-write' // or 'read-only' or 'transactional'
Caching Queries
You can cache queries such as dynamic finders and criteria. To do so using a dynamic finder you can pass the cache argument:def person = Person.findByFirstName("Fred", [cache: true])
In order for the results of the query to be cached, you must enable caching in your mapping as discussed in the previous section.
You can also cache criteria queries:def people = Person.withCriteria {
like('firstName', 'Fr%')
cache true
}Cache usages
Below is a description of the different cache settings and their usages:
read-only - If your application needs to read but never modify instances of a persistent class, a read-only cache may be used.read-write - If the application needs to update data, a read-write cache might be appropriate.nonstrict-read-write - If the application only occasionally needs to update data (ie. if it is very unlikely that two transactions would try to update the same item simultaneously) and strict transaction isolation is not required, a nonstrict-read-write cache might be appropriate.transactional - The transactional cache strategy provides support for fully transactional cache providers such as JBoss TreeCache. Such a cache may only be used in a JTA environment and you must specify hibernate.transaction.manager_lookup_class in the grails-app/conf/DataSource.groovy file's hibernate config.
5.5.2.3 継承ストラテジー
By default GORM classes use table-per-hierarchy inheritance mapping. This has the disadvantage that columns cannot have a NOT-NULL constraint applied to them at the database level. If you would prefer to use a table-per-subclass inheritance strategy you can do so as follows:class Payment {
Integer amount static mapping = {
tablePerHierarchy false
}
}class CreditCardPayment extends Payment {
String cardNumber
}Payment class specifies that it will not be using table-per-hierarchy mapping for all child classes.
5.5.2.4 カスタムデータベースアイデンティティー
You can customize how GORM generates identifiers for the database using the DSL. By default GORM relies on the native database mechanism for generating ids. This is by far the best approach, but there are still many schemas that have different approaches to identity.To deal with this Hibernate defines the concept of an id generator. You can customize the id generator and the column it maps to as follows:class Person {
…
static mapping = {
table 'people'
version false
id generator: 'hilo',
params: [table: 'hi_value',
column: 'next_value',
max_lo: 100]
}
}
For more information on the different Hibernate generators refer to the Hibernate reference documentation
Although you don't typically specify the id field (Grails adds it for you) you can still configure its mapping like the other properties. For example to customise the column for the id property you can do:class Person {
…
static mapping = {
table 'people'
version false
id column: 'person_id'
}
}5.5.2.5 プライマリキー合成
GORM supports the concept of composite identifiers (identifiers composed from 2 or more properties). It is not an approach we recommend, but is available to you if you need it:import org.apache.commons.lang.builder.HashCodeBuilderclass Person implements Serializable { String firstName
String lastName boolean equals(other) {
if (!(other instanceof Person)) {
return false
} other.firstName == firstName && other.lastName == lastName
} int hashCode() {
def builder = new HashCodeBuilder()
builder.append firstName
builder.append lastName
builder.toHashCode()
} static mapping = {
id composite: ['firstName', 'lastName']
}
}firstName and lastName properties of the Person class. To retrieve an instance by id you use a prototype of the object itself:def p = Person.get(new Person(firstName: "Fred", lastName: "Flintstone"))
println p.firstName
Serializable interface and override the equals and hashCode methods, using the properties in the composite key for the calculations. The example above uses a HashCodeBuilder for convenience but it's fine to implement it yourself.Another important consideration when using composite primary keys is associations. If for example you have a many-to-one association where the foreign keys are stored in the associated table then 2 columns will be present in the associated table.For example consider the following domain class:class Address {
Person person
}address table will have an additional two columns called person_first_name and person_last_name. If you wish the change the mapping of these columns then you can do so using the following technique:class Address {
Person person
static mapping = {
person {
column: "FirstName"
column: "LastName"
}
}
}5.5.2.6 データベースインデックス
To get the best performance out of your queries it is often necessary to tailor the table index definitions. How you tailor them is domain specific and a matter of monitoring usage patterns of your queries. With GORM's DSL you can specify which columns are used in which indexes:class Person {
String firstName
String address
static mapping = {
table 'people'
version false
id column: 'person_id'
firstName column: 'First_Name', index: 'Name_Idx'
address column: 'Address', index: 'Name_Idx,Address_Index'
}
}index attribute; in this example index:'Name_Idx, Address_Index' will cause an error.
5.5.2.7 楽観的ロックとバージョニング
As discussed in the section on Optimistic and Pessimistic Locking, by default GORM uses optimistic locking and automatically injects a version property into every class which is in turn mapped to a version column at the database level.If you're mapping to a legacy schema that doesn't have version columns (or there's some other reason why you don't want/need this feature) you can disable this with the version method:class Person {
…
static mapping = {
table 'people'
version false
}
}
If you disable optimistic locking you are essentially on your own with regards to concurrent updates and are open to the risk of users losing data (due to data overriding) unless you use pessimistic locking
Version columns types
By default Grails maps the version property as a Long that gets incremented by one each time an instance is updated. But Hibernate also supports using a Timestamp, for example:import java.sql.Timestampclass Person { …
Timestamp version static mapping = {
table 'people'
}
}Timestamp instead of a Long is that you combine the optimistic locking and last-updated semantics into a single column.
5.5.2.8 EagerとLazyフェッチング
Lazy Collections
As discussed in the section on Eager and Lazy fetching, GORM collections are lazily loaded by default but you can change this behaviour with the ORM DSL. There are several options available to you, but the most common ones are:
- lazy: false
- fetch: 'join'
and they're used like this:class Person { String firstName
Pet pet static hasMany = [addresses: Address] static mapping = {
addresses lazy: false
pet fetch: 'join'
}
}class Address {
String street
String postCode
}class Pet {
String name
}lazy: false , ensures that when a Person instance is loaded, its addresses collection is loaded at the same time with a second SELECT. The second option is basically the same, except the collection is loaded with a JOIN rather than another SELECT. Typically you want to reduce the number of queries, so fetch: 'join' is the more appropriate option. On the other hand, it could feasibly be the more expensive approach if your domain model and data result in more and larger results than would otherwise be necessary.For more advanced users, the other settings available are:
- batchSize: N
- lazy: false, batchSize: N
where N is an integer. These let you fetch results in batches, with one query per batch. As a simple example, consider this mapping for Person:class Person { String firstName
Pet pet static mapping = {
pet batchSize: 5
}
}Person instances, then when we access the first pet property, Hibernate will fetch that Pet plus the four next ones. You can get the same behaviour with eager loading by combining batchSize with the lazy: false option. You can find out more about these options in the Hibernate user guide and this primer on fetching strategies. Note that ORM DSL does not currently support the "subselect" fetching strategy.Lazy Single-Ended Associations
In GORM, one-to-one and many-to-one associations are by default lazy. Non-lazy single ended associations can be problematic when you load many entities because each non-lazy association will result in an extra SELECT statement. If the associated entities also have non-lazy associations, the number of queries grows significantly!Use the same technique as for lazy collections to make a one-to-one or many-to-one association non-lazy/eager:class Person {
String firstName
}class Address { String street
String postCode static belongsTo = [person: Person] static mapping = {
person lazy: false
}
}Person instance (through the person property) whenever an Address is loaded.Lazy Single-Ended Associations and Proxies
Hibernate uses runtime-generated proxies to facilitate single-ended lazy associations; Hibernate dynamically subclasses the entity class to create the proxy.Consider the previous example but with a lazily-loaded person association: Hibernate will set the person property to a proxy that is a subclass of Person. When you call any of the getters (except for the id property) or setters on that proxy, Hibernate will load the entity from the database.Unfortunately this technique can produce surprising results. Consider the following example classes:class Pet {
String name
}class Dog extends Pet {
}class Person {
String name
Pet pet
}Person instance with a Dog as the pet. The following code will work as you would expect:
def person = Person.get(1)
assert person.pet instanceof Dog
assert Pet.get(person.petId) instanceof Dog
def person = Person.get(1)
assert person.pet instanceof Dog
assert Pet.list()[0] instanceof Dog
assert Pet.list()[0] instanceof Dog
Person instance, Hibernate creates a proxy for its pet relation and attaches it to the session. Once that happens, whenever you retrieve that Pet instance with a query, a get(), or the pet relation within the same session , Hibernate gives you the proxy.Fortunately for us, GORM automatically unwraps the proxy when you use get() and findBy*(), or when you directly access the relation. That means you don't have to worry at all about proxies in the majority of cases. But GORM doesn't do that for objects returned with a query that returns a list, such as list() and findAllBy*(). However, if Hibernate hasn't attached the proxy to the session, those queries will return the real instances - hence why the last example works.You can protect yourself to a degree from this problem by using the instanceOf method by GORM:def person = Person.get(1)
assert Pet.list()[0].instanceOf(Dog)
ClassCastException because the first pet in the list is a proxy instance with a class that is neither Dog nor a sub-class of Dog:def person = Person.get(1)
Dog pet = Pet.list()[0]
Dog properties or methods on the instance without any problems.These days it's rare that you will come across this issue, but it's best to be aware of it just in case. At least you will know why such an error occurs and be able to work around it.
5.5.2.9 カスケードの振る舞いを変える
As described in the section on cascading updates, the primary mechanism to control the way updates and deletes cascade from one association to another is the static belongsTo property.However, the ORM DSL gives you complete access to Hibernate's transitive persistence capabilities using the cascade attribute.Valid settings for the cascade attribute include:
merge - merges the state of a detached associationsave-update - cascades only saves and updates to an associationdelete - cascades only deletes to an associationlock - useful if a pessimistic lock should be cascaded to its associationsrefresh - cascades refreshes to an associationevict - cascades evictions (equivalent to discard() in GORM) to associations if setall - cascade all operations to associationsall-delete-orphan - Applies only to one-to-many associations and indicates that when a child is removed from an association then it should be automatically deleted. Children are also deleted when the parent is.
It is advisable to read the section in the Hibernate documentation on transitive persistence to obtain a better understanding of the different cascade styles and recommendations for their usage
To specify the cascade attribute simply define one or more (comma-separated) of the aforementioned settings as its value:class Person { String firstName static hasMany = [addresses: Address] static mapping = {
addresses cascade: "all-delete-orphan"
}
}class Address {
String street
String postCode
}5.5.2.10 Hibernateユーザ定義型
You saw in an earlier section that you can use composition (with the embedded property) to break a table into multiple objects. You can achieve a similar effect with Hibernate's custom user types. These are not domain classes themselves, but plain Java or Groovy classes. Each of these types also has a corresponding "meta-type" class that implements org.hibernate.usertype.UserType.The Hibernate reference manual has some information on custom types, but here we will focus on how to map them in Grails. Let's start by taking a look at a simple domain class that uses an old-fashioned (pre-Java 1.5) type-safe enum class:class Book { String title
String author
Rating rating static mapping = {
rating type: RatingUserType
}
}rating field the enum type and set the property's type in the custom mapping to the corresponding UserType implementation. That's all you have to do to start using your custom type. If you want, you can also use the other column settings such as "column" to change the column name and "index" to add it to an index.Custom types aren't limited to just a single column - they can be mapped to as many columns as you want. In such cases you explicitly define in the mapping what columns to use, since Hibernate can only use the property name for a single column. Fortunately, Grails lets you map multiple columns to a property using this syntax:class Book { String title
Name author
Rating rating static mapping = {
name type: NameUserType, {
column name: "first_name"
column name: "last_name"
}
rating type: RatingUserType
}
}author property. You'll be pleased to know that you can also use some of the normal column/property mapping attributes in the column definitions. For example:column name: "first_name", index: "my_idx", unique: true
type, cascade, lazy, cache, and joinTable.One thing to bear in mind with custom types is that they define the SQL types for the corresponding database columns. That helps take the burden of configuring them yourself, but what happens if you have a legacy database that uses a different SQL type for one of the columns? In that case, override the column's SQL type using the sqlType attribute:class Book { String title
Name author
Rating rating static mapping = {
name type: NameUserType, {
column name: "first_name", sqlType: "text"
column name: "last_name", sqlType: "text"
}
rating type: RatingUserType, sqlType: "text"
}
}5.5.2.11 派生プロパティ
A derived property is one that takes its value from a SQL expression, often but not necessarily based on the value of one or more other persistent properties. Consider a Product class like this:class Product {
Float price
Float taxRate
Float tax
}tax property is derived based on the value of price and taxRate properties then is probably no need to persist the tax property. The SQL used to derive the value of a derived property may be expressed in the ORM DSL like this:class Product {
Float price
Float taxRate
Float tax static mapping = {
tax formula: 'PRICE * TAX_RATE'
}
}PRICE and TAX_RATE instead of price and taxRate.With that in place, when a Product is retrieved with something like Product.get(42), the SQL that is generated to support that will look something like this:select
product0_.id as id1_0_,
product0_.version as version1_0_,
product0_.price as price1_0_,
product0_.tax_rate as tax4_1_0_,
product0_.PRICE * product0_.TAX_RATE as formula1_0_
from
product product0_
where
product0_.id=?tax property is derived at runtime and not stored in the database it might seem that the same effect could be achieved by adding a method like getTax() to the Product class that simply returns the product of the taxRate and price properties. With an approach like that you would give up the ability query the database based on the value of the tax property. Using a derived property allows exactly that. To retrieve all Product objects that have a tax value greater than 21.12 you could execute a query like this:Product.findAllByTaxGreaterThan(21.12)
Product.withCriteria {
gt 'tax', 21.12f
}select
this_.id as id1_0_,
this_.version as version1_0_,
this_.price as price1_0_,
this_.tax_rate as tax4_1_0_,
this_.PRICE * this_.TAX_RATE as formula1_0_
from
product this_
where
this_.PRICE * this_.TAX_RATE>?
Because the value of a derived property is generated in the database and depends on the execution of SQL code, derived properties may not have GORM constraints applied to them. If constraints are specified for a derived property, they will be ignored.
5.5.2.12 命名標準のカスタマイズ
By default Grails uses Hibernate's ImprovedNamingStrategy to convert domain class Class and field names to SQL table and column names by converting from camel-cased Strings to ones that use underscores as word separators. You can customize these on a per-instance basis in the mapping closure but if there's a consistent pattern you can specify a different NamingStrategy class to use.Configure the class name to be used in grails-app/conf/DataSource.groovy in the hibernate section, e.g.dataSource {
pooled = true
dbCreate = "create-drop"
…
}hibernate {
cache.use_second_level_cache = true
…
naming_strategy = com.myco.myproj.CustomNamingStrategy
}package com.myco.myprojimport org.hibernate.cfg.ImprovedNamingStrategy
import org.hibernate.util.StringHelperclass CustomNamingStrategy extends ImprovedNamingStrategy { String classToTableName(String className) {
"table_" + StringHelper.unqualify(className)
} String propertyToColumnName(String propertyName) {
"col_" + StringHelper.unqualify(propertyName)
}
}5.5.3 デフォルトソート順
You can sort objects using query arguments such as those found in the list method:def airports = Airport.list(sort:'name')
class Airport {
…
static mapping = {
sort "name"
}
}Airports will by default be sorted by the airport name. If you also want to change the sort order , use this syntax:class Airport {
…
static mapping = {
sort name: "desc"
}
}class Airport {
…
static hasMany = [flights: Flight] static mapping = {
flights sort: 'number', order: 'desc'
}
}flights collection will always be sorted in descending order of flight number.
These mappings will not work for default unidirectional one-to-many or many-to-many relationships because they involve a join table. See this issue for more details. Consider using a SortedSet or queries with sort parameters to fetch the data you need.
5.6 プログラマチックトランザクション
Grails is built on Spring and uses Spring's Transaction abstraction for dealing with programmatic transactions. However, GORM classes have been enhanced to make this simpler with the withTransaction method. This method has a single parameter, a Closure, which has a single parameter which is a Spring TransactionStatus instance.Here's an example of using withTransaction in a controller methods:def transferFunds() {
Account.withTransaction { status ->
def source = Account.get(params.from)
def dest = Account.get(params.to) def amount = params.amount.toInteger()
if (source.active) {
if (dest.active) {
source.balance -= amount
dest.amount += amount
}
else {
status.setRollbackOnly()
}
}
}
}Exception or Error (but not a checked Exception, even though Groovy doesn't require that you catch checked exceptions) is thrown during the process the transaction will automatically be rolled back.You can also use "save points" to rollback a transaction to a particular point in time if you don't want to rollback the entire transaction. This can be achieved through the use of Spring's SavePointManager interface.The withTransaction method deals with the begin/commit/rollback logic for you within the scope of the block.
5.7 GORM と制約
Although constraints are covered in the Validation section, it is important to mention them here as some of the constraints can affect the way in which the database schema is generated.Where feasible, Grails uses a domain class's constraints to influence the database columns generated for the corresponding domain class properties.Consider the following example. Suppose we have a domain model with the following properties:String name
String description
| Column | Data Type |
|---|
| name | varchar(255) |
| description | varchar(255) |
But perhaps the business rules for this domain class state that a description can be up to 1000 characters in length. If that were the case, we would likely define the column as follows if we were creating the table with an SQL script.| Column | Data Type |
|---|
| description | TEXT |
Chances are we would also want to have some application-based validation to make sure we don't exceed that 1000 character limit before we persist any records. In Grails, we achieve this validation with constraints. We would add the following constraint declaration to the domain class.static constraints = {
description maxSize: 1000
}Constraints Affecting String Properties
If either the maxSize or the size constraint is defined, Grails sets the maximum column length based on the constraint value.In general, it's not advisable to use both constraints on the same domain class property. However, if both the maxSize constraint and the size constraint are defined, then Grails sets the column length to the minimum of the maxSize constraint and the upper bound of the size constraint. (Grails uses the minimum of the two, because any length that exceeds that minimum will result in a validation error.)If the inList constraint is defined (and the maxSize and the size constraints are not defined), then Grails sets the maximum column length based on the length of the longest string in the list of valid values. For example, given a list including values "Java", "Groovy", and "C++", Grails would set the column length to 6 (i.e., the number of characters in the string "Groovy").Constraints Affecting Numeric Properties
If the max, min, or range constraint is defined, Grails attempts to set the column precision based on the constraint value. (The success of this attempted influence is largely dependent on how Hibernate interacts with the underlying DBMS.)In general, it's not advisable to combine the pair min/max and range constraints together on the same domain class property. However, if both of these constraints is defined, then Grails uses the minimum precision value from the constraints. (Grails uses the minimum of the two, because any length that exceeds that minimum precision will result in a validation error.)
If the scale constraint is defined, then Grails attempts to set the column scale based on the constraint value. This rule only applies to floating point numbers (i.e., java.lang.Float, java.Lang.Double, java.lang.BigDecimal, or subclasses of java.lang.BigDecimal). The success of this attempted influence is largely dependent on how Hibernate interacts with the underlying DBMS.The constraints define the minimum/maximum numeric values, and Grails derives the maximum number of digits for use in the precision. Keep in mind that specifying only one of min/max constraints will not affect schema generation (since there could be large negative value of property with max:100, for example), unless the specified constraint value requires more digits than default Hibernate column precision is (19 at the moment). For example:someFloatValue max: 1000000, scale: 3
someFloatValue DECIMAL(19, 3) // precision is default
someFloatValue max: 12345678901234567890, scale: 5
someFloatValue DECIMAL(25, 5) // precision = digits in max + scale
someFloatValue max: 100, min: -100000
someFloatValue DECIMAL(8, 2) // precision = digits in min + default scale
6 Webレイヤ
6.1 コントローラ
A controller handles requests and creates or prepares the response. A controller can generate the response directly or delegate to a view. To create a controller, simply create a class whose name ends with Controller in the grails-app/controllers directory (in a subdirectory if it's in a package).
コントローラはリクエストを処理してレスポンスの準備・作成を行います。コントローラはレスポンスをビューに委譲したり、直接返す事ができます。単純にgrails-app/controlersディレクトリに、クラス名称の最後をControllerにしたクラスを作成することで、コントローラを追加できます。(パッケージに入れる場合は、パッケージ名のサブディレクトリに作成します。)The default
URL Mapping configuration ensures that the first part of your controller name is mapped to a URI and each action defined within your controller maps to URIs within the controller name URI.
6.1.1 コントローラとアクションの理解
コントローラを作成する
create-controllerまたはgenerate-controllerコマンドでコントローラが作成できます。Grailsプロジェクトのルートで以下のようにコマンドを実行します。grails create-controller book
The command will create a controller at the location grails-app/controllers/myapp/BookController.groovy:
コマンドを実行するとgrails-app/controllers/myapp/BookController.groovyにコントローラを生成します。package myappclass BookController { def index() { }
}where "myapp" will be the name of your application, the default package name if one isn't specified.
パッケージ名を指定しない場合は、"myapp"というアプリケーション名であれば、自動的にデフォルトパッケージとして生成されます。BookController by default maps to the /book URI (relative to your application root).
デフォルトでは、BookControllerは、URIが /bookとなります。(アプリケーションのコンテキストルートからの相対パス)
The create-controller and generate-controller commands are just for convenience and you can just as easily create controllers using your favorite text editor or IDE
create-controllerとgenerate-controllerコマンドは、簡単にコントローラを生成する便利なコマンドですが、IDEやテキストエディタの機能でクラスを作成してもかまいません。
create-controllerとgenerate-controllerコマンドは、簡単にコントローラを生成する便利なコマンドですが、IDEやテキストエディタの機能でクラスを作成してもかまいません。
アクションの作成
A controller can have multiple public action methods; each one maps to a URI:
コントローラは複数のアクションメソッドを持つことができます。それぞれURIにマップされます:class BookController { def list() { // do controller logic
// create model return model
}
}This example maps to the /book/list URI by default thanks to the property being named list.
この例では、アクションメソッド名がlistなので、URIは/book/listにマップされます。パブリックメソッドをアクションとする
In earlier versions of Grails actions were implemented with Closures. This is still supported, but the preferred approach is to use methods.
以前のバージョンまでは、アクションがクロージャで実装されてました。この方式はまだサポートされています。ただし今後のアクションの実装はメソッドを使用することを推奨します。Leveraging methods instead of Closure properties has some advantages:
クロージャではなく、メソッドにすることによって以下の利点があります:
- Memory efficient
- Allow use of stateless controllers (
singleton scope)
- You can override actions from subclasses and call the overridden superclass method with
super.actionName()
- Methods can be intercepted with standard proxying mechanisms, something that is complicated to do with Closures since they're fields.
- メモリ効率
- ステートレスコントローラの使用 (
シングルトンスコープ指定)
- サブクラスでのアクションのオーバーライドが可能。スーパークラスのアクションメソッド呼び出しが可能。
super.actionName()
- クロージャはフィールドのため複雑だった、スタンダードなプロキシを使用したメソッドのインターセプトが可能。
If you prefer the Closure syntax or have older controller classes created in earlier versions of Grails and still want the advantages of using methods, you can set the grails.compile.artefacts.closures.convert property to true in BuildConfig.groovy:
クロージャを使用したい場合や、旧バージョンで作られたコントローラを使用しながら、メソッドの利点も欲しい場合は、BuildConfig.groovyに、 grails.compile.artefacts.closures.convertを定義します:
grails.compile.artefacts.closures.convert = true
and a compile-time AST transformation will convert your Closures to methods in the generated bytecode.
この定義をすることで、AST変換を使用してクロージャをメソッドに変換したバイトコードを生成します。
If a controller class extends some other class which is not defined under the grails-app/controllers/ directory, methods inherited from that class are not converted to controller actions. If the intent is to expose those inherited methods as controller actions the methods may be overridden in the subclass and the subclass method may invoke the method in the super class.
デフォルトアクション
A controller has the concept of a default URI that maps to the root URI of the controller, for example /book for BookController. The action that is called when the default URI is requested is dictated by the following rules:
コントローラのルートURIににデフォルトURIをマップする概念をもっています。例としてBookControllerの場合は /bookになります。デフォルトURIが呼ばれたときに呼ばれるアクションは以下のルールになっています:
- If there is only one action, it's the default
- If you have an action named
index, it's the default
- Alternatively you can set it explicitly with the
defaultAction property:
- アクションが1つの場合は、それがデフォルトになります。
indexという名称のアクションがある場合は、それがデフォルトになります。defaultActionを定義して指定できます。
static defaultAction = "list"
6.1.2 コントローラとスコープ
使用可能なスコープ
Scopes are hash-like objects where you can store variables. The following scopes are available to controllers:
スコープは、変数を収納可能なハッシュのようなオブジェクトです。コントローラでは、次のスコープが使用可能です。
- servletContext - Also known as application scope, this scope lets you share state across the entire web application. The servletContext is an instance of ServletContext
- session - The session allows associating state with a given user and typically uses cookies to associate a session with a client. The session object is an instance of HttpSession
- request - The request object allows the storage of objects for the current request only. The request object is an instance of HttpServletRequest
- params - Mutable map of incoming request query string or POST parameters
- flash - See below
スコープへのアクセス
Scopes can be accessed using the variable names above in combination with Groovy's array index operator, even on classes provided by the Servlet API such as the
HttpServletRequest:
class BookController {
def find() {
def findBy = params["findBy"]
def appContext = request["foo"]
def loggedUser = session["logged_user"]
}
}You can also access values within scopes using the de-reference operator, making the syntax even more clear:
フィールド参照オペレータを使用してスコープの変数を参照すれば、シンタックスもっと簡潔にすることもできます:class BookController {
def find() {
def findBy = params.findBy
def appContext = request.foo
def loggedUser = session.logged_user
}
}This is one of the ways that Grails unifies access to the different scopes.
これはGrailsでの、様々なスコープにアクセスする一例です。フラッシュスコープを使用する
Grails supports the concept of
flash scope as a temporary store to make attributes available for this request and the next request only. Afterwards the attributes are cleared. This is useful for setting a message directly before redirecting, for example:
def delete() {
def b = Book.get(params.id)
if (!b) {
flash.message = "User not found for id ${params.id}"
redirect(action:list)
}
… // remaining code
}When the list action is requested, the message value will be in scope and can be used to display an information message. It will be removed from the flash scope after this second request.
この例では、deleteアクションに対してリクエストをすると、リダイレクトされてlistアクションが実行された際に、flashスコープのmessageに代入した内容がメッセージ表示等に使用可能になります。このリダイレクトされたlistアクション(deleteの次のアクション)の処理が終了したら、flashスコープの内容が削除されます。Note that the attribute name can be anything you want, and the values are often strings used to display messages, but can be any object type.
メッセージ表示などで文字列型が頻繁に使用されますが、flashスコープに一時的に保持する値は、どのようなオブジェクトでもかまいません。コントローラのスコープ設定
By default, a new controller instance is created for each request. In fact, because the controller is prototype scoped, it is thread-safe since each request happens on its own thread.
デフォルトでは、コントローラはリクエスト毎にインスタンスが生成されます。コントローラのスコープはprototypeになっているため、リクエストがそれぞれのスレッドを持っているので、スレッドセーフになります。You can change this behaviour by placing a controller in a particular scope. The supported scopes are:
コントローラにスコープを指定することで振る舞いを変更できます。サポートされているスコープは:
prototype (default) - A new controller will be created for each request (recommended for actions as Closure properties)session - One controller is created for the scope of a user sessionsingleton - Only one instance of the controller ever exists (recommended for actions as methods)
prototype (デフォルト) - リクエスト毎にコントローラが生成されます。(クロージャでアクションを推奨)session - ユーザのセッションを通して1個のコントローラが生成されます。singleton - 1個のコントローラのみが存在する状態です。(メソッドでのアクションをお勧めします)
To enable one of the scopes, add a static scope property to your class with one of the valid scope values listed above, for example
スコープを定義するには、コントローラクラスに、static scope 変数で指定したいスコープを定義します。以下が例になります。static scope = "singleton"
You can define the default strategy under in Config.groovy with the grails.controllers.defaultScope key, for example:
デフォルトスコープは、Config.groovyにgrails.controllers.defaultScopeを指定する事で変更できます。grails.controllers.defaultScope = "singleton"
Use scoped controllers wisely. For instance, we don't recommend having any properties in a singleton-scoped controller since they will be shared for all requests. Setting a default scope other than prototype may also lead to unexpected behaviors if you have controllers provided by installed plugins that expect that the scope is prototype.
コントローラのスコープは使用状況を考えてお使いください。例えば、シングルトンのコントローラは、_全ての_リクエストで共有されるためプロパティを持つべきではありません。デフォルトで定義されているスコープのprototype を変更することで、プラグインなどで提供されたコントローラがprotopypeを前提で実装されている場合があるので注意しましょう
6.1.3 モデルとビュー
モデルを返す
A model is a Map that the view uses when rendering. The keys within that Map correspond to variable names accessible by the view. There are a couple of ways to return a model. First, you can explicitly return a Map instance:
モデルはビューを描写する際に使用するMapインスタンスです。ビュー内でMapのキーに一致する変数名が使用できます。モデルを返すには、数種類の方法があります。先ずはじめにMapインスタンスを明示的に返す方法です。def show() {
[book: Book.get(params.id)]
}
The above does
not reflect what you should use with the scaffolding views - see the
scaffolding section for more details.
If no explicit model is returned the controller's properties will be used as the model, thus allowing you to write code like this:
以下の例のように、明示的にモデルを返さない場合は、コントローラのプロパティがモデルとして使用されます。class BookController { List books
List authors def list() {
books = Book.list()
authors = Author.list()
}
}
This is possible due to the fact that controllers are prototype scoped. In other words a new controller is created for each request. Otherwise code such as the above would not be thread-safe, and all users would share the same data.
これはコントローラのスコープがprototype(リクエスト毎にコントローラが生成される)の場合に可能な方法です。他の場合はスレッドセーフではありません。
In the above example the books and authors properties will be available in the view.
上記の例では、 プロパティのbookとauthorsがビューで参照できます。A more advanced approach is to return an instance of the Spring
ModelAndView class:
import org.springframework.web.servlet.ModelAndViewdef index() {
// get some books just for the index page, perhaps your favorites
def favoriteBooks = ... // forward to the list view to show them
return new ModelAndView("/book/list", [ bookList : favoriteBooks ])
}One thing to bear in mind is that certain variable names can not be used in your model:
一つ覚えておいて欲しいのが、一定の変数名が、モデル使用できないという事です。
Currently, no error will be reported if you do use them, but this will hopefully change in a future version of Grails.
現状では使用したとしてもエラーが出ることはありませんが、将来的には変わるかもしれません。ビューの選択
Selecting the View
In both of the previous two examples there was no code that specified which
view to render. So how does Grails know which one to pick? The answer lies in the conventions. Grails will look for a view at the location
grails-app/views/book/show.gsp for this
list action:
grails-app/views/book/show.gspをビューとして使用します。class BookController {
def show() {
[book: Book.get(params.id)]
}
}To render a different view, use the
render method:
def show() {
def map = [book: Book.get(params.id)]
render(view: "display", model: map)
}In this case Grails will attempt to render a view at the location grails-app/views/book/display.gsp. Notice that Grails automatically qualifies the view location with the book directory of the grails-app/views directory. This is convenient, but to access shared views you need instead you can use an absolute path instead of a relative one:
上記の例では、grails-app/views/book/display.gspの描写を試みます。注目する場所はGrailsは自動的にコントローラがbookであれば、grails-app/viewsディレクトリのbookディレクトリを、指定しなくても取得する所です。これは便利なのですが、ビューを共有する場合は、パスを指定する必要があります。def show() {
def map = [book: Book.get(params.id)]
render(view: "/shared/display", model: map)
}In this case Grails will attempt to render a view at the location grails-app/views/shared/display.gsp.
上記の例では、grails-app/views/shared/display.gspの描写を試みます。Grails also supports JSPs as views, so if a GSP isn't found in the expected location but a JSP is, it will be used instead.
Grailsでは、ビューにJSPもサポートしています。これによって、参照したパスにGSPが存在しない場合は、JSPが代わりに使用されます。レスポンスの描写
Sometimes it's easier (for example with Ajax applications) to render snippets of text or code to the response directly from the controller. For this, the highly flexible render method can be used:
直接文字列をコントローラからレスポンス(例としてAjaxアプリケーションなど)したい場合、とてもフレキシブルなrenderメソッドを使うと簡単にできます。The above code writes the text "Hello World!" to the response. Other examples include:
上記の例ではレスポンスに"Hello World!"を返します。他の例として:// マークアップを返す
render {
for (b in books) {
div(id: b.id, b.title)
}
}// 指定したビューを描写
render(view: 'show')
// コレクションの中身をそれぞれ指定したテンプレートを適応して描写
render(template: 'book_template', collection: Book.list())
// 文字列を指定したエンコーディングとコンテントタイプで描写
render(text: "<xml>some xml</xml>", contentType: "text/xml", encoding: "UTF-8")
If you plan on using Groovy's MarkupBuilder to generate HTML for use with the render method be careful of naming clashes between HTML elements and Grails tags, for example:
renderメソッドでGroovyのMarkupBuilderを使用してHTMLを生成する場合は、HTMLエレメント名とGrailsタグとの名称衝突を気をつけましょう。(Grailsのタグはアクション内部でメソッドとして使用できるため)import groovy.xml.MarkupBuilder
…
def login() {
def writer = new StringWriter()
def builder = new MarkupBuilder(writer)
builder.html {
head {
title 'Log in'
}
body {
h1 'Hello'
form {
}
}
} def html = writer.toString()
render html
}This will actually
call the form tag (which will return some text that will be ignored by the
MarkupBuilder). To correctly output a
<form> element, use the following:
<form>タグを正常に生成するには、以下のようにbuilder.formとします。def login() {
// …
body {
h1 'Hello'
builder.form {
}
}
// …
}6.1.4 リダイレクトとチェイン
リダイレクト
Redirects
Actions can be redirected using the
redirect controller method:
class OverviewController { def login() {} def find() {
if (!session.user)
redirect(action: 'login')
return
}
…
}
}sendRedirectメソッドを使用しています。The redirect method expects one of:
redirectメソッドでは以下のいずれかのように使用します:* Another closure within the same controller class:
*同じコントローラ内のアクションクロージャ(プロパティで)の指定:// Call the login action within the same class
redirect(action: login)
* The name of an action (and controller name if the redirect isn't to an action in the current controller):
- アクション名称でのしていと、別のコントローラのアクションの場合はコントローラの指定:
// Also redirects to the index action in the home controller
redirect(controller: 'home', action: 'index')
* A URI for a resource relative the application context path:
- アプリケーションコンテキストパス内のリソースのURI:
// Redirect to an explicit URI
redirect(uri: "/login.html")
* Or a full URL:
// Redirect to a URL
redirect(url: "http://grails.org")
Parameters can optionally be passed from one action to the next using the params argument of the method:
メソッドのparams引数をにパラメータを指定することで、アクションへのパラメータを渡せます:redirect(action: 'myaction', params: [myparam: "myvalue"])
These parameters are made available through the
params dynamic property that accesses request parameters. If a parameter is specified with the same name as a request parameter, the request parameter is overridden and the controller parameter is used.
Since the params object is a Map, you can use it to pass the current request parameters from one action to the next:
paramsオブジェクトはMapなので、以下のように、そのまま全てのリクエストパラメータを次のアクションに渡すことができます:redirect(action: "next", params: params)
Finally, you can also include a fragment in the target URI:
ターゲットURIに、フラグメントを含めることもできます:redirect(controller: "test", action: "show", fragment: "profile")
which will (depending on the URL mappings) redirect to something like "/myapp/test/show#profile".
この例では(URLマッピング定義によりますが)、リダイレクトは"/myapp/test/show#profile"になります。チェイニング
Chaining
Actions can also be chained. Chaining allows the model to be retained from one action to the next. For example calling the first action in this action:
アクションのチェインが可能です。チェインではアクションからアクションへのモデル参照が可能です。以下の例でアクションfirstを呼び出します:class ExampleChainController { def first() {
chain(action: second, model: [one: 1])
} def second () {
chain(action: third, model: [two: 2])
} def third() {
[three: 3])
}
}results in the model:
結果モデルは以下のようになります:[one: 1, two: 2, three: 3]
The model can be accessed in subsequent controller actions in the chain using the chainModel map. This dynamic property only exists in actions following the call to the chain method:
途中でコントローラアクションからモデルにアクセスするには、chainModelマップを使用します。この動的プロパティはchainメソッドから呼ばれた時のみに存在します。class ChainController { def nextInChain() {
def model = chainModel.myModel
…
}
}Like the redirect method you can also pass parameters to the chain method:
redirectメソッドと同じように、chainメソッドにパラメータを渡すこともできます:chain(action: "action1", model: [one: 1], params: [myparam: "param1"])
6.1.5 コントローラ・インターセプター
Often it is useful to intercept processing based on either request, session or application state. This can be achieved with action interceptors. There are currently two types of interceptors: before and after.
リクエスト、セッションまたはアプリケーションで処理のインターセプトができると、たいへん役に立ちます。これはアクションインターセプターで達成できます。現在2種類のインターセプターbeforeとafterがあります。
If your interceptor is likely to apply to more than one controller, you are almost certainly better off writing a
Filter. Filters can be applied to multiple controllers or URIs without the need to change the logic of each controller
ビフォア・インターセプション
Before Interception
The beforeInterceptor intercepts processing before the action is executed. If it returns false then the intercepted action will not be executed. The interceptor can be defined for all actions in a controller as follows:
beforeInterceptorは、アクションが実行される前に処理の追加を行うことができます。beforeInterceptorで、falseを返すとアクションは実行されません。コントローラ内の全てのアクションにインターセプターを定義するには以下のようにします。def beforeInterceptor = {
println "Tracing action ${actionUri}"
}The above is declared inside the body of the controller definition. It will be executed before all actions and does not interfere with processing. A common use case is very simplistic authentication:
上記はコントローラ内部に設定します。全てのアクションの前に実行され処理を干渉することはありません。
他によくある実装例としては簡単な認証などです:
def beforeInterceptor = [action: this.&auth, except: 'login']// defined with private scope, so it's not considered an action
private auth() {
if (!session.user) {
redirect(action: 'login')
return false
}
}def login() {
// display login page
}The above code defines a method called auth. A private method is used so that it is not exposed as an action to the outside world. The beforeInterceptor then defines an interceptor that is used on all actions except the login action and it executes the auth method. The auth method is referenced using Groovy's method pointer syntax. Within the method it detects whether there is a user in the session, and if not it redirects to the login action and returns false, causing the intercepted action to not be processed.
上記の例では先ず、authメソッドを定義します。外部にアクションとして認識されないようにprivateメソッドにします。
今回は、アクション名がlogin以外の全てのアクションで実行されるように、実行するメソッドをaction:に指定し、除外するアクション'login'を except:に指定して、beforeInterceptorを定義します。authメソッドはGroovyのメソッドポインターシンタックスで指定します。これで、authの処理によって、sessionにuser変数が見つからなかった場合は'login'アクションへリダイレクトしてfalseを返しアクションを実行しないインターセプターが行えます。
アフター・インターセプション
After Interception
Use the afterInterceptor property to define an interceptor that is executed after an action:
afterInterceptorは、アクションが実行される後に処理の追加を行うことができます:def afterInterceptor = { model ->
println "Tracing action ${actionUri}"
}The after interceptor takes the resulting model as an argument and can hence manipulate the model or response.
アフター・インターセプターでは、処理結果のモデルを引数として取得して、モデルやレスポンスを操作することができます。An after interceptor may also modify the Spring MVC
ModelAndView object prior to rendering. In this case, the above example becomes:
def afterInterceptor = { model, modelAndView ->
println "Current view is ${modelAndView.viewName}"
if (model.someVar) modelAndView.viewName = "/mycontroller/someotherview"
println "View is now ${modelAndView.viewName}"
}This allows the view to be changed based on the model returned by the current action. Note that the modelAndView may be null if the action being intercepted called redirect or render.
この例では返されたモデルの内容を元にビューを変更しています。インターセプトされた、アクションがredirectやrenderを呼び出している場合は、modelANdViewはnullになります。インターセプションの条件指定
Interception Conditions
Rails users will be familiar with the authentication example and how the 'except' condition was used when executing the interceptor (interceptors are called 'filters' in Rails; this terminology conflicts with Servlet filter terminology in Java):
'excepr'条件は、Railsユーザにとってインターセプターを使う時はお馴染みだと思います。(Railsではインターセプターはフィルターと呼ばれています。Javaでは用語的にサーブレットフィルターと衝突するのでインターセプターとしています)def beforeInterceptor = [action: this.&auth, except: 'login']
This executes the interceptor for all actions except the specified action. A list of actions can also be defined as follows:
上記の例では、exceptで指定したアクション以外でインターセプターを実行します。次のように、複数指定する場合はリストで指定します:def beforeInterceptor = [action: this.&auth, except: ['login', 'register']]
The other supported condition is 'only', this executes the interceptor for only the specified action(s):
指定したアクションのみでインターセプターを実行する場合は、'only'を使用します:def beforeInterceptor = [action: this.&auth, only: ['secure']]
6.1.6 データバインディング
Data binding is the act of "binding" incoming request parameters onto the properties of an object or an entire graph of objects. Data binding should deal with all necessary type conversion since request parameters, which are typically delivered by a form submission, are always strings whilst the properties of a Groovy or Java object may well not be.
データバインディングとは、受信したリクエストパラメータを、オブジェクトのプロパティまたオブジェクト構造へ結合させる機能です。データバインディングでは、フォームから送信された文字列のリクエストパラメータを、必要な型への変換を行います。Grails uses
Spring's underlying data binding capability to perform data binding.
モデルにリクエストデータをバインドする
Binding Request Data to the Model
There are two ways to bind request parameters onto the properties of a domain class. The first involves using a domain classes' Map constructor:
リクエストパラメータをドメインクラスのプロパティへバインドする2通りの方法があります。1つめはドメインクラスのMapを指定するコンストラクタを使用します。def save() {
def b = new Book(params)
b.save()
}The data binding happens within the code
new Book(params). By passing the
params object to the domain class constructor Grails automatically recognizes that you are trying to bind from request parameters. So if we had an incoming request like:
new Book(params)の部分でデータバインディングが実行されます。paramsオブジェクトをドメインクラスのコンストラクタに渡すことで、Grailsが自動にリクエストパラメータを認識してバインドします。例えば以下の例のようなリクエストを受信したとします。/book/save?title=The%20Stand&author=Stephen%20King
Then the
title and
author request parameters would automatically be set on the domain class. You can use the
properties property to perform data binding onto an existing instance:
titleとauthorが、自動的にドメインクラスへセットされます。もう一つの方法として、既存のドメインクラスインスタンスへデータバインディングを行う方法として、インスタンスのpropertiesプロパティにparamsをセットする方法があります。def save() {
def b = Book.get(params.id)
b.properties = params
b.save()
}This has the same effect as using the implicit constructor.
上記の例で先ほどのコンストラクタと同じ結果となります。シングルエンデッド・アソシエーション(単一終端関連)のデータバインディング
Data binding and Single-ended Associations
If you have a one-to-one or many-to-one association you can use Grails' data binding capability to update these relationships too. For example if you have an incoming request such as:
one-to-oneまたはmany-to-oneなどの関連も、Grailsデータバインディングの機能で更新可能です。例として次のようなリクエストを受信したとします:Grails will automatically detect the .id suffix on the request parameter and look up the Author instance for the given id when doing data binding such as:
同じ方法で、Grailsがリクエストパラメータの.id接尾辞を自動認識して、与えられたidで該当するAuthorインスタンスを検索してデータバインディングを行いますAn association property can be set to null by passing the literal String "null". For example:
次のように、関連のプロパティに文字列で"null"と指定することでnullをセットする事ができます/book/save?author.id=null
メニーエンデッド・アソシエーション(複数終端関連)のデータバインディング
Data Binding and Many-ended Associations
If you have a one-to-many or many-to-many association there are different techniques for data binding depending of the association type.
one-to-manyまたはmany-to-manyなどの関連には、それぞれの関連形式よって違ったデータバインディング方法があります。If you have a Set based association (the default for a hasMany) then the simplest way to populate an association is to send a list of identifiers. For example consider the usage of <g:select> below:
Setベースの関連(hasManyでのデフォルト)で、簡単に関連を設定するには、idのリストを送る方法が有ります。以下の例は<g:select>を使用した方法です:<g:select name="books"
from="${Book.list()}"
size="5" multiple="yes" optionKey="id"
value="${author?.books}" />This produces a select box that lets you select multiple values. In this case if you submit the form Grails will automatically use the identifiers from the select box to populate the books association.
このタグでは複数選択のセレクトボックスが生成されます。この例でフォームを送信すると、Grailsが自動的にセレクトボックスで選択されたidを使用して、booksの関連を設定します。However, if you have a scenario where you want to update the properties of the associated objects the this technique won't work. Instead you use the subscript operator:
ただしこの方法は、関連オブジェクトのプロパティを更新する場合は使用できません。代わりに添字演算子を使用します:<g:textField name="books[0].title" value="the Stand" />
<g:textField name="books[1].title" value="the Shining" />
However, with Set based association it is critical that you render the mark-up in the same order that you plan to do the update in. This is because a Set has no concept of order, so although we're referring to books0 and books1 it is not guaranteed that the order of the association will be correct on the server side unless you apply some explicit sorting yourself.
ただし、Setベースの関連では、マークアップ(HTML)が描写された順序とは同じ順序で更新されない危険性あります。 これはSetには順序という概念がなく、books[0]やbooks[1]と指定したとしても、サーバサイドでの関連のソートを明快に指定しない限り、順序が保証されないことになるからです。This is not a problem if you use List based associations, since a List has a defined order and an index you can refer to. This is also true of Map based associations.
Listベース関連の場合は、Listの順序とインデックスを指定することができるので問題有りません。Mapベース関連も同じ事がいえます。Note also that if the association you are binding to has a size of two and you refer to an element that is outside the size of association:
さらに注意するポイントとして、バインドする関連が2個の物に、それより多い数の場合は:<g:textField name="books[0].title" value="the Stand" />
<g:textField name="books[1].title" value="the Shining" />
<g:textField name="books[2].title" value="Red Madder" />
Then Grails will automatically create a new instance for you at the defined position. If you "skipped" a few elements in the middle:
Grailsが新たにインスタンスを指定したポジションに生成します。途中のいくつかのエレメントを飛ばした数値を指定した場合は:<g:textField name="books[0].title" value="the Stand" />
<g:textField name="books[1].title" value="the Shining" />
<g:textField name="books[5].title" value="Red Madder" />
Then Grails will automatically create instances in between. For example in the above case Grails will create 4 additional instances if the association being bound had a size of 2.
Grailsが間のインスタンスも自動的に生成します。上記のケースでは関連が2個の場合は、4個のインスタンスが追加されます。You can bind existing instances of the associated type to a List using the same .id syntax as you would use with a single-ended association. For example:
既存のインスタンスをList関連でバインドするには、単一終端関連と同じように.idシンタックスを使用します。例として:<g:select name="books[0].id" from="${bookList}"
value="${author?.books[0]?.id}" /><g:select name="books[1].id" from="${bookList}"
value="${author?.books[1]?.id}" /><g:select name="books[2].id" from="${bookList}"
value="${author?.books[2]?.id}" />Would allow individual entries in the books List to be selected separately.
この例では、別々に選択して、books Listの特定の場所にエントリを可能にします。Entries at particular indexes can be removed in the same way too. For example:
同じ方法で、個々のインデックスからエントリの削除も可能です:<g:select name="books[0].id"
from="${Book.list()}"
value="${author?.books[0]?.id}"
noSelection="['null': '']"/>Will render a select box that will remove the association at books0 if the empty option is chosen.
上記の例では、空のオプションを選択することで、book[0]の関連を削除します。Binding to a Map property works the same way except that the list index in the parameter name is replaced by the map key:
リストのインデックス数値をパラメータ名称にすることで、マップのキーとして認識されるので、Mapのプロパティも同じ方法で動作します:<g:select name="images[cover].id"
from="${Image.list()}"
value="${book?.images[cover]?.id}"
noSelection="['null': '']"/>This would bind the selected image into the Map property images under a key of "cover".
この例では、Mapプロパティimagesのキー"cover"に対してバインドされます。複数ドメインクラスでのデータバインディング
Data binding with Multiple domain classes
It is possible to bind data to multiple domain objects from the
params object.
For example so you have an incoming request to:
例として以下のようなリクエストがあったとします:/book/save?book.title=The%20Stand&author.name=Stephen%20King
You'll notice the difference with the above request is that each parameter has a prefix such as author. or book. which is used to isolate which parameters belong to which type. Grails' params object is like a multi-dimensional hash and you can index into it to isolate only a subset of the parameters to bind.
上記のリクエストでは、それぞれのパラメータにauthor.またbook.という接頭辞が付いていて、どちらの型(ドメインクラス)に属するかを区別しています。Grailsのparamsオブジェクトは多次元ハッシュのようになっており、それぞれバインドするためのパラメータサブセットとして区別されて索引されます。def b = new Book(params.book)
Notice how we use the prefix before the first dot of the book.title parameter to isolate only parameters below this level to bind. We could do the same with an Author domain class:
上記のように接頭辞bookをparams指定することで、ドメインクラスBookに対して、book.titleパラメータだけが区別されてバインドされます。ドメインクラスAuthorも同じように指定します。def a = new Author(params.author)
データバインディングとアクション引数
Data Binding and Action Arguments
Controller action arguments are subject to request parameter data binding. There are 2 categories of controller action arguments. The first category is command objects. Complex types are treated as command objects. See the Command Objects section of the user guide for details. The other category is basic object types. Supported types are the 8 primitives, their corresponding type wrappers and java.lang.String. The default behavior is to map request parameters to action arguments by name:class AccountingController { // accountNumber will be initialized with the value of params.accountNumber
// accountType will be initialized with params.accountType
def displayInvoice(String accountNumber, int accountType) {
// …
}
}params.accountType request parameter has to be converted to an int. If type conversion fails for any reason, the argument will have its default value per normal Java behavior (null for type wrapper references, false for booleans and zero for numbers) and a corresponding error will be added to the errors property of the defining controller./accounting/displayInvoice?accountNumber=B59786&accountType=bogusValue
controller.errors.hasErrors() will be true, controller.errors.errorCount will be equal to 1 and controller.errors.getFieldError('accountType') will contain the corresponding error.If the argument name does not match the name of the request parameter then the @grails.web.RequestParameter annotation may be applied to an argument to express the name of the request parameter which should be bound to that argument:import grails.web.RequestParameterclass AccountingController { // mainAccountNumber will be initialized with the value of params.accountNumber
// accountType will be initialized with params.accountType
def displayInvoice(@RequestParameter('accountNumber') String mainAccountNumber, int accountType) {
// …
}
}型変換エラーとデータバインディング
Data binding and type conversion errors
Sometimes when performing data binding it is not possible to convert a particular String into a particular target type. This results in a type conversion error. Grails will retain type conversion errors inside the
errors property of a Grails domain class. For example:
class Book {
…
URL publisherURL
}Here we have a domain class Book that uses the java.net.URL class to represent URLs. Given an incoming request such as:
ドメインクラスBookでURLを表すプロパティにjava.net.URLクラスを使用したとします。次のようなリクエストを受信したとします:/book/save?publisherURL=a-bad-url
it is not possible to bind the string a-bad-url to the publisherURL property as a type mismatch error occurs. You can check for these like this:
型違いエラーが起きるため、文字列a-bad-urlをpublisherURLにバインドすることはできません。次のようにしてエラーを確認します:def b = new Book(params)if (b.hasErrors()) {
println "The value ${b.errors.getFieldError('publisherURL').rejectedValue}" +
" is not a valid URL!"
}Although we have not yet covered error codes (for more information see the section on
Validation), for type conversion errors you would want a message from the
grails-app/i18n/messages.properties file to use for the error. You can use a generic error message handler such as:
grails-app/i18n/messages.propertiesを使用してメッセージを返す事もあると思います。次のような一般的なメッセージハンドラーを使用することもできますtypeMismatch.java.net.URL=The field {0} is not a valid URLOr a more specific one:
また、さらに対象を特定する場合は:typeMismatch.Book.publisherURL=The publisher URL you specified is not a valid URL
データバインディングとセキュリティ考慮
Data Binding and Security concerns
When batch updating properties from request parameters you need to be careful not to allow clients to bind malicious data to domain classes and be persisted in the database. You can limit what properties are bound to a given domain class using the subscript operator:
リクエストパラメータからのバッチ更新をする際は、クライアントからの悪意のあるデータを、ドメインクラスやデータベースへの永続化に反映させないように注意が必要です。添字演算子を使用してドメインクラスにバインドするプロパティを制限することができます。def p = Person.get(1)p.properties['firstName','lastName'] = params
In this case only the firstName and lastName properties will be bound.
上記の例では、firstNameとlastNameのみバインドされます。Another way to do this is is to use
Command Objects as the target of data binding instead of domain classes. Alternatively there is also the flexible
bindData method.
The bindData method allows the same data binding capability, but to arbitrary objects:
bindDataメソッドは任意のオブジェクトにデータバインディングが可能です:def p = new Person()
bindData(p, params)
The bindData method also lets you exclude certain parameters that you don't want updated:
bindDataメソッドでは、更新しないパラメータを除外する事が可能です:def p = new Person()
bindData(p, params, [exclude: 'dateOfBirth'])
Or include only certain properties:
または、指定したプロパティのみの更新も可能です:def p = new Person()
bindData(p, params, [include: ['firstName', 'lastName]])
Note that if an empty List is provided as a value for the include parameter then all fields will be subject to binding if they are not explicitly excluded.
6.1.7 XMLとJSONのレスポンス
renderメソッドでXMLを出力する
Using the render method to output XML
Grails supports a few different ways to produce XML and JSON responses. The first is the
render method.
The render method can be passed a block of code to do mark-up building in XML:
renderメソッドに、マークアップビルダーのコードブロックを渡してXML生成:def list() { def results = Book.list() render(contentType: "text/xml") {
books {
for (b in results) {
book(title: b.title)
}
}
}
}The result of this code would be something like:
このコードの結果は以下のようになります:<books>
<book title="The Stand" />
<book title="The Shining" />
</books>Be careful to avoid naming conflicts when using mark-up building. For example this code would produce an error:
マークアップビルダーを使用する際は、変数名称の衝突を回避する必要があります。例として次のコードはエラーになります:def list() { def books = Book.list() // naming conflict here render(contentType: "text/xml") {
books {
for (b in results) {
book(title: b.title)
}
}
}
}This is because there is local variable books which Groovy attempts to invoke as a method.
この例では、Groovyがローカル変数のbooksをメソッドとして実行してしまいます。renderメソッドでJSONを出力する
Using the render method to output JSON
The render method can also be used to output JSON:
JSONを出力する場合もrenderメソッドが使用できます:def list() { def results = Book.list() render(contentType: "text/json") {
books = array {
for (b in results) {
book title: b.title
}
}
}
}In this case the result would be something along the lines of:
このコードの結果は以下のようになります:[
{title:"The Stand"},
{title:"The Shining"}
]The same dangers with naming conflicts described above for XML also apply to JSON building.
JSONビルダーもXMLと同じく、変数名称の衝突を回避する必要があります。自動XMLマーシャリング
Automatic XML Marshalling
Grails also supports automatic marshalling of
domain classes to XML using special converters.
To start off with, import the grails.converters package into your controller:
使用するには、grails.convertersパッケージをインポートする必要があります:import grails.converters.*
Now you can use the following highly readable syntax to automatically convert domain classes to XML:
ドメインクラスをXMLに変換するのに、次のように見やすいシンタックスで記述できます:render Book.list() as XML
The resulting output would look something like the following::
この例では次のような結果を出力します:<?xml version="1.0" encoding="ISO-8859-1"?>
<list>
<book id="1">
<author>Stephen King</author>
<title>The Stand</title>
</book>
<book id="2">
<author>Stephen King</author>
<title>The Shining</title>
</book>
</list>def xml = Book.list().encodeAsXML()
render xml
For more information on XML marshalling see the section on
REST自動JSONマーシャリング
Automatic JSON Marshalling
Grails also supports automatic marshalling to JSON using the same mechanism. Simply substitute XML with JSON:
GrailsではXMLと同じ仕組みで、JSONの自動マーシャリングもサポートしています。単純に先のXMLをJSONにするだけですrender Book.list() as JSON
The resulting output would look something like the following:
この例では次のような結果を出力します:[
{"id":1,
"class":"Book",
"author":"Stephen King",
"title":"The Stand"},
{"id":2,
"class":"Book",
"author":"Stephen King",
"releaseDate":new Date(1194127343161),
"title":"The Shining"}
]Again as an alternative you can use the encodeAsJSON to achieve the same effect.
もちろん、encodeAsJSONも同じ結果になります。
6.1.8 JSONBuilder (JSONビルダー)
The previous section on on XML and JSON responses covered simplistic examples of rendering XML and JSON responses. Whilst the XML builder used by Grails is the standard
XmlSlurper found in Groovy, the JSON builder is a custom implementation specific to Grails.
JSONBuilderとGrailsのバージョン
JSONBuilder and Grails versions
JSONBuilder behaves different depending on the version of Grails you use. For version below 1.2 the deprecated
grails.web.JSONBuilder class is used. This section covers the usage of the Grails 1.2 JSONBuilder
For backwards compatibility the old JSONBuilder class is used with the render method for older applications; to use the newer/better JSONBuilder class set the following in Config.groovy:
下位互換として、古いバージョンからメンテナンスしているアプリケーションのために、renderメソッドで古いJSONBuilderを使用するようになっています。新しい良くなったJSONBuilderを使用するにはConfig.groovyに、次のような設定をします:grails.json.legacy.builder = false
単純なオブジェクトを描写
Rendering Simple Objects
To render a simple JSON object just set properties within the context of the Closure:
単純なJSONオブジェクトを生成するには、クロージャの中にプロパティをセットするだけです:render(contentType: "text/json") {
hello = "world"
}The above will produce the JSON:
上記の例では、このような結果が得られます:JSON配列描写
Rendering JSON Arrays
To render a list of objects simple assign a list:
オブジェクトのリストを描写するには、変数に配列を指定するだけです:render(contentType: "text/json") {
categories = ['a', 'b', 'c']
}This will produce:
この例では以下を生成:{"categories":["a","b","c"]}You can also render lists of complex objects, for example:
複雑なオブジェクトのリストも可能です。例として:render(contentType: "text/json") {
categories = [ { a = "A" }, { b = "B" } ]
}This will produce:
この例では以下を生成:{"categories":[ {"a":"A"} , {"b":"B"}] }Use the special element method to return a list as the root:
elementメソッドを使用することで、リストをルートとして返す事ができます:render(contentType: "text/json") {
element 1
element 2
element 3
}The above code produces:
この例では以下を生成:複雑なオブジェクトの描写
Rendering Complex Objects
Rendering complex objects can be done with Closures. For example:
より複雑なオブジェクトをクロージャで描写できます。例として:render(contentType: "text/json") {
categories = ['a', 'b', 'c']
title = "Hello JSON"
information = {
pages = 10
}
}The above will produce the JSON:
この例では次のようなJSONを生成します:{"categories":["a","b","c"],"title":"Hello JSON","information":{"pages":10}}複雑なオブジェクトの配列
Arrays of Complex Objects
As mentioned previously you can nest complex objects within arrays using Closures:
前述したように、クロージャを使用してオブジェクトを配列にネストすることも可能です:render(contentType: "text/json") {
categories = [ { a = "A" }, { b = "B" } ]
}You can use the array method to build them up dynamically:
arrayメソッドを使用して動的に生成する事もできます:def results = Book.list()
render(contentType: "text/json") {
books = array {
for (b in results) {
book title: b.title
}
}
}JSONBuilder APIに直接アクセスする
Direct JSONBuilder API Access
If you don't have access to the render method, but still want to produce JSON you can use the API directly:
renderメソッドと関係の無い場所ではJSONを生成したい場合はAPIを直に使用できます:def builder = new JSONBuilder()def result = builder.build {
categories = ['a', 'b', 'c']
title = "Hello JSON"
information = {
pages = 10
}
}// prints the JSON text
println result.toString()def sw = new StringWriter()
result.render sw6.1.9 ファイルアップロード
プログラムによるファイルアップロード
Programmatic File Uploads
Grails supports file uploads using Spring's
MultipartHttpServletRequest interface. The first step for file uploading is to create a multipart form like this:
Upload Form: <br />
<g:uploadForm action="upload">
<input type="file" name="myFile" />
<input type="submit" />
</g:uploadForm>The uploadForm tag conveniently adds the enctype="multipart/form-data" attribute to the standard <g:form> tag.
uploadFormタグは、通常の<g:form>タグに、enctype="multipart/form-data"の属性を追加します。There are then a number of ways to handle the file upload. One is to work with the Spring
MultipartFile instance directly:
def upload() {
def f = request.getFile('myFile')
if (f.empty) {
flash.message = 'file cannot be empty'
render(view: 'uploadForm')
return
} f.transferTo(new File('/some/local/dir/myfile.txt'))
response.sendError(200, 'Done')
}This is convenient for doing transfers to other destinations and manipulating the file directly as you can obtain an
InputStream and so on with the
MultipartFile interface.
InputStreamを取得して直接ファイルを操作したりなど便利です。データバインディング経由のファイルアップロード
File Uploads through Data Binding
File uploads can also be performed using data binding. Consider this Image domain class:
データバインディングでファイルアップロードを処理する事ができます。Imageというドメインクラスがあるとします:class Image {
byte[] myFile static constraints = {
// Limit upload file size to 2MB
myFile maxSize: 1024 * 1024 * 2
}
}If you create an image using the params object in the constructor as in the example below, Grails will automatically bind the file's contents as a byte to the myFile property:
次の例のように、paramsをコンストラクタに渡してImageオブジェクトを生成すると、Grailsが自動的にファイルのコンテントをmyFileプロパティにbyte[]としてバインドします:def img = new Image(params)
It's important that you set the
size or
maxSize constraints, otherwise your database may be created with a small column size that can't handle reasonably sized files. For example, both H2 and MySQL default to a blob size of 255 bytes for
byte properties.
byte[]プロパティで指定した場合のblobのデフォルトサイズが255バイトになります。It is also possible to set the contents of the file as a string by changing the type of the myFile property on the image to a String type:
テキストファイルなどの場合は、myFileプロパティの型をString型にすることで文字列にすることも可能です:class Image {
String myFile
}6.1.10 コマンドオブジェクト
Grails controllers support the concept of command objects. A command object is similar to a form bean in a framework like Struts, and they are useful for populating a subset of the properties needed to update a domain class. Or where there is no domain class required for the interaction, but you need features such as
data binding and
validation.
コマンドオブジェクトの宣言
Declaring Command Objects
Command objects are typically declared in the same source file as a controller, directly below the controller class definition. For example:
コマンドオブジェクトは通常使用するコントローラと同じファイルに宣言します。例として:
class UserController {
…
}class LoginCommand {
String username
String password static constraints = {
username(blank: false, minSize: 6)
password(blank: false, minSize: 6)
}
}コマンドオブジェクトを使用する
Using Command Objects
To use command objects, controller actions may optionally specify any number of command object parameters. The parameter types must be supplied so that Grails knows what objects to create, populate and validate.
コマンドオブジェクトを使用する際に、コントローラアクションに複数のコマンドオブジェクトパラメータを明記することができます。Grailsにどのオブジェクトを使用して、収集、バリデートするかを知らせるために、パラメータの型は必ず指定しましょう。Before the controller action is executed Grails will automatically create an instance of the command object class, populate its properties with by binding the request parameters, and validate the command object. For example:
コントローラアクションが実行される前に、Grailsがコマンドオブジェクトのインスタンスを生成して、リクエストパラメータをバインドして、必要なプロパティを収集しコマンドオブジェクトでバリデートします。例として:class LoginController { def login = { LoginCommand cmd ->
if (cmd.hasErrors()) {
redirect(action: 'loginForm')
return
} // work with the command object data
}
}When using methods instead of Closures for actions, you can specify command objects in arguments:
クロージャアクションでは無く、メソッドアクションの場合は引数として明記します:class LoginController {
def login(LoginCommand cmd) {
if (cmd.hasErrors()) {
redirect(action: 'loginForm')
return
} // work with the command object data
}
}コマンドオブジェクトと依存注入
Command Objects and Dependency Injection
Command objects can participate in dependency injection. This is useful if your command object has some custom validation logic uses Grails
services:
class LoginCommand { def loginService String username
String password static constraints = {
username validator: { val, obj ->
obj.loginService.canLogin(obj.username, obj.password)
}
}
}In this example the command object interacts with the loginService bean which is injected by name from the Spring ApplicationContext.
この例では、loginServiceをSpringのApplicatinContextから名前解決でコマンドオブジェクトに注入しています。
Grails has built-in support for handling duplicate form submissions using the "Synchronizer Token Pattern". To get started you define a token on the
form tag:
<g:form useToken="true" ...>
Then in your controller code you can use the
withForm method to handle valid and invalid requests:
withForm {
// good request
}.invalidToken {
// bad request
}If you only provide the
withForm method and not the chained
invalidToken method then by default Grails will store the invalid token in a
flash.invalidToken variable and redirect the request back to the original page. This can then be checked in the view:
invalidTokenにチェインしなかった場合は、デフォルトでGrailsが無効トークンをflash.invalidTokenに保持して、元のページにリクエストをリダイレクトします。これによってビューで以下のように確認できます:
<g:if test="${flash.invalidToken}">
Don't click the button twice!
</g:if>
The
withForm tag makes use of the
session and hence requires session affinity or clustered sessions if used in a cluster.
6.1.12 シンプルタイプコンバータ
型変換メソッド
Type Conversion Methods
If you prefer to avoid the overhead of
Data Binding and simply want to convert incoming parameters (typically Strings) into another more appropriate type the
params object has a number of convenience methods for each type:
def total = params.int('total')The above example uses the int method, and there are also methods for boolean, long, char, short and so on. Each of these methods is null-safe and safe from any parsing errors, so you don't have to perform any additional checks on the parameters.
上記の例ではintメソッドを使用しています。ほかに、boolean,long,char,short等多数のメソッドがあります。これらのメソッドはnullセーフであり、パースエラーセーフなので、パラメータに対してのチェックを追加する必要がありません。
Each of the conversion methods allows a default value to be passed as an optional second argument. The default value will be returned if a corresponding entry cannot be found in the map or if an error occurs during the conversion. Example:
型変換メソッドの第二引数にデフォルト値を設定することができます。一致する入力が無い場合や、型変換でエラーが起きた場合に指定したデフォルト値が返されます:def total = params.int('total', 42)These same type conversion methods are also available on the attrs parameter of GSP tags.
GSPタグのattrsパラメータでも、同じ仕組みの型変換機能が使用できます。複数の同一名称パラメータのハンドリング
Handling Multi Parameters
A common use case is dealing with multiple request parameters of the same name. For example you could get a query string such as ?name=Bob&name=Judy.
よくあるケースとして、リクエストパラメータ内の複数の同じ名称を扱う場合があります。クエリーの例として、"?name=Bob&name=Judy"等。In this case dealing with one parameter and dealing with many has different semantics since Groovy's iteration mechanics for
String iterate over each character. To avoid this problem the
params object provides a
list method that always returns a list:
Stringの文字列が1文字ずつ参照されてしまいます。この問題を避けるために、paramsオブジェクトのlistメソッドを使用することで毎回リストを返すことが可能です:for (name in params.list('name')) {
println name
}6.1.13 非同期リクエスト処理
Grails support asynchronous request processing as provided by the Servlet 3.0 specification. To enable the async features you need to set your servlet target version to 3.0 in BuildConfig.groovy:
Servlet 3.0での非同期リクエスト処理をサポートしています。有効にするには、BuildConfig.groovy サーブレットバージョン指定を3.0に変更します。
grails.servlet.version = "3.0"
With that done ensure you do a clean re-compile as some async features are enabled at compile time.
設定を変更したら、async機能がコンパイル時に有効にするために、クリーンしてリコンパイルしてください。
With a Servlet target version of 3.0 you can only deploy on Servlet 3.0 containers such as Tomcat 7 and above.
Servlet 3.0を指定した場合は、Servlet 3.0のみ対応でデプロイされるので、Servlet 3.0に対応したコンテナ(Tomcatの場合は7以上)で運用しましょう。
非同期描写
Asynchronous Rendering
You can render content (templates, binary data etc.) in an asynchronous manner by calling the startAsync method which returns an instance of the Servlet 3.0 AsyncContext. Once you have a reference to the AsyncContext you can use Grails' regular render method to render content:
Servlet 3.0のAsyncContextインスタンスを返すstartAsyncメソッドを呼び出すことで、非同期でコンテンツが描写(テンプレート、バイナリー等)できます。AsyncContextの参照をするだけで、あとは通常のGrailsのrenderメソッドを使用してコンテンツを描写できます。
def index() {
    def ctx = startAsync()
    ctx.start {
        new Book(title:"The Stand").save()
        render template:"books", model:[books:Book.list()]
        ctx.complete()
    }
}Note that you must call the complete() method to terminate the connection.
コネクションを終了するには必ずcomplete()メソッドをコールしてください。
非同期リクエストの再開
Resuming an Async Request
You resume processing of an async request (for example to delegate to view rendering) by using the dispatch method of the AsyncContext class:
非同期リクエストを再開するには、AsyncContextクラスのdispatch()メソッドを使用します。
def index() {
def ctx = startAsync()
ctx.start {
// do working
…
// render view
ctx.dispatch()
}
}6.2 Groovyサーバーページ
Groovy Servers Pages (or GSP for short) is Grails' view technology. It is designed to be familiar for users of technologies such as ASP and JSP, but to be far more flexible and intuitive.
Groovy Server Pages(GSPと略す)は、Grailsのビュー技術です。より柔軟で直感的であり、ASPやJSPのような技術に精通しているユーザ向けに設計されています。
GSPs live in the
grails-app/views directory and are typically rendered automatically (by convention) or with the
render method such as:
A GSP is typically a mix of mark-up and GSP tags which aid in view rendering.
GSPはマークアップとビュー描写を補助するGSPタグで内容が構成されています。
Although it is possible to have Groovy logic embedded in your GSP and doing this will be covered in this document, the practice is strongly discouraged. Mixing mark-up and code is a bad thing and most GSP pages contain no code and needn't do so.
GroovyロジックをGSPに埋め込むことも可能ですが推奨しません。マークアップとコードが混在するのは良いことではありません。ほとんどのGSPではコードを持つべきで無く、そうする必要がありません。
A GSP typically has a "model" which is a set of variables that are used for view rendering. The model is passed to the GSP view from a controller. For example consider the following controller action:
GSPは通常ビュー描写に使用される変数のセットなどの"モデル"を持っています。モデルはコントローラからGSPビューげ渡されます。例として次のコントローラアクションを見てみましょう。def show() {
[book: Book.get(params.id)]
}This action will look up a Book instance and create a model that contains a key called book. This key can then be referenced within the GSP view using the name book:
このアクションはBookインスタンスを取り出して、bookというキーでモデルを作成しています。GSPでは、このキーbookが参照できます。
6.2.1 GSPの基本
In the next view sections we'll go through the basics of GSP and what is available to you. First off let's cover some basic syntax that users of JSP and ASP should be familiar with.
ここのセクションでは、GSPで何が可能かの基礎を見ていきましょう。先ずはじめにJSPやASPのユーザに親和性の高い基本的なシンタックスをカバーしていきます。GSP supports the usage of <% %> scriptlet blocks to embed Groovy code (again this is discouraged):
GSPは、Groovyを記述できる、スクリプトレットブロック<% %>をサポートしています。(しつこいですが推奨しません)<html>
<body>
<% out << "Hello GSP!" %>
</body>
</html>You can also use the <%= %> syntax to output values:
もちろん<%= %>を使用して値を出力することもできます。<html>
<body>
<%="Hello GSP!" %>
</body>
</html>GSP also supports JSP-style server-side comments (which are not rendered in the HTML response) as the following example demonstrates:
次のようなJSPスタイルのサーバサイドコメント(HTMLに出力されない)もサポートされています。<html>
<body>
<%-- This is my comment --%>
<%="Hello GSP!" %>
</body>
</html>6.2.1.1 変数とスコープ
Within the <% %> brackets you can declare variables:
<% %>で変数を宣言できます。and then access those variables later in the page:
宣言した変数はページ内でアクセスすることができます。Within the scope of a GSP there are a number of pre-defined variables, including:
GSPには、初期定義されたスコープ変数がいくつか存在します。
6.2.1.2 ロジックとイテレーション
Using the <% %> syntax you can embed loops and so on using this syntax:
以下のように<% %>シンタックスを使ってループなどを記述できます。<html>
<body>
<% [1,2,3,4].each { num -> %>
<p><%="Hello ${num}!" %></p>
<%}%>
</body>
</html>As well as logical branching:
また他に分岐も<html>
<body>
<% if (params.hello == 'true')%>
<%="Hello!"%>
<% else %>
<%="Goodbye!"%>
</body>
</html>6.2.1.3 ページディレクティブ
GSP also supports a few JSP-style page directives.
GSPはJSPのページディレクティブの一部をサポートしています。The import directive lets you import classes into the page. However, it is rarely needed due to Groovy's default imports and
GSP Tags:
<%@ page import="java.awt.*" %>
GSP also supports the contentType directive:
contentTypeディレクティブもサポートしています。<%@ page contentType="text/json" %>
The contentType directive allows using GSP to render other formats.
contentTypeディレクティブはGSPを別のフォーマットを可能にします。
6.2.1.4 エクスプレッション
In GSP the <%= %> syntax introduced earlier is rarely used due to the support for GSP expressions. A GSP expression is similar to a JSP EL expression or a Groovy GString and takes the form ${expr}:
GSPでは、先に紹介した<%= %>シンタックスは滅多に使用しません。代わりに、JSPの式言語(JSP EL)と同じような機能をもつGSP(Groovy)表記または、${expr}のようなGroovyのGStringを使用します。
<html>
<body>
Hello ${params.name}
</body>
</html>However, unlike JSP EL you can have any Groovy expression within the ${..} block. Variables within the ${..} block are not escaped by default, so any HTML in the variable's string is rendered directly to the page. To reduce the risk of Cross-site-scripting (XSS) attacks, you can enable automatic HTML escaping with the grails.views.default.codec setting in grails-app/conf/Config.groovy:
JSP式言語(JSP EL)と違い、Groovy表記は、${…}ブロックに記述します。${…}ブロックの変数はデフォルトではエスケープを行いません。したがって、HTML文字列が直接ページ内に描写されます。これによって起こりうる、XSS(クロスサイトスクリプティング)をリスクを軽減するには、grails-app/conf/Config.groovyにgrails.views.default.codecを設定します。grails.views.default.codec='html'
Other possible values are 'none' (for no default encoding) and 'base64'.
他に設定可能な値は'none'(何も設定しない)と'base64'になります。
Now that the less attractive JSP heritage has been set aside, the following sections cover GSP's built-in tags, which are the preferred way to define GSP pages.
魅力の低い遺産JSPはさておき、このセクションではGSPの組込タグを、GSPページでどのように活用すると良いか解説していきます。
The section on
Tag Libraries covers how to add your own custom tag libraries.
All built-in GSP tags start with the prefix g:. Unlike JSP, you don't specify any tag library imports. If a tag starts with g: it is automatically assumed to be a GSP tag. An example GSP tag would look like:
全ての組込GSPタグは接頭辞g:で始まるタグです。JSPと違いタグライブラリのインポートが必要有りません。g:接頭辞のタグは自動的にGSPタグとして用いられます。例としてGSPタグの見ためは次のようになります:GSP tags can also have a body such as:
GSPタグの内容も記述できます:<g:example>
Hello world
</g:example>
Expressions can be passed into GSP tag attributes, if an expression is not used it will be assumed to be a String value:
GSPのタグ属性にエクスプレッションを記述できます。エクスプレッションを使用しない場合は文字列として値が用いられます。:<g:example attr="${new Date()}">
Hello world
</g:example>Maps can also be passed into GSP tag attributes, which are often used for a named parameter style syntax:
GSPのタグ属性に、ひんぱんに使用する名前付きパラメータ構文として、Map型を記述できます:<g:example attr="${new Date()}" attr2="[one:1, two:2, three:3]">
Hello world
</g:example>Note that within the values of attributes you must use single quotes for Strings:
属性内での、Mapの文字列値はシングルクォートを使用してください:<g:example attr="${new Date()}" attr2="[one:'one', two:'two']">
Hello world
</g:example>With the basic syntax out the way, the next sections look at the tags that are built into Grails by default.
ここまでで基本構文は全てです。次のセクションではどのようなタグがGrailsにデフォルトで組み込まれているか見ていきましょう。
6.2.2.1 変数とスコープ
Variables can be defined within a GSP using the
set tag:
<g:set var="now" value="${new Date()}" />Here we assign a variable called now to the result of a GSP expression (which simply constructs a new java.util.Date instance). You can also use the body of the <g:set> tag to define a variable:
この例では変数nowにGSP表記の結果を割り当てています(単純にjava.util.Dateのインスタンスを生成しただけです)。<g:set>タグのタグ内容に記述して定義することもできます。:<g:set var="myHTML">
Some re-usable code on: ${new Date()}
</g:set>Variables can also be placed in one of the following scopes:
変数は以下のいずれかのスコープに定義することができます:
page - Scoped to the current page (default)request - Scoped to the current requestflash - Placed within flash scope and hence available for the next requestsession - Scoped for the user sessionapplication - Application-wide scope.
page - (デフォルト)現在のページrequest - 現在のリクエストflash - flashスコープに配置され、次のリクエストまで。session - ユーザのセッションapplication - アプリケーション全体
To specify the scope, use the scope attribute:
スコープの定義は、scope属性に指定します:<g:set var="now" value="${new Date()}" scope="request" />6.2.2.2 ロジックとイテレーション
GSP also supports logical and iterative tags out of the box. For logic there are
if,
else and
elseif tags for use with branching:
<g:if test="${session.role == 'admin'}">
<%-- show administrative functions --%>
</g:if>
<g:else>
<%-- show basic functions --%>
</g:else><g:each in="${[1,2,3]}" var="num">
<p>Number ${num}</p>
</g:each><g:set var="num" value="${1}" />
<g:while test="${num < 5 }">
<p>Number ${num++}</p>
</g:while>6.2.2.3 検索とフィルタリング
If you have collections of objects you often need to sort and filter them. Use the
findAll and
grep tags for these tasks:
Stephen King's Books:
<g:findAll in="${books}" expr="it.author == 'Stephen King'">
<p>Title: ${it.title}</p>
</g:findAll>The
expr attribute contains a Groovy expression that can be used as a filter. The
grep tag does a similar job, for example filtering by class:
expr属性に記述します。grepタグも同じような動作をします。クラスでのフィルタリングを例とすると:<g:grep in="${books}" filter="NonFictionBooks.class">
<p>Title: ${it.title}</p>
</g:grep>Or using a regular expression:
正規表現を使用した例:<g:grep in="${books.title}" filter="~/.*?Groovy.*?/">
<p>Title: ${it}</p>
</g:grep>The above example is also interesting due to its usage of GPath. GPath is an XPath-like language in Groovy. The books variable is a collection of Book instances. Since each Book has a title, you can obtain a list of Book titles using the expression books.title. Groovy will auto-magically iterate the collection, obtain each title, and return a new list!
上記の例ではGPathも使用方法も紹介されています。GPathはGroovyでのXpathのような言語です。変数booksはBookインスタンスのコレクションです。全てのBookにプロパティtitleが有る場合、books.titleとすることでBookのtitleプロパティのリストを得られます。Groovyは自動的にコレクションを検索して全てのtitleを含んだリストを返してくれます。
6.2.2.4 リンクとリソース
GSP also features tags to help you manage linking to controllers and actions. The
link tag lets you specify controller and action name pairing and it will automatically work out the link based on the
URL Mappings, even if you change them! For example:
<g:link action="show" id="1">Book 1</g:link><g:link action="show" id="${currentBook.id}">${currentBook.name}</g:link><g:link controller="book">Book Home</g:link><g:link controller="book" action="list">Book List</g:link><g:link url="[action: 'list', controller: 'book']">Book List</g:link><g:link params="[sort: 'title', order: 'asc', author: currentBook.author]"
action="list">Book List</g:link>フォームの基礎
Form Basics
GSP supports many different tags for working with HTML forms and fields, the most basic of which is the
form tag. This is a controller/action aware version of the regular HTML form tag. The
url attribute lets you specify which controller and action to map to:
url属性にマップでコントローラアクションを指定します:<g:form name="myForm" url="[controller:'book',action:'list']">...</g:form>
In this case we create a form called myForm that submits to the BookController's list action. Beyond that all of the usual HTML attributes apply.
この例では、myFormという名称で、BookControllerのlistアクションへ送信するフォームを生成します。通常のHTML属性はそのまま使用できます。フォームフィールド
Form Fields
In addition to easy construction of forms, GSP supports custom tags for dealing with different types of fields, including:
フォームを簡単に作成するために、GSPでは多数種類のフィールドタグをサポートしています:
- textField - For input fields of type 'text'
- passwordField - For input fields of type 'password'
- checkBox - For input fields of type 'checkbox'
- radio - For input fields of type 'radio'
- hiddenField - For input fields of type 'hidden'
- select - For dealing with HTML select boxes
Each of these allows GSP expressions for the value:
value属性の値にGSPエクスプレッションを使用できます:<g:textField name="myField" value="${myValue}" />マルチ送信ボタン
Multiple Submit Buttons
The age old problem of dealing with multiple submit buttons is also handled elegantly with Grails using the
actionSubmit tag. It is just like a regular submit, but lets you specify an alternative action to submit to:
<g:actionSubmit value="Some update label" action="update" />
One major different between GSP tags and other tagging technologies is that GSP tags can be called as either regular tags or as method calls from
controllers,
tag libraries or GSP views.
GSPでタグをメソッドとして使用する
Tags as method calls from GSPs
Tags return their results as a String-like object (a StreamCharBuffer which has all of the same methods as String) instead of writing directly to the response when called as methods. For example:
タグをメソッドとして使用すると、結果をレスポンスへ出力する代わりに、文字列のようなオブジェクトで返します(Stringと同じメソッドを持つStreamCharBuffer)。:Static Resource: ${createLinkTo(dir: "images", file: "logo.jpg")}This is particularly useful for using a tag within an attribute:
タグの属性内に使用する際などに特に便利です:<img src="${createLinkTo(dir: 'images', file: 'logo.jpg')}" />In view technologies that don't support this feature you have to nest tags within tags, which becomes messy quickly and often has an adverse effect of WYSWIG tools such as Dreamweaver that attempt to render the mark-up as it is not well-formed:
以下の例のように、このような機能をもたないタグ技術は、タグをネストしないといけません。これだとすぐにコードは乱雑になり、Dreamweaver等のツールでの表示が正常になりません:<img src="<g:createLinkTo dir="images" file="logo.jpg" />" />
コントローラとタグライブラリでタグをメソッドとして使用する
Tags as method calls from Controllers and Tag Libraries
You can also invoke tags from controllers and tag libraries. Tags within the default
g: namespace can be invoked without the prefix and a
StreamCharBuffer result is returned:
g:を持つタグは、接頭辞無しで呼び出す事で、結果にStreamCharBufferを返します:def imageLocation = createLinkTo(dir:"images", file:"logo.jpg").toString()
Prefix the namespace to avoid naming conflicts:
名前の衝突を避けるために、ネームスペースを接頭辞とする場合は:def imageLocation = g.createLinkTo(dir:"images", file:"logo.jpg").toString()
def editor = fckeditor.editor(name: "text", width: "100%", height: "400")
6.2.3 ビューとテンプレート
Grails also has the concept of templates. These are useful for partitioning your views into maintainable chunks, and combined with
Layouts provide a highly re-usable mechanism for structured views.
テンプレートの基礎
Template Basics
Grails uses the convention of placing an underscore before the name of a view to identify it as a template. For example, you might have a template that renders Books located at grails-app/views/book/_bookTemplate.gsp:
Grailsでは、アンダースコアがビュー名称の前にあるとテンプレートとして認識するルールがあります。例として、Bookコントローラからbookを描写するテンプレートはgrails-app/views/books/に _bookTemplate.gspとして配置:<div class="book" id="${book?.id}">
<div>Title: ${book?.title}</div>
<div>Author: ${book?.author?.name}</div>
</div>grails-app/views/book:
grails-app/views/bookの配置したビューで、テンプレートを使用するには、renderタグを使います:<g:render template="bookTemplate" model="[book: myBook]" />
Notice how we pass into a model to use using the model attribute of the render tag. If you have multiple Book instances you can also render the template for each Book using the render tag with a collection attribute:
この例のrenderタグのmodel属性を使用してモデルをテンプレートに渡している部分に注目してください。もし複数のBookインスタンスを使用して、それぞれのBookをテンプレートで描写する場合は、以下のようにrenderタグのcollection属性にコレクションを指定します:<g:render template="bookTemplate" var="book" collection="${bookList}" />テンプレートの共有
Shared Templates
In the previous example we had a template that was specific to the BookController and its views at grails-app/views/book. However, you may want to share templates across your application.
前の例ではBookControllerとgrails-app/views/book階層以下のビューを対象に説明しました。テンプレートはアプリケーション全体を通して使用したいと思います。In this case you can place them in the root views directory at grails-app/views or any subdirectory below that location, and then with the template attribute use an absolute location starting with / instead of a relative location. For example if you had a template called grails-app/views/shared/_mySharedTemplate.gsp, you would reference it as:
このケースでは、ビューのルートディレクトリである grails-app/views、あるいはルートディレクトのサブディレクトリにテンプレートファイルを配置して、template属性には、/(スラッシュ)から始まる grails-app/viewsからの絶対パスで指定します。例として、テンプレートファイルが、grails-app/views/shared/_mySharedTemplate.gspだとした場合は次のように指定します:<g:render template="/shared/mySharedTemplate" />
You can also use this technique to reference templates in any directory from any view or controller:
この方法では、どこにテンプレートが配置されていても、どのビューまたはコントローラからでもテンプレートが使用できます:<g:render template="/book/bookTemplate" model="[book: myBook]" />
テンプレートネームスペース
The Template Namespace
Since templates are used so frequently there is template namespace, called tmpl, available that makes using templates easier. Consider for example the following usage pattern:
テンプレートを多用する場合は、テンプレートを簡単に使用するためのtmplという名称の、テンプレートネームスペースが使用できます:<g:render template="bookTemplate" model="[book:myBook]" />
tmpl namespace as follows:
上記の例をtmplネームスペースで記述すると以下のようになります:<tmpl:bookTemplate book="${myBook}" />コントローラとタグライブラリでのテンプレート
Templates in Controllers and Tag Libraries
You can also render templates from controllers using the
render controller method. This is useful for
Ajax applications where you generate small HTML or data responses to partially update the current page instead of performing new request:
def bookData() {
def b = Book.get(params.id)
render(template:"bookTemplate", model:[book:b])
}The
render controller method writes directly to the response, which is the most common behaviour. To instead obtain the result of template as a String you can use the
render tag:
def bookData() {
def b = Book.get(params.id)
String content = g.render(template:"bookTemplate", model:[book:b])
render content
}Notice the usage of the
g namespace which tells Grails we want to use the
tag as method call instead of the
render method.
gを使用することでタグをメソッドとして使用するのか、コントローラのrenderメソッドなのかを区別しています。
6.2.4 Sitemeshでレイアウト
レイアウトを作成する
Creating Layouts
Grails leverages
Sitemesh, a decorator engine, to support view layouts. Layouts are located in the
grails-app/views/layouts directory. A typical layout can be seen below:
grails-app/views/layoutsディレクトリに配置します。標準的なレイアウトは以下のようになります:<html>
<head>
<title><g:layoutTitle default="An example decorator" /></title>
<g:layoutHead />
</head>
<body onload="${pageProperty(name:'body.onload')}">
<div class="menu"></menu>
<div class="body">
<g:layoutBody />
</div>
</div>
</body>
</html>
layoutTitle - outputs the target page's titlelayoutHead - outputs the target page's head tag contentslayoutBody - outputs the target page's body tag contents
layoutTitle - ページのタイトルを出力layoutHead - ページのheadタグコンテントを出力layoutBody - ページのbodyタグコンテントを出力
The previous example also demonstrates the
pageProperty tag which can be used to inspect and return aspects of the target page.
レイアウトを反映させる
Triggering Layouts
There are a few ways to trigger a layout. The simplest is to add a meta tag to the view:
レイアウトを反映させる幾つかの方法があります。簡単な方法は、ビューにmetaタグを追加するだけです:<html>
<head>
<title>An Example Page</title>
<meta name="layout" content="main" />
</head>
<body>This is my content!</body>
</html>In this case a layout called grails-app/views/layouts/main.gsp will be used to layout the page. If we were to use the layout from the previous section the output would resemble this:
この例では、レイアウトのgrails-app/views/layouts/main.gspが呼び出されてページのレイアウトに使用されます。内容が先ほどのレイアウトの内奥であれば、以下のような出力が得られます:<html>
<head>
<title>An Example Page</title>
</head>
<body onload="">
<div class="menu"></div>
<div class="body">
This is my content!
</div>
</body>
</html>コントローラでレイアウトを指定
Specifying A Layout In A Controller
Another way to specify a layout is to specify the name of the layout by assigning a value to the "layout" property in a controller. For example, if you have a controller such as:
別の方法として、コントローラに"layout"プロパティの値としてレイアウトする事ができます。例として以下のようなコントローラがあるとしたら:class BookController {
static layout = 'customer' def list() { … }
}You can create a layout called grails-app/views/layouts/customer.gsp which will be applied to all views that the BookController delegates to. The value of the "layout" property may contain a directory structure relative to the grails-app/views/layouts/ directory. For example:
grails-app/views/layouts/customer.gspというレイアウトファイルを作成すると、BookControllerに連動する全てのビューに反映します。
"layout"プロパティの値はgrails-app/views/layouts/ディレクトリが含まれます。例として:class BookController {
static layout = 'custom/customer' def list() { … }
}grails-app/views/layouts/custom/customer.gsp template.
この例で、このコントローラのビューは、grails-app/views/layouts/custom/customer.gspテンプレートでデコレートされます。慣習によるレイアウト
Layout by Convention
Another way to associate layouts is to use "layout by convention". For example, if you have this controller:
"慣習によるレイアウト"によってレイアウトと連動することが可能です。例として、次のようなコントローラがあるとします:class BookController {
def list() { … }
}You can create a layout called grails-app/views/layouts/book.gsp, which will be applied to all views that the BookController delegates to.
BookControllerのビューに反映されるレイアウトgrails-app/views/layouts/book.gspを作成できます。Alternatively, you can create a layout called grails-app/views/layouts/book/list.gsp which will only be applied to the list action within the BookController.
あるいは、BookControllerのアクションlistのみに反映するレイアウトgrails-app/views/layouts/book/list.gspを作成できます。If you have both the above mentioned layouts in place the layout specific to the action will take precedence when the list action is executed.
両方のレイアウトが存在する場合は、アクションに指定したレイアウトが優先されます。If a layout may not be located using any of those conventions, the convention of last resort is to look for the application default layout which
is grails-app/views/layouts/application.gsp. The name of the application default layout may be changed by defining a property
in grails-app/conf/Config.groovy as follows:
もしこれらの慣習にあわせたレイアウトが存在しない場合は、最終的にデフォルトレイアウトのgrails-app/views/layouts/application.gspを探しに行きます。アプリケーションのデフォルトレイアウト名称は、次のプロパティをgrails-app/conf/Config.groovyに定義することで変更が可能です。:grails.sitemesh.default.layout = 'myLayoutName'
With that property in place, the application default layout will be grails-app/views/layouts/myLayoutName.gsp.
この例でのアプリケーションのデフォルトレイアウトはgrails-app/views/layouts/myLayoutName.gspになります。インラインレイアウト
Inline Layouts
Grails' also supports Sitemesh's concept of inline layouts with the
applyLayout tag. This can be used to apply a layout to a template, URL or arbitrary section of content. This lets you even further modularize your view structure by "decorating" your template includes.
Some examples of usage can be seen below:
例としては以下のようになります:<g:applyLayout name="myLayout" template="bookTemplate" collection="${books}" /><g:applyLayout name="myLayout" url="http://www.google.com" /><g:applyLayout name="myLayout">
The content to apply a layout to
</g:applyLayout>サーバーサイドインクルード
Server-Side Includes
While the
applyLayout tag is useful for applying layouts to external content, if you simply want to include external content in the current page you use the
include tag:
<g:include controller="book" action="list" />
<g:applyLayout name="myLayout">
<g:include controller="book" action="list" />
</g:applyLayout>
Finally, you can also call the
include tag from a controller or tag library as a method:
def content = include(controller:"book", action:"list")
The resulting content will be provided via the return value of the
include tag.
6.2.5 静的リソース
Grails 2.0 integrates with the
Resources plugin to provide sophisticated static resource management. This plugin is installed by default in new Grails applications.
The basic way to include a link to a static resource in your application is to use the
resource tag. This simple approach creates a URI pointing to the file.
However modern applications with dependencies on multiple JavaScript and CSS libraries and frameworks (as well as dependencies on multiple Grails plugins) require something more powerful.
しかし近頃のアプリケーションは、様々なJavaScriptやCSSライブラリやフレームワークに依存しており、もっとパワフルな方法が必要となります。
The issues that the Resources framework tackles are:
Resourceフレームワークの取り組んだ課題:
- Web application performance tuning is difficult
- Correct ordering of resources, and deferred inclusion of JavaScript
- Resources that depend on others that must be loaded first
- The need for a standard way to expose static resources in plugins and applications
- The need for an extensible processing chain to optimize resources
- Preventing multiple inclusion of the same resource
- Webアプリケーションのパフォーマンスチューニングが難しい
- リソースの配置順と、JavaScriptの遅延包括
- 先に読み込む必要のある依存関係のあるリソース
- プラグインやアプリケーションでの、静的リソースを表示する方法の標準化が必要
- リソースの最適化を行うための拡張可能な連鎖行程が必要
- 同じリソースの多重配置を防ぐ
The plugin achieves this by introducing new artefacts and processing the resources using the server's local file system.
プラグインでアーテファクトの提供と、サーバのローカルファイルシステムを使用して処理をすることで、これらを達成しています。It adds artefacts for declaring resources, for declaring "mappers" that can process resources, and a servlet filter to serve processed resources.
プラグインは、リソースを宣言するためのアーテファクト、リソースを処理する"マッパー"、処理されたリソースを提供するサーブレットフィルタを追加します。What you get is an incredibly advanced resource system that enables you to easily create highly optimized web applications that run the same in development and in production.
信じられないほど上級のリソースシステムが、簡単に高度に最適化されたWebアプリケーション作成をdevelpoment,productionモード共に可能とします。The Resources plugin documentation provides a more detailed overview of the
concepts which will be beneficial when reading the following guide.
r:requireでリソースを制御する
Pulling in resources with r:require
To use resources, your GSP page must indicate which resource modules it requires. For example with the
jQuery plugin, which exposes a "jquery" resource module, to use jQuery in any page on your site you simply add:
<html>
<head>
<r:require module="jquery"/>
<r:layoutResources/>
</head>
<body>
…
<r:layoutResources/>
</body>
</html>This will automatically include all resources needed for jQuery, including them at the correct locations in the page. By default the plugin sets the disposition to be "head", so they load early in the page.
これで自動的にjQueryで必要なリソースをページの正確な場所に配置します。デフォルトではプラグインが"head"に配置するので、ページの初めの方でロードされます。You can call r:require multiple times in a GSP page, and you use the "modules" attribute to provide a list of modules:
GSPページでr:requireを複数回呼んでも構いません。そして"modules"属性を使用してモジュールを列挙することもできます:<html>
<head>
<r:require modules="jquery, main, blueprint, charting"/>
<r:layoutResources/>
</head>
<body>
…
<r:layoutResources/>
</body>
</html>The above may result in many JavaScript and CSS files being included, in the correct order, with some JavaScript files loading at the end of the body to improve the apparent page load time.
上記の結果は、多くのJavaScriptとCSSファイルが正確な順番に、そして一部のJavaScriptはページ読み込み時間を向上させるために、ページボディの最後にロードされるようにページに含まれます。However you cannot use r:require in isolation - as per the examples you must have the <r:layoutResources/> tag to actually perform the render.
r:requireは単体で使用することはできません。例にあるように実際に描写を行う<r:layoutResources/>タグが必要になります。r:layoutResourcesでリソースへのリンクを描写する
Rendering the links to resources with r:layoutResources
When you have declared the resource modules that your GSP page requires, the framework needs to render the links to those resources at the correct time.
GSPページに必要なリソースモジュールを宣言すると、フレームワークは正常なタイミングでリソースへのリンクを描写する必要があります。To achieve this correctly, you must include the r:layoutResources tag twice in your page, or more commonly, in your GSP layout:
これを正常に行うには、r:layoutResourcesタグをページまたはGSPレイアウトの2ヶ所に配置します。:<html>
<head>
<g:layoutTitle/>
<r:layoutResources/>
</head>
<body>
<g:layoutBody/>
<r:layoutResources/>
</body>
</html>This represents the simplest Sitemesh layout you can have that supports Resources.
これはリソースフレームワークに対応した、いちばん単純なSitemeshレイアウトの例です。The Resources framework has the concept of a "disposition" for every resource. This is an indication of where in the page the resource should be included.
リソースフレームワークには全てのリソースに"配置"の概念を持っています。ページのどの部分にリソースを含めるべきかを指示する物です。The default disposition applied depends on the type of resource. All CSS must be rendered in <head> in HTML, so "head" is the default for all CSS, and will be rendered by the first r:layoutResources. Page load times are improved when JavaScript is loaded after the page content, so the default for JavaScript files is "defer", which means it is rendered when the second r:layoutResources is invoked.
基本的な配置はリソースの種類によって適用されます。全てのCSSはHTMLの<head>に描写されるべきです。したがって全てのCSSは、デフォルトで最初のr:layoutResourcesによって"head"に描写されます。JavaScriptはページコンテンツの最後に読み込ませてJavaScriptファイルの実行を遅らせることで("defer")、ページのロード時間が向上されます。したがって2つ目のr:layoutResourcesが実行された時に描写されます。Note that both your GSP page and your Sitemesh layout (as well as any GSP template fragments) can call r:require to depend on resources. The only limitation is that you must call r:require before the r:layoutResources that should render it.
GSPページとSItemeshレイアウト両方で(もちろんGSPテンプレートでも)、リソースに依存するr:requireを呼び出す事ができます。唯一の制約として、内容を描写するr:layoutResourcesの前に必ずr:requireを呼び出す必要があります。
r:scriptでページ固有のJavaScriptコードを追加
Adding page-specific JavaScript code with r:script
Grails has the
javascript tag which is adapted to defer to Resources plugin if installed, but it is recommended that you call
r:script directly when you need to include fragments of JavaScript code.
r:scriptを呼ぶことを推奨します。This lets you write some "inline" JavaScript which is actually not rendered inline, but either in the <head> or at the end of the body, based on the disposition.
これはJavaScriptをインラインで記述できて描写はインラインでは無く、配置指定をした<head>またはボディの最後に描写されます。Given a Sitemesh layout like this:
このようなSitemeshレイアウトがあるとします:<html>
<head>
<g:layoutTitle/>
<r:layoutResources/>
</head>
<body>
<g:layoutBody/>
<r:layoutResources/>
</body>
</html>...in your GSP you can inject some JavaScript code into the head or deferred regions of the page like this:
GSPではJavaScriptコードをヘッドまたページの最後の方に以下のように記述します:<html>
<head>
<title>Testing r:script magic!</title>
</head>
<body>
<r:script disposition="head">
window.alert('This is at the end of <head>');
</r:script>
<r:script disposition="defer">
window.alert('This is at the end of the body, and the page has loaded.');
</r:script>
</body>
</html>The default disposition is "defer", so the disposition in the latter r:script is purely included for demonstration.
disposition属性のデフォルトは"defer"になります。従って後者のr:scriptはここでの説明として定義しているだけです。Note that such r:script code fragments always load after any modules that you have used, to ensure that any required libraries have loaded.
r:scripのコードブロックは、必要なライブラリがロードされているのを保証するために、常に指定したモジュールの後に読み込まれます。r:imgで画像へのリンク
Linking to images with r:img
This tag is used to render <img> markup, using the Resources framework to process the resource on the fly (if configured to do so - e.g. make it eternally cacheable).
このタグは、リソースフレームワークを使用してリソースを処理した、<img>タグを描写するのに使用します。(定義をした場合。e.g.画像キャッシュ等)This includes any extra attributes on the <img> tag if the resource has been previously declared in a module.
あらかじめリソースモジュール宣言されたタグの属性も<img>タグの属性に追加します。With this mechanism you can specify the width, height and any other attributes in the resource declaration in the module, and they will be pulled in as necessary.
この仕組みでは、モジュールに宣言した、width,heightまたその他の属性をタグに取り込みます。Example:
例として:<html>
<head>
<title>Testing r:img</title>
</head>
<body>
<r:img uri="/images/logo.png"/>
</body>
</html>Note that Grails has a built-in
g:img tag as a shortcut for rendering
<img> tags that refer to a static resource. The Grails
img tag is Resources-aware and will delegate to
r:img if found. However it is recommended that you use
r:img directly if using the Resources plugin.
<img>タグを描写する、リソース参照できるg:imgタグが存在します。Grailsのimgタグは、存在した場合リソースフレームワークが認識してr:imgに委譲しますが、リソースプラグインを使用している場合は直接r:imgを使用することを推奨します。Alongside the regular Grails
resource tag attributes, this also supports the "uri" attribute for increased brevity.
r:resource
This is equivalent to the Grails
resource tag, returning a link to the processed static resource. Grails' own
g:resource tag delegates to this implementation if found, but if your code requires the Resources plugin, you should use
r:resource directly.
g:resourceタグが有った場合はこのタグに委譲します。リソースプラグインを使用している場合は直接r:resourceを使用しましょう。Alongside the regular Grails
resource tag attributes, this also supports the "uri" attribute for increased brevity.
r:external
This is a resource-aware version of Grails
external tag which renders the HTML markup necessary to include an external file resource such as CSS, JS or a favicon.
6.2.5.3 リソースの宣言
A DSL is provided for declaring resources and modules. This can go either in your Config.groovy in the case of application-specific resources, or more commonly in a resources artefact in grails-app/conf.
リソースとモジュールを宣言するためのDSLが提供されています。アプリケーション固有の場合はConfig.groovyファイルに記述、また通常はリソースアーテファクトとしてgrails-app/confにファイルで配置します。Note that you do not need to declare all your static resources, especially images. However you must to establish dependencies or other resources-specific attributes. Any resource that is not declared is called "ad-hoc" and will still be processed using defaults for that resource type.
特に画像に関しては、全ての静的リソースを宣言する必要はありませんが、依存関係またはリソース固有の属性を確立する必要があります。宣言されていないリソースは"ad-hoc"とよばれ、リソースの種類に対応した処理が行われます。Consider this example resource configuration file, grails-app/conf/MyAppResources.groovy:
次のようなリソース定義がgrails-app/conf/MyAppResources.groovyファイルで例として有るとします:modules = {
core {
dependsOn 'jquery, utils' resource url: '/js/core.js', disposition: 'head'
resource url: '/js/ui.js'
resource url: '/css/main.css',
resource url: '/css/branding.css'
resource url: '/css/print.css', attrs: [media: 'print']
} utils {
dependsOn 'jquery' resource url: '/js/utils.js'
} forms {
dependsOn 'core,utils' resource url: '/css/forms.css'
resource url: '/js/forms.js'
}
}This defines three resource modules; 'core', 'utils' and 'forms'. The resources in these modules will be automatically bundled out of the box according to the module name, resulting in fewer files. You can override this with
bundle:'someOtherName' on each resource, or call
defaultBundle on the module (see
resources plugin documentation).
bundle:'someOtherName'またはモジュールでdefaultBundleを呼ぶことででオーバーライドできます。(Resourcesプラグインドキュメントを参照)It declares dependencies between them using dependsOn, which controls the load order of the resources.
リソースの読み込み順を操作するために、それぞれの依存関係をdependsOnで宣言しています。When you include an <r:require module="forms"/> in your GSP, it will pull in all the resources from 'core' and 'utils' as well as 'jquery', all in the correct order.
GSPに<r:require module="forms"/>を含んだ場合、この例では'core','util'そして'jquery'のリソースを正常な順番で引っ張ります。You'll also notice the disposition:'head' on the core.js file. This tells Resources that while it can defer all the other JS files to the end of the body, this one must go into the <head>.
さらにcore.jsファイルのdisposition:'head'に注目してください。その他全てのリソースはボディの最後に配置して、このファイルは必ず<head>に配置する指定をしています。The CSS file for print styling adds custom attributes using the attrs map option, and these are passed through to the r:external tag when the engine renders the link to the resource, so you can customize the HTML attributes of the generated link.
プリント指定用のCSSでは、カスタム属性をattrsマップで追加しています。そしてこれらはr:externalタグを通してリソースへのリンクを形成します。これによってリンクのHTML属性をカスタマイズすることができます。There is no limit to the number of modules or xxxResources.groovy artefacts you can provide, and plugins can supply them to expose modules to applications, which is exactly how the jQuery plugin works.
モジュールやxxxResources.groovyアーテファクトには数量制限がありません。jQueryプラグインのようにプラグインでモジュールを提供することもできます。To define modules like this in your application's Config.groovy, you simply assign the DSL closure to the grails.resources.modules Config variable.
アプリケーションのConfig.groovyでモジュールを宣言する場合は、モジュールのDSLクロージャをgrails.resources.modulesに定義します。
リソースDSLの詳細はResourcesプラグインのドキュメントを参考にしてください。
6.2.5.4 プラグインリソースのオーバーライド
Because a resource module can define the bundle groupings and other attributes of resources, you may find that the settings provided are not correct for your application.
リソースモジュールにバンドルのグルーピングと他のリソース属性の宣言ができることで、提供されている設定が個々のアプリケーションで違う場合が有るのを認識します。For example, you may wish to bundle jQuery and some other libraries all together in one file. There is a load-time and caching trade-off here, but often it is the case that you'd like to override some of these settings.
例として、jQueryと他のライブラリをまとめてバンドルするとします。これだとロード時間とキャッシングのトレードオフになりますが、しかし良くあるケースとしてこれらの設定をオーバーライドするとします。To do this, the DSL supports an "overrides" clause, within which you can change the defaultBundle setting for a module, or attributes of individual resources that have been declared with a unique id:
これには、モジュールまたは固有のリソース属性で変更可能なdefaultBundle設定で定義した名称を指定する、DSLの"overrides"で対応しています。modules = {
core {
dependsOn 'jquery, utils'
defaultBundle 'monolith' resource url: '/js/core.js', disposition: 'head'
resource url: '/js/ui.js'
resource url: '/css/main.css',
resource url: '/css/branding.css'
resource url: '/css/print.css', attrs: [media: 'print']
} utils {
dependsOn 'jquery'
defaultBundle 'monolith' resource url: '/js/utils.js'
} forms {
dependsOn 'core,utils'
defaultBundle 'monolith' resource url: '/css/forms.css'
resource url: '/js/forms.js'
} overrides {
jquery {
defaultBundle 'monolith'
}
}
}This will put all code into a single bundle named 'monolith'. Note that this can still result in multiple files, as separate bundles are required for head and defer dispositions, and JavaScript and CSS files are bundled separately.
この設定で全てのコードが'monolith'という名称の一つのバンドルになります。この設定を行ってもそれぞれのバンドルとしてそれぞれのファイルで配置されます。Note that overriding individual resources requires the original declaration to have included a unique id for the resource.
固有のリソースをオーバライドする場合は、もとの宣言がリソース毎にユニークIDで含まれている必要があります。For full details of the resource DSL please see the resources plugin documentation.
リソースDSLの詳細はリソースプラグインのドキュメントを参考にしてください。
6.2.5.5 リソースの最適化
The Resources framework uses "mappers" to mutate the resources into the final format served to the user.
リソースフレームワークは"マッパー"を使用して、最終フォーマットへリソースを変化させてユーザへ配信します。The resource mappers are applied to each static resource once, in a specific order. You can create your own resource mappers, and several plugins provide some already for zipping, caching and minifying.
リソースマッパーはそれぞれの静的リソースに一度だけ特定の順番で適用されます。幾つかのプラグインzipping, caching や minifyingのように独自のリソースマッパーを作成することが可能です。Out of the box, the Resources plugin provides bundling of resources into fewer files, which is achieved with a few mappers that also perform CSS re-writing to handle when your CSS files are moved into a bundle.
すぐに使用できる仕組みとして、リソースをまとめて少なくするバンドルマッパーをResourcesプラグインで提供しています。複数のリソースを少ないファイルにまとめる
Bundling multiple resources into fewer files
The 'bundle' mapper operates by default on any resource with a "bundle" defined - or inherited from a defaultBundle clause on the module. Modules have an implicit default bundle name the same as the name of the module.
バンドルマッパーは、"bundle"が定義されたリソース、またはモジュールのdefaultBundleに継承されたリソースに対してデフォルトで操作します。モジュールはモジュール名と同じ名称で、暗黙なデフォルトバンドル名を持っています。Files of the same kind will be aggregated into this bundle file. Bundles operate across module boundaries:
同じ種類のファイルがこのバンドルに集計されます。バンドルはモジュールにわたって操作されます:modules = {
core {
dependsOn 'jquery, utils'
defaultBundle 'common' resource url: '/js/core.js', disposition: 'head'
resource url: '/js/ui.js', bundle: 'ui'
resource url: '/css/main.css', bundle: 'theme'
resource url: '/css/branding.css'
resource url: '/css/print.css', attrs: [media: 'print']
} utils {
dependsOn 'jquery' resource url: '/js/utils.js', bundle: 'common'
} forms {
dependsOn 'core,utils' resource url: '/css/forms.css', bundle: 'ui'
resource url: '/js/forms.js', bundle: 'ui'
}
}Here you see that resources are grouped into bundles; 'common', 'ui' and 'theme' - across module boundaries.
この例でモジュールにわたって、リソースは'common','ui','theme'のグループにまとめられます。Note that auto-bundling by module does not occur if there is only one resource in the module.
もしモジュールにリソースが1つの場合は、自動バンドリング処理は行われません。クライアントのブラウザでリソースを"永久的に"キャッシュさせる
Making resources cache "eternally" in the client browser
Caching resources "eternally" in the client is only viable if the resource has a unique name that changes whenever the contents change, and requires caching headers to be set on the response.
リソースを"永久的に"キャッシュさせるには、コンテンツが変わらない限り唯一のリソース名を持ち、キャッシングヘッダーがレスポンスにセットされている時のみです。The
cached-resources plugin provides a mapper that achieves this by hashing your files and renaming them based on this hash. It also sets the caching headers on every response for those resources. To use, simply install the cached-resources plugin.
Note that the caching headers can only be set if your resources are being served by your application. If you have another server serving the static content from your app (e.g. Apache HTTPD), configure it to send caching headers. Alternatively you can configure it to request and proxy the resources from your container.
キャッシングヘッダーはリソースがアプリケーションから配信されたときのみセットされます。もし別のサーバで静的コンテンツを配信している場合は(Apache HTTPD等で)、サーバでそれらのキャッシングヘッダーの定義を行ってください。あるいはリソースをアプリケーションコンテナーを介して配信するように設定も可能です。リソース(Zip)圧縮
Zipping resources
Returning gzipped resources is another way to reduce page load times and reduce bandwidth.
ページロード時間と帯域を減らす別の方法として、gzipしたリソースを返すことができます。The
zipped-resources plugin provides a mapper that automatically compresses your content, excluding by default already compressed formats such as gif, jpeg and png.
Simply install the zipped-resources plugin and it works.
単にzipped-resourcesプラグインをインストールするだけで使用できます。最小化(Minifying)
Minifying
There are a number of CSS and JavaScript minifiers available to obfuscate and reduce the size of your code. At the time of writing none are publicly released but releases are imminent.
最小化してコード内容をわかりにくくしたりサイズを縮小する幾つかのCSSとJavascript minifierが有ります。現段階ではプラグインの提供は無いですが近々リリースされると思います。
6.2.5.6 デバッグ
When your resources are being moved around, renamed and otherwise mutated, it can be hard to debug client-side issues. Modern browsers, especially Safari, Chrome and Firefox have excellent tools that let you view all the resources requested by a page, including the headers and other information about them.
リソースが、リソースフレームワークにより、動き回り、名称変更されたり、変更されるとクライアントサイドのデバッグが大変になります。最近のブラウザSafari,Chrome,Firefoxには、リクエストでのページの全てのリソースやヘッダーやその他の情報が閲覧できる優秀なツールがあります。There are several debugging features built in to the Resources framework.
リソースフレームワークには、幾つかのデバッグ時に使用する機能を持ち合わせています。X-Grails-Resources-Original-Srcヘッダー
X-Grails-Resources-Original-Src Header
Every resource served in development mode will have the X-Grails-Resources-Original-Src: header added, indicating the original source file(s) that make up the response.
開発(development)モードでのリソースには、レスポンスを構成した元のリソースファイルを示す、X-Grails-Resources-Original-Src:ヘッダーが追加されています。デバッグフラグを追加
Adding the debug flag
If you add a query parameter _debugResources=y to your URL and request the page, Resources will bypass any processing so that you can see your original source files.
クエリパラメータ _debugResources=y をURLに追加してページをリクエストすると、Resourcesプラグインはバイパスされて元のソースファイルを見ることができます。This also adds a unique timestamp to all your resource URLs, to defeat any caching that browsers may use. This means that you should always see your very latest code when you reload the page.
さらにこの機能では、ユニークなタイムスタンプを全てのリソースに追加することでブラウザにキャッシュされるのを阻止します。したがってページをリロードするたびに最新のコードを参照することになります。常にデバッグを有効にする
Turning on debug all the time
You can turn on the aforementioned debug mechanism without requiring a query parameter, but turning it on in Config.groovy:
前途したデバッグ機能をクエリパラメータ無しで有効にするには、以下のようにConfig.groovyで設定します:grails.resources.debug = true
You can of course set this per-environment.
もちろんこの設定は環境ごとに定義できます。
6.2.5.7 リソース生成・変換処理を防ぐ
Sometimes you do not want a resource to be processed in a particular way, or even at all. Occasionally you may also want to disable all resource mapping.
特定のリソースだけ変換処理を行わない事もあります。時折リソースマッピングを無効にしたいこともあります。個々のリソースの特定のマッパー処理を防ぐ
Preventing the application of a specific mapper to an individual resource
All resource declarations support a convention of noXXXX:true where XXXX is a mapper name.
全てのリソース宣言では、XXXXがマッパー名称とすると、noXXXX:trueのような規約に対応しています。So for example to prevent the "hashandcache" mapper from being applied to a resource (which renames and moves it, potentially breaking relative links written in JavaScript code), you would do this:
例として、リソースに適用される"hashandcache"マッパーの処理を防ぐ場合は:modules = {
forms {
resource url: '/css/forms.css', nohashandcache: true
resource url: '/js/forms.js', nohashandcache: true
}
}特定のマッパーでの、パス、ファイルタイプの除外と包含
Excluding/including paths and file types from specific mappers
Mappers have includes/excludes Ant patterns to control whether they apply to a given resource. Mappers set sensible defaults for these based on their activity, for example the zipped-resources plugin's "zip" mapper is set to exclude images by default.
マッパーには、Antパターンで対象リソースを制御するincludes/excludes定義があります。各マッパーはそれぞれの動作に対応したふさわしいデフォルトをセットしています。例としてzipped-resourcesプラグインの"zip"マッパーはデフォルトで画像を除外する設定をしています。You can configure this in your Config.groovy using the mapper name e.g:
Config.groovyにマッパー名で定義することができます:// We wouldn't link to .exe files using Resources but for the sake of example:
grails.resources.zip.excludes = ['**/*.zip', '**/*.exe']// Perhaps for some reason we want to prevent bundling on "less" CSS files:
grails.resources.bundle.excludes = ['**/*.less']
There is also an "includes" inverse. Note that settings these replaces the default includes/excludes for that mapper - it is not additive.
逆の意味の"includes"も使用できます。設定をするとマッパーデフォルトのincludes/excludesを入れ換えるので注意が必要です。"ad-hoc"(レガシー)リソースとして扱う物の操作
Controlling what is treated as an "ad-hoc" (legacy) resource
Ad-hoc resources are those undeclared, but linked to directly in your application without using the Grails or Resources linking tags (resource, img or external).
"ad-hoc"リソースは、宣言されずGrailsまたResourcesのリンク系タグを使用しないで、直接アプリケーションにリンクされているリソースです。These may occur with some legacy plugins or code with hardcoded paths in.
古い方式のプラグインやパスがコードに埋め込まれている場合をさします。There is a Config.groovy setting grails.resources.adhoc.patterns which defines a list of Servlet API compliant filter URI mappings, which the Resources filter will use to detect such "ad-hoc resource" requests.
サーブレットAPI準拠のフィルタURIマッピングのリストを定義して、どのリクエストを"ad-hoc"リソースとしてResourcesのフィルタが使用するか認識させるConfig.groovy用の設定 grails.resources.adhoc.patterns があります。By default this is set to:
デフォルトでは次のようにセットされています:
grails.resources.adhoc.patterns = ['images/*', '*.js', '*.css']
6.2.5.8 リソース関連のプラグイン
At the time of writing, the following plugins include support for the Resources framework:
現時点でのリソースフレームワークに対応したプラグイン:
6.2.6 Sitemeshコンテントブロック
Although it is useful to decorate an entire page sometimes you may find the need to decorate independent sections of your site. To do this you can use content blocks. To get started, partition the page to be decorated using the <content> tag:
サイト全体のページをデコレートするのに便利ですが、ページ内のブロック(パーツ)をデコレートする必要も有ると思います。この場合はコンテントブロックを使用します。コンテントブロックを使用するには<content>タグでページ内をブロック分割します。<content tag="navbar">
… ここにナビゲーションバーコンテンツ…
</content><content tag="header">
… ここにヘッダーコンテンツ…
</content><content tag="footer">
… ここにフッターコンテンツ…
</content><content tag="body">
… ここにボディコンテンツ…
</content>
Then within the layout you can reference these components and apply individual layouts to each:
そしてレイアウト側には、それぞれのコンポーネントの参照を配置します:<html>
<body>
<div id="header">
<g:applyLayout name="headerLayout">
<g:pageProperty name="page.header" />
</g:applyLayout>
</div>
<div id="nav">
<g:applyLayout name="navLayout">
<g:pageProperty name="page.navbar" />
</g:applyLayout>
</div>
<div id="body">
<g:applyLayout name="bodyLayout">
<g:pageProperty name="page.body" />
</g:applyLayout>
</div>
<div id="footer">
<g:applyLayout name="footerLayout">
<g:pageProperty name="page.footer" />
</g:applyLayout>
</div>
</body>
</html>6.2.7 デプロイされたアプリケーションへの変更
One of the main issues with deploying a Grails application (or typically any servlet-based one) is that any change to the views requires that you redeploy your whole application. If all you want to do is fix a typo on a page, or change an image link, it can seem like a lot of unnecessary work. For such simple requirements, Grails does have a solution: the grails.gsp.view.dir configuration setting.
Grailsアプリケーションをデプロイする際に起きる大きな問題の一つに(または他のサーブレットベースのアプリケーションも含む)、ビューを変更するたびにアプリケーション全体を再デプロイする必要がある事です。もし誤植や画像リンクの修正など有る場合は無駄な作業が発生します。そのような事を発生させないために、Grailsには、grails.gsp.view.dir定義という解決方法が存在します。How does this work? The first step is to decide where the GSP files should go. Let's say we want to keep them unpacked in a /var/www/grails/my-app directory. We add these two lines to grails-app/conf/Config.groovy :
はじめに、何処にGSPを配置するかを決めましょう。/var/www/grails/my-appの階層はパックしないこととします。以下の2行をgrails-app/conf/Config.groovyに追加します:grails.gsp.enable.reload = true
grails.gsp.view.dir = "/var/www/grails/my-app/"
The first line tells Grails that modified GSP files should be reloaded at runtime. If you don't have this setting, you can make as many changes as you like but they won't be reflected in the running application until you restart. The second line tells Grails where to load the views and layouts from.
最初の行は変更されたGSPファイルはリロードするという指定です。この指定をしないと、GSPが更新されても再起動するまで反映されません。2行目は何処にあるビューとレイアウトをロードするかの指定です。
The trailing slash on the grails.gsp.view.dir value is important! Without it, Grails will look for views in the parent directory.
grails.gsp.view.dirの最後に付いているスラッシュは重要です。これが無いとGrailsが親ディレクトリにビューを探しに行きます。
Setting "grails.gsp.view.dir" is optional. If it's not specified, you can update files directly to the application server's deployed war directory. Depending on the application server, these files might get overwritten when the server is restarted. Most application servers support "exploded war deployment" which is recommended in this case.
"grails.gsp.view.dir"の設定は省略可能です。省略した場合はwarがデプロイされたディレクトリのファイルを変更できます。アプリケーションサーバによりますが、サーバのリスタート時にこれらのファイルは上書きされてしまいます。ホット再デプロイメントをサポートしたアプリケーションサーバの場合にのみ推奨します。With those settings in place, all you need to do is copy the views from your web application to the external directory. On a Unix-like system, this would look something like this:
この場合に、サーバ内で設定をするには、Webアプリケーションのディレクトリから別のディレクトリへ全てのビューをコピーします。Unix系のシステムでは以下のように作業します:mkdir -p /var/www/grails/my-app/grails-app/views
cp -R grails-app/views/* /var/www/grails/my-app/grails-app/views
The key point here is that you must retain the view directory structure, including the grails-app/views bit. So you end up with the path /var/www/grails/my-app/grails-app/views/... .
ポイントとなるのは、grails-app/viewsを含んだ全てのビューディレクトリ階層を持たなくてはならない所です。この場合だとパスは、/var/www/grails/my-app/grails-app/views/...となります。One thing to bear in mind with this technique is that every time you modify a GSP, it uses up permgen space. So at some point you will eventually hit "out of permgen space" errors unless you restart the server. So this technique is not recommended for frequent or large changes to the views.
ひとつ気にかけてほしいのが、GSPを更新するたびに、permgenスペースを多く使用するという事です。それにより再起動するのと比べて、そのうち"out of permgen space"エラーが起こります。したがって、常に更新される物や、ビューへの大きな変更には推奨できません。There are also some System properties to control GSP reloading:
GSPリロードをコントロールするシステムプロパティも提供しています:
| Name | Description | Default |
|---|
| grails.gsp.enable.reload | altervative system property for enabling the GSP reload mode without changing Config.groovy | |
| grails.gsp.reload.interval | interval between checking the lastmodified time of the gsp source file, unit is milliseconds | 5000 |
| grails.gsp.reload.granularity | the number of milliseconds leeway to give before deciding a file is out of date. this is needed because different roundings usually cause a 1000ms difference in lastmodified times | 1000 |
| 名称 | 説明 | 既存値 |
|---|
| grails.gsp.enable.reload | Config.groovy変更せずにGSPリロードモードを許可にします。 | |
| grails.gsp.reload.interval | gspソースファイルの更新を確認するインターバル。ミリ秒で指定。 | 5000 |
| grails.gsp.reload.granularity | ファイルが更新されたかを判断する時間のゆとり。ミリ秒で指定。 | 1000 |
GSP reloading is supported for precompiled GSPs since Grails 1.3.5 .
プリコンパイルGSPに対してのGSPリロードはGrails 1.3.5からサポートされています。
6.2.8 GSPデバッグ
生成されたソースコードを表示する
Viewing the generated source code
- Adding "?showSource=true" or "&showSource=true" to the url shows the generated Groovy source code for the view instead of rendering it. It won't show the source code of included templates. This only works in development mode
- The saving of all generated source code can be activated by setting the property "grails.views.gsp.keepgenerateddir" (in Config.groovy) . It must point to a directory that exists and is writable.
- During "grails war" gsp pre-compilation, the generated source code is stored in grails.project.work.dir/gspcompile (usually in ~/.grails/(grails_version)/projects/(project name)/gspcompile).
- URLに、 "?showSource=true" または、"&showSource=true"を追加するとページ描写の代わりに、ビュー用に生成されたGroovyコードが参照できます。但し含んだテンプレートのコードは含まれません。開発モードのみで動作します。
- Config.groovyにプロパティ"grails.views.gsp.keepgenerateddir"を指定すると生成ファイルが指定された場所に保存されます。
- "grails war"でのgspプリコンパイル時に、生成されたソースコードがgrails.project.work.dir/gspcompileに保存されます。(通常は~/.grails/(grails_version)/projects/(project name)/gspcompileです。)
デバッガでGSPコードをデバッグ
Debugging GSP code with a debugger
使用されたテンプレートの情報を参照
Viewing information about templates used to render a single url
GSP templates are reused in large web applications by using the g:render taglib. Several small templates can be used to render a single page.
It might be hard to find out what GSP template actually renders the html seen in the result.
The debug templates -feature adds html comments to the output. The comments contain debug information about gsp templates used to render the page.
規模の大きいなWebアプリケーションでは、g:renderタグを使用してGSPテンプレートは再利用されます。幾つかの小さなテンプレートが1つのページで使われる事もあります。どの部分でGSPテンプレートが実際にHTMLを描写したか探すのは大変だと思います。テンプレートデバッグ機能ではhtmlコメントでGSPテンプレートのデバッグ情報を提供します。
Usage is simple: append "?debugTemplates" or "&debugTemplates" to the url and view the source of the result in your browser.
"debugTemplates" is restricted to development mode. It won't work in production.
使用方法は簡単、URLに"?debugTemplates" または "&debugTemplates"を追加して表示されたページのソースを参照します。"debugTemplates"は開発モードのみで動作します。Here is an example of comments added by debugTemplates :
debugTemplatesでは以下のようなコメントが追記されます:<!-- GSP #2 START template: /home/.../views/_carousel.gsp
precompiled: false lastmodified: … -->
.
.
.
<!-- GSP #2 END template: /home/.../views/_carousel.gsp
rendering time: 115 ms -->Each comment block has a unique id so that you can find the start & end of each template call.
それぞれのコメントブロックには番号を持っていて、テンプレートの開始と終了を探し安くしてあります。
6.3 タグライブラリ
Like
Java Server Pages (JSP), GSP supports the concept of custom tag libraries. Unlike JSP, Grails' tag library mechanism is simple, elegant and completely reloadable at runtime.
Quite simply, to create a tag library create a Groovy class that ends with the convention TagLib and place it within the grails-app/taglib directory:
タグライブラリを作成するには、grails-app/taglibディレクトリに、名称の最後がTagLibとなるGroovyクラスを作成します:Now to create a tag create a Closure property that takes two arguments: the tag attributes and the body content:
タグライブラリクラスを作成したら、2つの引数(属性とタグ内容)を受け取るクロージャを追加してタグを作成します:class SimpleTagLib {
def simple = { attrs, body -> }
}attrs argument is a Map of the attributes of the tag, whilst the body argument is a Closure that returns the body content when invoked:
引数attrsはタグ属性のMapです。引数bodyはタグ内容のコンテンツを呼び出すクロージャです:class SimpleTagLib {
def emoticon = { attrs, body ->
out << body() << (attrs.happy == 'true' ? " :-)" : " :-(")
}
}As demonstrated above there is an implicit out variable that refers to the output Writer which you can use to append content to the response. Then you can reference the tag inside your GSP; no imports are necessary:
上記の例では、レスポンスを出力するWriterを参照する変数outに対してコンテンツを追加しています。ここまで作成したら、以下のように、GSPの中でタグをそのまま参照します。importは必要ありません。:<g:emoticon happy="true">Hi John</g:emoticon>
To help IDEs like SpringSource Tool Suite (STS) and others autocomplete tag attributes, you should add Javadoc comments to your tag closures with @attr descriptions. Since taglibs use Groovy code it can be difficult to reliably detect all usable attributes.
タグリブはGroovyコードを使用しているため、タグで使用可能な属性全てを認識することは困難です。SpringSource Tool Suite (STS)等のIDEでの補完機能に対しての手助けとして、タグクロージャのJavadocコメント内に@attrを含めましょう。For example:
例として:class SimpleTagLib { /**
* Renders the body with an emoticon.
*
* @attr happy whether to show a happy emoticon ('true') or
* a sad emoticon ('false')
*/
def emoticon = { attrs, body ->
out << body() << (attrs.happy == 'true' ? " :-)" : " :-(")
}
}and any mandatory attributes should include the REQUIRED keyword, e.g.
必須条件の属性には、キーワードREQUIREDを指定します。class SimpleTagLib { /**
* Creates a new password field.
*
* @attr name REQUIRED the field name
* @attr value the field value
*/
def passwordField = { attrs ->
attrs.type = "password"
attrs.tagName = "passwordField"
fieldImpl(out, attrs)
}
}
6.3.1 変数とスコープ
Within the scope of a tag library there are a number of pre-defined variables including:
タグライブラリのスコープには、多数の前定義された変数があります:
actionName - The currently executing action namecontrollerName - The currently executing controller nameflash - The flash objectgrailsApplication - The GrailsApplication instanceout - The response writer for writing to the output streampageScope - A reference to the pageScope object used for GSP rendering (i.e. the binding)params - The params object for retrieving request parameterspluginContextPath - The context path to the plugin that contains the tag libraryrequest - The HttpServletRequest instanceresponse - The HttpServletResponse instanceservletContext - The javax.servlet.ServletContext instancesession - The HttpSession instance
As demonstrated it the previous example it is easy to write simple tags that have no body and just output content. Another example is a dateFormat style tag:
前の説明で、簡単にコンテンツを出力するタグは簡単に記述できると説明しました。他の例としてdateFormatタグを紹介します:def dateFormat = { attrs, body ->
out << new java.text.SimpleDateFormat(attrs.format).format(attrs.date)
}The above uses Java's SimpleDateFormat class to format a date and then write it to the response. The tag can then be used within a GSP as follows:
この例ではJavaのSimpleDateFormatクラスを使ってフォーマットした日付をレスポンスに出力します。このタグは、GSPで次のように使用します:
<g:dateFormat format="dd-MM-yyyy" date="${new Date()}" />With simple tags sometimes you need to write HTML mark-up to the response. One approach would be to embed the content directly:
単純なタグでHTMLマークアップをレスポンスすることもあるでしょう。一つのアプローチとして直接コンテンツを埋め込む事ができます:
def formatBook = { attrs, body ->
out << "<div id="${attrs.book.id}">"
out << "Title : ${attrs.book.title}"
out << "</div>"
}Although this approach may be tempting it is not very clean. A better approach would be to reuse the
render tag:
def formatBook = { attrs, body ->
out << render(template: "bookTemplate", model: [book: attrs.book])
}And then have a separate GSP template that does the actual rendering.
このようにして、実際に描写されるGSPテンプレートと切り離せます.
You can also create logical tags where the body of the tag is only output once a set of conditions have been met. An example of this may be a set of security tags:
条件に合ったときのみにタグ内容を出力する制御タグを作成できます。セキュリティタグを例とします:def isAdmin = { attrs, body ->
def user = attrs.user
if (user && checkUserPrivs(user)) {
out << body()
}
}The tag above checks if the user is an administrator and only outputs the body content if he/she has the correct set of access privileges:
この例ではアクセスしたユーザをチェックして、管理者であった場合のみ内容を出力します:<g:isAdmin user="${myUser}">
// some restricted content
</g:isAdmin>Iterative tags are easy too, since you can invoke the body multiple times:
タグ内容を複数回実行するような、イテレートタグも簡単に作れます:def repeat = { attrs, body ->
attrs.times?.toInteger()?.times { num ->
out << body(num)
}
}In this example we check for a times attribute and if it exists convert it to a number, then use Groovy's times method to iterate the specified number of times:
この例では、属性timesを有無や数値なのかを確認し、その数値でGroovyのtimesメソッドを実行して、与えられた数値の回数、実行内容を繰り返します:<g:repeat times="3">
<p>Repeat this 3 times! Current repeat = ${it}</p>
</g:repeat>Notice how in this example we use the implicit it variable to refer to the current number. This works because when we invoked the body we passed in the current value inside the iteration:
ここでは、数値を参照した変数itの使い方を紹介しています。これはbody実行時にイテレーションの数値をbodyに渡すことで動作しています。:That value is then passed as the default variable it to the tag. However, if you have nested tags this can lead to conflicts, so you should should instead name the variables that the body uses:
この値はタグ内の変数itに渡されます。ただしタグをネストした場合は名称の衝突が起きるため違う名称を指定できるようにする必要があります。:def repeat = { attrs, body ->
def var = attrs.var ?: "num"
attrs.times?.toInteger()?.times { num ->
out << body((var):num)
}
}Here we check if there is a var attribute and if there is use that as the name to pass into the body invocation on this line:
この例では、属性varが存在すれば、その値を名称として使用できるようにbodyに渡して実行します。
Note the usage of the parenthesis around the variable name. If you omit these Groovy assumes you are using a String key and not referring to the variable itself.
変数名パーレン使用時の注意点です。これを省略するとGroovyは文字列キーとして解釈してしまい変数として参照できません。
Now we can change the usage of the tag as follows:
これで、以下のようにタグで使用できます:<g:repeat times="3" var="j">
<p>Repeat this 3 times! Current repeat = ${j}</p>
</g:repeat>Notice how we use the var attribute to define the name of the variable j and then we are able to reference that variable within the body of the tag.
こうすることで、var属性に指定した変数名jをタグ内部で変数として参照することができます。
6.3.5 タグネームスペース
By default, tags are added to the default Grails namespace and are used with the g: prefix in GSP pages. However, you can specify a different namespace by adding a static property to your TagLib class:
デフォルトでのタグは、Grailsのデフォルトネームスペースに追加され、GSPではg:接頭辞が使用できます。ネームスペースはstaticプロパティnamespaceをTagLibクラスに追加する事で、独自に定義することが可能です。:class SimpleTagLib {
static namespace = "my" def example = { attrs ->
…
}
}Here we have specified a namespace of my and hence the tags in this tag lib must then be referenced from GSP pages like this:
この例ではnamespaceをmyと定義したので、このタグを参照するにはGSPページ内では以下のように参照できます:<my:example name="..." />
where the prefix is the same as the value of the static namespace property. Namespaces are particularly useful for plugins.
これ例でnamespaceプロパティに設定したものが接頭辞として使用しています。ネームスペースはプラグインでタグ提供を行う際に有用です。Tags within namespaces can be invoked as methods using the namespace as a prefix to the method call:
ネームスペース付きタグのメソッドコール時はネームスペースを接頭辞として使用します:out << my.example(name:"foo")
This works from GSP, controllers or tag libraries
GSP、コントローラ、タグライブラリで使用できます。
6.3.6 JSPタグライブラリの使用
In addition to the simplified tag library mechanism provided by GSP, you can also use JSP tags from GSP. To do so simply declare the JSP to use with the taglib directive:
単純なタグライブラリ機能がGSPで提供されているのに加えて、GSPでは、JSPタグを使用することもできます。使用するには、taglibディレクティブを定義します。<%@ taglib prefix="fmt" uri="http://java.sun.com/jsp/jstl/fmt" %>
Then you can use it like any other tag:
他のタグと同じように使用できます:<fmt:formatNumber value="${10}" pattern=".00"/>With the added bonus that you can invoke JSP tags like methods:
さらに追加として、JSPタグをメソッドとして実行可能です:${fmt.formatNumber(value:10, pattern:".00")}6.3.7 タグの戻り値
Since Grails 1.2, a tag library call returns an instance of org.codehaus.groovy.grails.web.util.StreamCharBuffer class by default.
This change improves performance by reducing object creation and optimizing buffering during request processing.
In earlier Grails versions, a java.lang.String instance was returned.
Grails 1.2以降、タグライブラリを呼び出すと、デフォルトではorg.codehaus.groovy.grails.web.util.StreamCharBuffer クラスのインスタンスを返します。
この実装でリクエスト処理時のバッファリング最適化や、オブジェクト生成の減少によりパフォーマンスの向上が行われました。
それ以前のGrailsではjava.lang.Stringインスタンスを返します。Tag libraries can also return direct object values to the caller since Grails 1.2..
Object returning tag names are listed in a static returnObjectForTags property in the tag library class.
さらに、Grails 1.2からは、タグライブラリから直接オブジェクトを返す事が可能です。オブジェクトを返すタグを定義するにはstatic returnObjectForTagsプロパティにタグ名称をリストします。Example:
例:
class ObjectReturningTagLib {
static namespace = "cms"
static returnObjectForTags = ['content'] def content = { attrs, body ->
CmsContent.findByCode(attrs.code)?.content
}
}6.4 URLマッピング
Throughout the documentation so far the convention used for URLs has been the default of /controller/action/id. However, this convention is not hard wired into Grails and is in fact controlled by a URL Mappings class located at grails-app/conf/UrlMappings.groovy.
ここまでのドキュメント内容では、URLのルールはデフォルトの/controller/action/idを使用しています。このルールはGrailsで必須になっているわけでは無く、grails-app/conf/UrlMappings.groovyに配置されているURLマッピングクラスでコントロールされています。The UrlMappings class contains a single property called mappings that has been assigned a block of code:
URLMappingsクラスは、コードブロックが定義されたmappingsというプロパティを持っています。:class UrlMappings {
static mappings = {
}
}6.4.1 コントローラとアクションにマッピング
To create a simple mapping simply use a relative URL as the method name and specify named parameters for the controller and action to map to:
簡単なマッピングは、相対URLをメソッド名とするメソッドに、マップ対象のコントローラとアクション名称を、名前付きパラメータ引数として作成します:"/product"(controller: "product", action: "list")
In this case we've mapped the URL /product to the list action of the ProductController. Omit the action definition to map to the default action of the controller:
この例ではURL /productは、ProductControllerのlistアクションにマップ定義したことになります。アクションを省略すると、コントローラのデフォルトアクションにマップ定義できます:"/product"(controller: "product")
An alternative syntax is to assign the controller and action to use within a block passed to the method:
他のシンタックスとして、コントローラとアクションを指定したコードブロックをメソッドに渡すこともできます:"/product" {
controller = "product"
action = "list"
}Which syntax you use is largely dependent on personal preference. To rewrite one URI onto another explicit URI (rather than a controller/action pair) do something like this:
どちらのシンタックスを使用するかは個人の選択に依存します。(コントローラ・アクションを指定するのでは無く)URIを明示的なURIへ書き換えする場合は:"/hello"(uri: "/hello.dispatch")
Rewriting specific URIs is often useful when integrating with other frameworks.
特定のURIへの書き換えは、他のフレームワークと統合する場合に便利です。
6.4.2 埋込変数
簡単な変数
Simple Variables
The previous section demonstrated how to map simple URLs with concrete "tokens". In URL mapping speak tokens are the sequence of characters between each slash, '/'. A concrete token is one which is well defined such as as /product. However, in many circumstances you don't know what the value of a particular token will be until runtime. In this case you can use variable placeholders within the URL for example:
前セクションでは、具体トークンURLを簡単にマップする方法を紹介しました。URLマッピングでのトークンとは"/"スラッシュの間にある文字列の事を指します。具体トークンは/productのように適切に指定できますが、状況によっては、ランタイム時にしか一部のトークンが予測できない場合があります。その場合は以下の例のように変数を指定できます:static mappings = {
"/product/$id"(controller: "product")
}In this case by embedding a $id variable as the second token Grails will automatically map the second token into a parameter (available via the
params object) called
id. For example given the URL
/product/MacBook, the following code will render "MacBook" to the response:
idのパラメータとしてマップします(このパラメータはparamsオブジェクトから取得できます)。例として、URL /product/MacBookへアクセスを行うと、次のコードでは、結果として"MacBook"をレスポンスします:class ProductController {
def index() { render params.id }
}You can of course construct more complex examples of mappings. For example the traditional blog URL format could be mapped as follows:
もっと複雑なマッピングも作成できます。例としてブログのようなURLフォーマットを次のようにしてマッピングできます:static mappings = {
"/$blog/$year/$month/$day/$id"(controller: "blog", action: "show")
}The above mapping would let you do things like:
このマッピングでは、以下のようなURLでアクセスを可能にします:/graemerocher/2007/01/10/my_funky_blog_entry
The individual tokens in the URL would again be mapped into the
params object with values available for
year,
month,
day,
id and so on.
blog, year, month, day, idとして値を取得する事ができます。動的なコントローラ名とアクション名
Dynamic Controller and Action Names
Variables can also be used to dynamically construct the controller and action name. In fact the default Grails URL mappings use this technique:
変数を使って動的にコントローラとアクション名を構成することができます。GrailsでのデフォルトURLマッピングはこの機能を使用しています:static mappings = {
"/$controller/$action?/$id?"()
}Here the name of the controller, action and id are implicitly obtained from the variables controller, action and id embedded within the URL.
URLに指定された内容から、変数controller,action,idを取得して、コントローラ、アクション、idを確定します。You can also resolve the controller name and action name to execute dynamically using a closure:
コントローラ名の解決を変数で行い、クロージャを実行して動的にアクション名を解決することもできます:static mappings = {
"/$controller" {
action = { params.goHere }
}
}省略可能な変数
Optional Variables
Another characteristic of the default mapping is the ability to append a ? at the end of a variable to make it an optional token. In a further example this technique could be applied to the blog URL mapping to have more flexible linking:
変数の最後に ? を付加することで、変数を省略可能にすることが可能です。この仕組みを使用して、前述した例のブログURLマッピングをもっと柔軟にしてみましょう:static mappings = {
"/$blog/$year?/$month?/$day?/$id?"(controller:"blog", action:"show")
}With this mapping all of these URLs would match with only the relevant parameters being populated in the
params object:
/graemerocher/2007/01/10/my_funky_blog_entry
/graemerocher/2007/01/10
/graemerocher/2007/01
/graemerocher/2007
/graemerocher
任意変数
Arbitrary Variables
You can also pass arbitrary parameters from the URL mapping into the controller by just setting them in the block passed to the mapping:
URLマッピングからコントローラへ、コードブロック内で設定した任意のパラメータを渡すことが可能です:"/holiday/win" {
id = "Marrakech"
year = 2007
}This variables will be available within the
params object passed to the controller.
動的解決変数
Dynamically Resolved Variables
The hard coded arbitrary variables are useful, but sometimes you need to calculate the name of the variable based on runtime factors. This is also possible by assigning a block to the variable name:
任意の変数をURLマッピングに埋め込むのは便利ですが、時折状況に応じて変数の内容を演算したい場合があると思います。この場合コードブロックを変数に割り当てます。:"/holiday/win" {
id = { params.id }
isEligible = { session.user != null } // must be logged in
}In the above case the code within the blocks is resolved when the URL is actually matched and hence can be used in combination with all sorts of logic.
URLが実際にマッチした時にコードブロックのロジックが実行されて変数の内容が解決されます。
6.4.3 ビューへマッピング
You can resolve a URL to a view without a controller or action involved. For example to map the root URL / to a GSP at the location grails-app/views/index.gsp you could use:
コントローラまたはアクションを含まずにビューへURLをマップできます。例としてルートURL / を、grails-app/views/index.gspにマッピングするには:static mappings = {
"/"(view: "/index") // map the root URL
}Alternatively if you need a view that is specific to a given controller you could use:
あるいは、特定のコントローラにあるビューを指定する場合は:static mappings = {
"/help"(controller: "site", view: "help") // to a view for a controller
}6.4.4 レスポンスコードへマッピング
Grails also lets you map HTTP response codes to controllers, actions or views. Just use a method name that matches the response code you are interested in:
GrailsではHTTPレスポンスコードをコントローラ、アクション、ビューにマッピングすることができます。使用したいレスポンスコードをメソッド名に指定するだけです:static mappings = {
"403"(controller: "errors", action: "forbidden")
"404"(controller: "errors", action: "notFound")
"500"(controller: "errors", action: "serverError")
}Or you can specify custom error pages:
カスタムエラーページを指定する場合は:static mappings = {
"403"(view: "/errors/forbidden")
"404"(view: "/errors/notFound")
"500"(view: "/errors/serverError")
}エラーハンドリング宣言
Declarative Error Handling
In addition you can configure handlers for individual exceptions:
特定の例外をのハンドラを定義することも可能です:static mappings = {
"403"(view: "/errors/forbidden")
"404"(view: "/errors/notFound")
"500"(controller: "errors", action: "illegalArgument",
exception: IllegalArgumentException)
"500"(controller: "errors", action: "nullPointer",
exception: NullPointerException)
"500"(controller: "errors", action: "customException",
exception: MyException)
"500"(view: "/errors/serverError")
}With this configuration, an IllegalArgumentException will be handled by the illegalArgument action in ErrorsController, a NullPointerException will be handled by the nullPointer action, and a MyException will be handled by the customException action. Other exceptions will be handled by the catch-all rule and use the /errors/serverError view.
この設定では、IllegalArgumentExceptionはErrorsControllerのillegalArgument、NullPointerExceptionはnullPointerアクション、MyExceptionはcustomExceptionアクションでそれぞれ処理されます。その他の例外がcatch-allルールでハンドルされビューに/errors/serverErrorを使用します。You can access the exception from your custom error handing view or controller action using the request's exception attribute like so:
カスタムエラーハンドリングで、ビューまたは、コントローラアクションから例外を参照するには、requestインスタンスのexceptionを使用します:class ErrorController {
def handleError() {
def exception = request.exception
// perform desired processing to handle the exception
}
}
If your error-handling controller action throws an exception as well, you'll end up with a StackOverflowException.
エラーハンドリング用のコントローラアクションが例外を出した場合は、最終的にStackOverflowExceptionになります。
6.4.5 HTTPメソッドへマッピング
URL mappings can also be configured to map based on the HTTP method (GET, POST, PUT or DELETE). This is very useful for RESTful APIs and for restricting mappings based on HTTP method.
URLマッピングでは、HTTPメソッド(GET, POST, PUT, DELETE)へのマップを定義することができます。HTTPメソッドをベースに制限したり、RESTful API等に便利です。As an example the following mappings provide a RESTful API URL mappings for the ProductController:
このマッピングの例ではProductController用にRESTful API URLマッピングを提供しています:static mappings = {
"/product/$id"(controller:"product") {
action = [GET:"show", PUT:"update", DELETE:"delete", POST:"save"]
}
}6.4.6 マッピングワイルドカード
Grails' URL mappings mechanism also supports wildcard mappings. For example consider the following mapping:
GrailsのURLマッピング機能ではワイルドカードもサポートしています。例として次ぎのマッピングに注目してください:static mappings = {
"/images/*.jpg"(controller: "image")
}This mapping will match all paths to images such as /image/logo.jpg. Of course you can achieve the same effect with a variable:
このマッピングが/image/logo.jpgのような画像パスにマッチします。変数も使用可能です:static mappings = {
"/images/$name.jpg"(controller: "image")
}However, you can also use double wildcards to match more than one level below:
ダブルワイルドカード使用すると1レベル下の階層までマッチします:static mappings = {
"/images/**.jpg"(controller: "image")
}In this cases the mapping will match /image/logo.jpg as well as /image/other/logo.jpg. Even better you can use a double wildcard variable:
このマッピング例では、/image/logo.jpgや、/image/other/logo.jpgにマッチします。ダブルワイルドカード変数も使用できます:static mappings = {
// will match /image/logo.jpg and /image/other/logo.jpg
"/images/$name**.jpg"(controller: "image")
}In this case it will store the path matched by the wildcard inside a
name parameter obtainable from the
params object:
nameパラメータにマッチしたパスをparamsオブジェクトから取得できます:def name = params.name
println name // prints "logo" or "other/logo"
If you use wildcard URL mappings then you may want to exclude certain URIs from Grails' URL mapping process. To do this you can provide an excludes setting inside the UrlMappings.groovy class:
ワイルドカードURLマッピングを使用すると、一定のURIをURLマッピングでの除外も必要となります。UrlMappings.groovyクラスで、excludesを指定することで可能です:class UrlMappings {
static excludes = ["/images/*", "/css/*"]
static mappings = {
…
}
}In this case Grails won't attempt to match any URIs that start with /images or /css.
この例では、 /imagesまた/cssで始まるURIはURLマッピングから除外されます.
6.4.7 自動リンクリライト
Another great feature of URL mappings is that they automatically customize the behaviour of the
link tag so that changing the mappings don't require you to go and change all of your links.
This is done through a URL re-writing technique that reverse engineers the links from the URL mappings. So given a mapping such as the blog one from an earlier section:
URLマッピングからリバースエンジニアリングによってURLをリライトするという仕組みで実装されています。前のセクションからのブログマッピングを例があるとします:static mappings = {
"/$blog/$year?/$month?/$day?/$id?"(controller:"blog", action:"show")
}If you use the link tag as follows:
以下のようにlinkタグを使用します:<g:link controller="blog" action="show"
params="[blog:'fred', year:2007]">
My Blog
</g:link><g:link controller="blog" action="show"
params="[blog:'fred', year:2007, month:10]">
My Blog - October 2007 Posts
</g:link>Grails will automatically re-write the URL in the correct format:
GrailsがURLを自動的にリライトします:<a href="/fred/2007">My Blog</a>
<a href="/fred/2007/10">My Blog - October 2007 Posts</a>
6.4.8 制約の適用
URL Mappings also support Grails' unified
validation constraints mechanism, which lets you further "constrain" how a URL is matched. For example, if we revisit the blog sample code from earlier, the mapping currently looks like this:
static mappings = {
"/$blog/$year?/$month?/$day?/$id?"(controller:"blog", action:"show")
}This allows URLs such as:
以下のURLを許可します:/graemerocher/2007/01/10/my_funky_blog_entry
However, it would also allow:
もちろんこのままでは、以下のようなURLも許可します:/graemerocher/not_a_year/not_a_month/not_a_day/my_funky_blog_entry
This is problematic as it forces you to do some clever parsing in the controller code. Luckily, URL Mappings can be constrained to further validate the URL tokens:
これが許可されるといたずらされる危険性があります。ここで!URLマッピングに制約を定義してURLトークンをバリデートします:"/$blog/$year?/$month?/$day?/$id?" {
controller = "blog"
action = "show"
constraints {
year(matches:/\d{4}/)
month(matches:/\d{2}/)
day(matches:/\d{2}/)
}
}In this case the constraints ensure that the year, month and day parameters match a particular valid pattern thus relieving you of that burden later on.
この例では、year,month,dayパラメータが特定のパターンにマッチするように制約を定義しています。
6.4.9 名前付きURLマッピング
URL Mappings also support named mappings, that is mappings which have a name associated with them. The name may be used to refer to a specific mapping when links are generated.
URLマッピングでは、名前で連携ができるように、名前付きマッピングに対応しています。The syntax for defining a named mapping is as follows:
名前付きマッピングの定義は以下のようになります:static mappings = {
name <mapping name>: <url pattern> {
// …
}
}For example:
例として:static mappings = {
name personList: "/showPeople" {
controller = 'person'
action = 'list'
}
name accountDetails: "/details/$acctNumber" {
controller = 'product'
action = 'accountDetails'
}
}The mapping may be referenced in a link tag in a GSP.
次のように、GSPでlinkタグからマッピングを参照します:<g:link mapping="personList">List People</g:link>
That would result in:
この結果は以下のようになります:<a href="/showPeople">List People</a>
Parameters may be specified using the params attribute.
params属性でパラメータを定義することができます.<g:link mapping="accountDetails" params="[acctNumber:'8675309']">
Show Account
</g:link>That would result in:
この例の結果は:<a href="/details/8675309">Show Account</a>
Alternatively you may reference a named mapping using the link namespace.
名前付きマッピングでは、linkタグの代わりに、linkネームスペースのタグが使用できます。<link:personList>List People</link:personList>
That would result in:
この例の結果は:<a href="/showPeople">List People</a>
The link namespace approach allows parameters to be specified as attributes.
linkネームスペースタグでは、パラメータを属性で指定できます。<link:accountDetails acctNumber="8675309">Show Account</link:accountDetails>
That would result in:
この例の結果は:<a href="/details/8675309">Show Account</a>
To specify attributes that should be applied to the generated href, specify a Map value to the attrs attribute. These attributes will be applied directly to the href, not passed through to be used as request parameters.
属性に指定した全ての内容は生成されたhrefに適用されてしまうので、他の属性は、attrs属性にMapで指定します。<link:accountDetails attrs="[class: 'fancy']" acctNumber="8675309">
Show Account
</link:accountDetails>That would result in:
この例の結果は:<a href="/details/8675309" class="fancy">Show Account</a>
The default URL Mapping mechanism supports camel case names in the URLs. The default URL for accessing an action named addNumbers in a controller named MathHelperController would be something like /mathHelper/addNumbers. Grails allows for the customization of this pattern and provides an implementation which replaces the camel case convention with a hyphenated convention that would support URLs like /math-helper/add-numbers. To enable hyphenated URLs assign a value of "hyphenated" to the grails.web.url.converter property in grails-app/conf/Config.groovy.
URLでの
URLマッピングは、デフォルトでキャメルケースのURLになります。例えばコントローラMathHelperControllerのアクションaddNumbersの場合、デフォルトURLでのURLは、/mathHelper/addNumbersのようになります。Grailsでは、このパターンをカスタマイズして、/math-helper/add-numbersのようなハイフン形式にキャメルケース形式を入れ換える実装が可能です。ハイフンURLを可能にするには、grails-app/conf/Config.groovyのgrails.web.url.converterを"hyphenated"にします。// grails-app/conf/Config.groovygrails.web.url.converter = 'hyphenated'
Arbitrary strategies may be plugged in by providing a class which implements the
UrlConverter interface and adding an instance of that class to the Spring application context with the bean name of
grails.web.UrlConverter.BEAN_NAME. If Grails finds a bean in the context with that name, it will be used as the default converter and there is no need to assign a value to the
grails.web.url.converter config property.
grails.web.UrlConverter.BEAN_NAMEで追加します。Grailsがそのビーン名称をコンテキストに有ることを認識した場合、指定したクラスの実装がデフォルトとなります。この場合は、grails.web.url.converterプロパティは必要有りません。
// src/groovy/com/myapplication/MyUrlConverterImpl.groovypackage com.myapplicationclass MyUrlConverterImpl implements grails.web.UrlConverter {    String toUrlElement(String propertyOrClassName) {
        // return some representation of a property or class name that should be used in URLs…
    }
}
// src/groovy/com/myapplication/MyUrlConverterImpl.groovypackage com.myapplicationclass MyUrlConverterImpl implements grails.web.UrlConverter { String toUrlElement(String propertyOrClassName) {
// URLで描写するプロパティ名またはクラス名を返す
}
}// grails-app/conf/spring/resources.groovybeans = {
"${grails.web.UrlConverter.BEAN_NAME}"(com.myapplication.MyUrlConverterImpl)
}6.5 Webフロー
概要
Overview
Grails supports the creation of web flows built on the
Spring Web Flow project. A web flow is a conversation that spans multiple requests and retains state for the scope of the flow. A web flow also has a defined start and end state.
Web flows don't require an HTTP session, but instead store their state in a serialized form, which is then restored using a flow execution key that Grails passes around as a request parameter. This makes flows far more scalable than other forms of stateful application that use the HttpSession and its inherit memory and clustering concerns.
WebフローにはHTTP sessionは必要有りません。代わりに、リクエストパラメータでGrailsが持ち回る、フローエクスキュージョンキーを使用した連載形式でステートを保持しています。この方式はメモリ継承やクラスタリング問題のあるHttpSessionを使用したステートフルアプリケーションの形式よりもフローをスケーラブルにします。Web flow is essentially an advanced state machine that manages the "flow" of execution from one state to the next. Since the state is managed for you, you don't have to be concerned with ensuring that users enter an action in the middle of some multi step flow, as web flow manages that for you. This makes web flow perfect for use cases such as shopping carts, hotel booking and any application that has multi page work flows.
Webフローは本質的には、"フロー"の実行のステートの流れを管理する上級ステートマシーンです。
ステートが管理されると、Webフローが管理してくれるので、ユーザがフロー途中のアクションから入ってくる場合どうするか等を気にしなくても良くなります。これによりショッピングカート、ホテル予約などの複数ページにまたがるワークフローを持つアプリケーションにWebフローがよく合うと言う事です。
From Grails 1.2 onwards Webflow is no longer in Grails core, so you must install the Webflow plugin to use this feature: grails install-plugin webflow
Grails 1.2からWebフローはGrailsのコア機能では無くなりました。この機能を使用するには、Webフロープラグインをインストールする必要があります: grails install-plugin webflow
フローの作成
Creating a Flow
To create a flow create a regular Grails controller and add an action that ends with the convention Flow. For example:
フローを作成するには、名称がFlowで終わるアクションをGrailsの通常にコントローラに作成します。例として:class BookController { def index() {
redirect(action: "shoppingCart")
} def shoppingCartFlow = {
…
}
}Notice when redirecting or referring to the flow as an action we omit the Flow suffix. In other words the name of the action of the above flow is shoppingCart.
フローをアクションとしてリダイレクトまたは参照をするには、接尾辞のFlowを省略します。言い換えれば上記のフローのアクション名はshoppingCartとなります。
6.5.1 開始と終了のステート
As mentioned before a flow has a defined start and end state. A start state is the state which is entered when a user first initiates a conversation (or flow). The start state of a Grails flow is the first method call that takes a block. For example:
前述したように、Webフローでは明示された開始と終了ステートも持っています。開始ステートは、ユーザが最初に対話(またはフロー)を開始するステートです。最初のブロックのメソッドコールがGrailsフローの開始ステートです:class BookController {
…
def shoppingCartFlow ={
showCart {
on("checkout").to "enterPersonalDetails"
on("continueShopping").to "displayCatalogue"
}
…
displayCatalogue {
redirect(controller: "catalogue", action: "show")
}
displayInvoice()
}
}Here the
showCart node is the start state of the flow. Since the showCart state doesn't define an action or redirect it is assumed be a
view state that, by convention, refers to the view
grails-app/views/book/shoppingCart/showCart.gsp.
showCartノードになります。showCartがアクションまたリダイレクトを定義していない場合は、慣習によりgrails-app/views/book/shoppingCart/showCart.gspを参照して表示するビューステートとして見なされます。
Notice that unlike regular controller actions, the views are stored within a directory that matches the name of the flow: grails-app/views/book/shoppingCart.
通常のコントローラアクションと違い、ビューファイルはフロー名称のディレクトリに配置された物にマッチします:grails-app/views/book/shoppingCartThe shoppingCart flow also has two possible end states. The first is displayCatalogue which performs an external redirect to another controller and action, thus exiting the flow. The second is displayInvoice which is an end state as it has no events at all and will simply render a view called grails-app/views/book/shoppingCart/displayInvoice.gsp whilst ending the flow at the same time.
このshoppingCartフローには、2つの終了ステートがあります。一つ目のステートは、外部のコントローラアクションにリダイレクトしてフローから出るdisplayCatalogue。二つ目のステートは、何もイベント処理が無く単純に、ビューのgrails-app/views/book/shoppingCart/displayInvoice.gspを描写して同時にフローを終了する、displayInvoiceです。Once a flow has ended it can only be resumed from the start state, in this case showCart, and not from any other state.
フローが終了したら、開始フローのみから再開できます。この例ではshowCartになります。
6.5.2 アクションステートとビューステート
ビューステート
View states
A view state is a one that doesn't define an action or a redirect. So for example this is a view state:
actionまたridairectを定義していないものがビューステートです。この例がビューステートになります:enterPersonalDetails {
on("submit").to "enterShipping"
on("return").to "showCart"
}It will look for a view called
grails-app/views/book/shoppingCart/enterPersonalDetails.gsp by default. Note that the
enterPersonalDetails state defines two events:
submit and
return. The view is responsible for
triggering these events. Use the
render method to change the view to be rendered:
grails-app/views/book/shoppingCart/enterPersonalDetails.gspを使用します。enterPersonalDetailsステートは、submitとreturnという2つのイベントを定義しています。これらのイベントはビューでトリガーする必要があります。renderメソッドを使用して描写するビューを変更することが可能です:enterPersonalDetails {
render(view: "enterDetailsView")
on("submit").to "enterShipping"
on("return").to "showCart"
}Now it will look for grails-app/views/book/shoppingCart/enterDetailsView.gsp. Start the view parameter with a / to use a shared view:
この例でgrails-app/views/book/shoppingCart/enterDetailsView.gspを参照するようになります。viewのパラメータに / を使用して共有ビューを使用できます:enterPersonalDetails {
render(view: "/shared/enterDetailsView")
on("submit").to "enterShipping"
on("return").to "showCart"
}Now it will look for grails-app/views/shared/enterDetailsView.gsp
この例でgrails-app/views/shared/enterDetailsView.gspを参照するようになります。アクションステート
Action States
An action state is a state that executes code but does not render a view. The result of the action is used to dictate flow transition. To create an action state you define an action to to be executed. This is done by calling the action method and passing it a block of code to be executed:
アクションステートはコードを実行してビューを描写しないステートです。アクションの結果は指示されたフロートランジションで使用されます。actionメソッドに実行したいコードブロックを渡してアクションステートを実装します:listBooks {
action {
[bookList: Book.list()]
}
on("success").to "showCatalogue"
on(Exception).to "handleError"
}As you can see an action looks very similar to a controller action and in fact you can reuse controller actions if you want. If the action successfully returns with no errors the
success event will be triggered. In this case since we return a Map, which is regarded as the "model" and is automatically placed in
flow scope.
successイベントがトリガーされます。この例では、モデルと見なしたMapを返して自動的にflowスコープに配置されます。In addition, in the above example we also use an exception handler to deal with errors on the line:
加えて、上記の例では、エラーを取り扱う例外ハンドラも使用しています:on(Exception).to "handleError"
This makes the flow transition to a state called handleError in the case of an exception.
例外時にhandleErrorというステートにフローが移行します。You can write more complex actions that interact with the flow request context:
フローリクエストコンテキストとやりとりをする複雑なアクションを記述できます:processPurchaseOrder {
action {
def a = flow.address
def p = flow.person
def pd = flow.paymentDetails
def cartItems = flow.cartItems
flow.clear() def o = new Order(person: p, shippingAddress: a, paymentDetails: pd)
o.invoiceNumber = new Random().nextInt(9999999)
for (item in cartItems) { o.addToItems item }
o.save()
[order: o]
}
on("error").to "confirmPurchase"
on(Exception).to "confirmPurchase"
on("success").to "displayInvoice"
}Here is a more complex action that gathers all the information accumulated from the flow scope and creates an Order object. It then returns the order as the model. The important thing to note here is the interaction with the request context and "flow scope".
この例では、アクションで、flowスコープから収集した情報からOrderオブジェクトを生成しています。そして生成後オーダーをモデルで返しています。ここで重要なのはリクエストコンテキストと"flowスコープ"のやりとりです。アクションのトランジション
Transition Actions
Another form of action is what is known as a
transition action. A transition action is executed directly prior to state transition once an
event has been triggered. A simple example of a transition action can be seen below:
enterPersonalDetails {
on("submit") {
log.trace "Going to enter shipping"
}.to "enterShipping"
on("return").to "showCart"
}Notice how we pass a block of the code to
submit event that simply logs the transition. Transition states are very useful for
data binding and validation, which is covered in a later section.
submitイベントにコードブロックを渡してトランジションのログを実行しています。この後に解説をする、データバインディングとバリデーションで、このトランジションステートが便利に活用できます。
6.5.3 フロー実行イベント
In order to transition execution of a flow from one state to the next you need some way of trigger an event that indicates what the flow should do next. Events can be triggered from either view states or action states.
ステートから次のステートへのフローでの トランジション 実行ができると、次のフローの イベントトリガー を指定する方法が必要になります。ビューステートまたはアクションステートからイベントをトリガーできます。ビューステートからのイベントトリガー
Triggering Events from a View State
As discussed previously the start state of the flow in a previous code listing deals with two possible events. A checkout event and a continueShopping event:
前のコードの例と同じく、フローの開始ステートには2つのイベントを与えます。checkoutイベントとcontinueShoppingイベントです:def shoppingCartFlow = {
showCart {
on("checkout").to "enterPersonalDetails"
on("continueShopping").to "displayCatalogue"
}
…
}Since the
showCart event is a view state it will render the view
grails-app/book/shoppingCart/showCart.gsp. Within this view you need to have components that trigger flow execution. On a form this can be done use the
submitButton tag:
shopCartイベントはビューステートなので、grails-app/book/shoppingCart/showCart.gspを描写します。このビューの中に、フロートリガーを実行するコンポーネントを持つ必要があります。 submitButtonタグを使用したフォームを使います:<g:form action="shoppingCart">
<g:submitButton name="continueShopping" value="Continue Shopping" />
<g:submitButton name="checkout" value="Checkout" />
</g:form>The form must submit back to the
shoppingCart flow. The name attribute of each
submitButton tag signals which event will be triggered. If you don't have a form you can also trigger an event with the
link tag as follows:
shoppingCartフローへ送信するようにします。それぞれのsubmitButtonタグのname属性にトリガーするイベントを指定します。フォームを使用しない場合は、次のようにlinkタグをイベントトリガーに使用できます:<g:link action="shoppingCart" event="checkout" />
アクションからのイベントトリガー
Triggering Events from an Action
To trigger an event from an action you invoke a method. For example there is the built in error() and success() methods. The example below triggers the error() event on validation failure in a transition action:
アクションからイベントをトリガーするには、メソッドを実行します。組込のerror()とsuccess()メソッド(トランジションアクション)が有るのでそれを例に使用します。次の例では、トランジションアクションでバリデーションが失敗したらerror()イベントをトリガーしています:enterPersonalDetails {
on("submit") {
def p = new Person(params)
flow.person = p
if (!p.validate()) return error()
}.to "enterShipping"
on("return").to "showCart"
}In this case because of the error the transition action will make the flow go back to the enterPersonalDetails state.
このケースでは、errorトランジションアクションにより、フローはenterPersonalDetailsステートに戻ります。With an action state you can also trigger events to redirect flow:
アクションステートでは、リダイレクトフローへイベントをトリガーできます:shippingNeeded {
action {
if (params.shippingRequired) yes()
else no()
}
on("yes").to "enterShipping"
on("no").to "enterPayment"
}6.5.4 フローのスコープ
スコープの基礎
Scope Basics
You'll notice from previous examples that we used a special object called flow to store objects within "flow scope". Grails flows have five different scopes you can utilize:
先ほどの例で、"フロー範囲で有効な"オブジェクトを蓄積する、flowという特殊なオブジェクトを使用しました。Grailsフローでは5つのスコープが利用できます:
request - Stores an object for the scope of the current requestflash - Stores the object for the current and next request onlyflow - Stores objects for the scope of the flow, removing them when the flow reaches an end stateconversation - Stores objects for the scope of the conversation including the root flow and nested subflowssession - Stores objects in the user's session
- request - 現在のリクエスト範囲のオブジェクトを蓄積
- flash - 現在と次までが有効範囲のオブジェクトを蓄積
- flow - フロー範囲で有効なオブジェクトを蓄積。フローが終了ステートに到達したら削除されます。
- conversation - ルートフローやサブフローを含む範囲での対話でのオブジェクトを蓄積
- session - ユーザのセッションへオブジェクトを蓄積
Grails service classes can be automatically scoped to a web flow scope. See the documentation on
Services for more information.
Returning a model Map from an action will automatically result in the model being placed in flow scope. For example, using a transition action, you can place objects within flow scope as follows:
アクションからモデルMapを返すと自動的に結果にあるモデルがflowスコープに配置されます。例としてトランジションアクションで次のようにflowスコープにオブジェクトを配置できます:enterPersonalDetails {
on("submit") {
[person: new Person(params)]
}.to "enterShipping"
on("return").to "showCart"
}Be aware that a new request is always created for each state, so an object placed in request scope in an action state (for example) will not be available in a subsequent view state. Use one of the other scopes to pass objects from one state to another. Also note that Web Flow:
それぞれのステートごとに新しいrequestスコープができます、(例えば)アクションステートのrequestスコープに配置したオブジェクトは次のビューステートでは使用できません。他のステートにオブジェクトを渡す場合は別のスコープを使いましょう。さらにWebフローでは:
- Moves objects from flash scope to request scope upon transition between states;
- Merges objects from the flow and conversation scopes into the view model before rendering (so you shouldn't include a scope prefix when referencing these objects within a view, e.g. GSP pages).
- ステート間のトランジションでオブジェクトをflashスコープからrequestスコープへ移動します。
- 描写する前に、flowとconversationスコープのオブジェクトをビューモデルにマージします。(GSPページ等のビューでオブジェクトを参照する際はスコープ接頭辞を含まないでください)
フロースコープとシリアライズ
Flow Scopes and Serialization
When placing objects in
flash,
flow or
conversation scope they must implement
java.io.Serializable or an exception will be thrown. This has an impact on
domain classes in that domain classes are typically placed within a scope so that they can be rendered in a view. For example consider the following domain class:
flash、flowまたconversationスコープに配置するオブジェクトは、必ずjava.io.Serializableを継承してください。継承しない場合は例外を投げます。ドメインクラスは通常スコープに配置されビューの描写に使用するので影響を受けます。例として次のようなドメインクラスがあるとします:class Book {
String title
}To place an instance of the Book class in a flow scope you will need to modify it as follows:
Bookのインスタンスをflowスコープで使用する場合は次のようにします:class Book implements Serializable {
String title
}This also impacts associations and closures you declare within a domain class. For example consider this:
ドメインクラスに関連するクラスやクロージャにも影響があります。次のようになっていたとします:class Book implements Serializable {
String title
Author author
}Here if the
Author association is not
Serializable you will also get an error. This also impacts closures used in
GORM events such as
onLoad,
onSave and so on. The following domain class will cause an error if an instance is placed in a flow scope:
AuthorがSerializableでは無い場合はエラーとなります。onLoadやonSave等のGORMイベントのクロージャにも影響があります。次のドメインクラスをflowスコープに配置するとエラーとなります:class Book implements Serializable { String title def onLoad = {
println "I'm loading"
}
}The reason is that the assigned block on the onLoad event cannot be serialized. To get around this you should declare all events as transient:
理由はアサインされたonLoadイベントのブロックがシリアライズされないからです。これを対応させるにはイベントにtransientを指定します:class Book implements Serializable { String title transient onLoad = {
println "I'm loading"
}
}or as methods:
またはメソッドにします:class Book implements Serializable { String title def onLoad() {
println "I'm loading"
}
}
The flow scope contains a reference to the Hibernate session. As a result, any object loaded into the session through a GORM query will also be in the flow and will need to implement Serializable.If you don't want your domain class to be Serializable or stored in the flow, then you will need to evict the entity manually before the end of the state:flow.persistenceContext.evict(it)
6.5.5 データバインディングとバリデーション
In the section on
start and end states, the start state in the first example triggered a transition to the
enterPersonalDetails state. This state renders a view and waits for the user to enter the required information:
enterPersonalDetailsステートへトリガーしています。このステートはビューを描写して、ユーザが必要な情報をエントリーするのを待ちます:enterPersonalDetails {
on("submit").to "enterShipping"
on("return").to "showCart"
}The view contains a form with two submit buttons that either trigger the submit event or the return event:
ビューは、submitイベントまたはreturnイベントをトリガーする、2つの送信ボタンを持つフォームを持っています:<g:form action="shoppingCart">
<g:submitButton name="submit" value="Continue"></g:submitButton>
<g:submitButton name="return" value="Back"></g:submitButton>
</g:form>However, what about the capturing the information submitted by the form? To capture the form info we can use a flow transition action:
フォームから送信された情報を取り込むには、トランジションアクションを使用します:enterPersonalDetails {
on("submit") {
flow.person = new Person(params)
!flow.person.validate() ? error() : success()
}.to "enterShipping"
on("return").to "showCart"
}Notice how we perform data binding from request parameters and place the
Person instance within
flow scope. Also interesting is that we perform
validation and invoke the
error() method if validation fails. This signals to the flow that the transition should halt and return to the
enterPersonalDetails view so valid entries can be entered by the user, otherwise the transition should continue and go to the
enterShipping state.
flowスコープのPersonインスタンスに渡している部分を注目してください。さらに興味深い部分は、バリデーションを実行して、失敗したらerror()メソッドを実行している部分です。この結果を受け取るとトランジションは停止されenterPersonalDetailsビューへ戻りユーザが正当な内容をエントリできるようになります。あるいは内容が問題無ければ、トランジションが続行されてenterShippingステートへ移動します。Like regular actions, flow actions also support the notion of
Command Objects by defining the first argument of the closure:
enterPersonalDetails {
on("submit") { PersonDetailsCommand cmd ->
flow.personDetails = cmd
!flow.personDetails.validate() ? error() : success()
}.to "enterShipping"
on("return").to "showCart"
}6.5.6 サブフローとの対話
Grails' Web Flow integration also supports subflows. A subflow is like a flow within a flow. For example take this search flow:
GrailsのWebフローはサブフローにも対応しています。サブフローはフォローの中にあるフローです。この検索フローを例とします:def searchFlow = {
displaySearchForm {
on("submit").to "executeSearch"
}
executeSearch {
action {
[results:searchService.executeSearch(params.q)]
}
on("success").to "displayResults"
on("error").to "displaySearchForm"
}
displayResults {
on("searchDeeper").to "extendedSearch"
on("searchAgain").to "displaySearchForm"
}
extendedSearch {
// Extended search subflow
subflow(controller: "searchExtensions", action: "extendedSearch")
on("moreResults").to "displayMoreResults"
on("noResults").to "displayNoMoreResults"
}
displayMoreResults()
displayNoMoreResults()
}It references a subflow in the extendedSearch state. The controller parameter is optional if the subflow is defined in the same controller as the calling flow.
この例ではextendedSearchステートで中にサブフローを参照しています。サブフローが同じコントローラで呼ばれる場合は、コントローラを指定するパラメータは省略可能です。
Prior to 1.3.5, the previous subflow call would look like subflow(extendedSearchFlow), with the requirement that the name of the subflow state be the same as the called subflow (minus Flow). This way of calling a subflow is deprecated and only supported for backward compatibility.
1.3.5以前、サブフローは、subflow(extendedSearchFlow)のように呼び出しました。この方法は非推奨となっており、下位互換のために対応はしています。
The subflow is another flow entirely:
サブフローは完全に別のフローです:def extendedSearchFlow = {
startExtendedSearch {
on("findMore").to "searchMore"
on("searchAgain").to "noResults"
}
searchMore {
action {
def results = searchService.deepSearch(ctx.conversation.query)
if (!results) return error()
conversation.extendedResults = results
}
on("success").to "moreResults"
on("error").to "noResults"
}
moreResults()
noResults()
}Notice how it places the extendedResults in conversation scope. This scope differs to flow scope as it lets you share state that spans the whole conversation not just the flow. Also notice that the end state (either moreResults or noResults of the subflow triggers the events in the main flow:
conversationスコープのextendedResultsの位置に注目してください。このスコープはflowスコープと違い、flowの間だけで無く、全ての対話にかけてステートを共有できます。さらに終了ステートに注目してください。サブフローはサブフロー内とメインフローのイベントをトリガーできます:extendedSearch {
// Extended search subflow
subflow(controller: "searchExtensions", action: "extendedSearch")
on("moreResults").to "displayMoreResults"
on("noResults").to "displayNoMoreResults"
}6.6 フィルタ
Although Grails
controllers support fine grained interceptors, these are only really useful when applied to a few controllers and become difficult to manage with larger applications. Filters on the other hand can be applied across a whole group of controllers, a URI space or to a specific action. Filters are far easier to plugin and maintain completely separately to your main controller logic and are useful for all sorts of cross cutting concerns such as security, logging, and so on.
6.6.1 フィルタの適用
To create a filter create a class that ends with the convention Filters in the grails-app/conf directory. Within this class define a code block called filters that contains the filter definitions:
フィルタを作成するには、grails-app/confディレクトリに、名称がFiltersで終わるクラスを作成します。このクラスにはフィルタを記述する、filtersというコードブロックを定義します:class ExampleFilters {
def filters = {
// your filters here
}
}Each filter you define within the filters block has a name and a scope. The name is the method name and the scope is defined using named arguments. For example to define a filter that applies to all controllers and all actions you can use wildcards:
filtersブロックに定義する各フィルタには、範囲と名称を持たせます。名称はメソッド名で、範囲は引数で定義します。例として、ワイルドカードを使用した全コントローラ・アクションに適用されるフィルタを定義します:sampleFilter(controller:'*', action:'*') {
// interceptor definitions
}The scope of the filter can be one of the following things:
フィルタの範囲は次のように指定できます:
- A controller and/or action name pairing with optional wildcards
- A URI, with Ant path matching syntax
- 省略可能なワイルドカードを使用した、コントローラ名と(または)アクション名の組み合わせ。
- Antパスマッチング書式のURI指定。
Filter rule attributes:
フィルタルール属性:
controller - controller matching pattern, by default * is replaced with .* and a regex is compiledcontrollerExclude - controller exclusion pattern, by default * is replaced with .* and a regex is compiledaction - action matching pattern, by default * is replaced with .* and a regex is compiledactionExclude - action exclusion pattern, by default * is replaced with .* and a regex is compiledregex (true/false) - use regex syntax (don't replace '*' with '.*')uri - a uri to match, expressed with as Ant style path (e.g. /book/**)uriExclude - a uri pattern to exclude, expressed with as Ant style path (e.g. /book/**)find (true/false) - rule matches with partial match (see java.util.regex.Matcher.find())invert (true/false) - invert the rule (NOT rule)
controller - コントローラ対象のパターンマッチング, 既存値 * で正規表現コンパイル時には .*に置換されます。controllerExclude - 除外するコントローラのパターン, 既存値 * で正規表現コンパイル時には .*に置換されます。action - アクション対象のパターンマッチング, 既存値 * で正規表現コンパイル時には .*に置換されます。actionExclude - 除外するアクションのパターン, 既存値 * で正規表現コンパイル時には .*に置換されます。regex (true/false) - 正規表現の使用 ('*' を '.*'に置換しない指定)uri - URIマッチ, Antスタイルパス (e.g. /book/**)uriExclude - 除外するURIパターン, Antスタイルパス (e.g. /book/**)find (true/false) - 部分マッチ (java.util.regex.Matcher.find()を参照)invert (true/false) - ルールを逆にする
Some examples of filters include:
フィルタの例:
- All controllers and actions
all(controller: '*', action: '*') {}
- Only for the
BookController
justBook(controller: 'book', action: '*') {}
- All controllers except the
BookController
notBook(controller: 'book', invert: true) {}
- All actions containing 'save' in the action name
saveInActionName(action: '*save*', find: true) {}
- All actions starting with the letter 'b' except for actions beginning with the phrase 'bad*'
- "bad*"を除外した、'b'で始まるアクション全て
actionBeginningWithBButNotBad(action: 'b*', actionExclude: 'bad*', find: true) {}someURIs(uri: '/book/**') {}In addition, the order in which you define the filters within the
filters code block dictates the order in which they are executed. To control the order of execution between
Filters classes, you can use the
dependsOn property discussed in
filter dependencies section.
filtersコードブロックに定義した順序でフィルタは実行されます。Filtersクラス間での実行を制御するには、フィルタ依存セクションで記載されているdependsOnプロパティが使用できます。
Note: When exclude patterns are used they take precedence over the matching patterns. For example, if action is 'b*' and actionExclude is 'bad*' then actions like 'best' and 'bien' will have that filter applied but actions like 'bad' and 'badlands' will not.
注意:除外パターンが使用された場合は除外マッチングパターンが優先されます。例として、アクションが'b*' で、actionExcludeが'bad*'の場合、'best','bien'等のアクションは適用されますが、'bad','badland'は適用されません。
6.6.2 フィルタの種類
Within the body of the filter you can then define one or several of the following interceptor types for the filter:
フィルタの中に、幾つかのインターセプタを定義することができます。
before - Executed before the action. Return false to indicate that the response has been handled that that all future filters and the action should not executeafter - Executed after an action. Takes a first argument as the view model to allow modification of the model before rendering the viewafterView - Executed after view rendering. Takes an Exception as an argument which will be non-null if an exception occurs during processing. Note: this Closure is called before the layout is applied.
before - アクションの前に実行されます。falseを返す事で、その後に実行されるフィルタとアクションは実行されません。after - アクションの後に実行されます。最初の引数に、ビュー描写前に変更可能なビューモデルが渡されます。afterView - ビュー描写後に実行されます。実行時に例外が発生した場合はnon-nullなExceptionが引数として渡されます。このクロージャはレイアウトが適用される前に実行されます。
For example to fulfill the common simplistic authentication use case you could define a filter as follows:
シンプルな認証の仕組みとしてフィルタを定義する例です:
class SecurityFilters {
def filters = {
loginCheck(controller: '*', action: '*') {
before = {
if (!session.user && !actionName.equals('login')) {
redirect(action: 'login')
return false
}
}
}
}
}Here the loginCheck filter uses a before interceptor to execute a block of code that checks if a user is in the session and if not redirects to the login action. Note how returning false ensure that the action itself is not executed.
このloginCheckフィルタは、beforeインターセプタのコードブロックを実行することで、ユーザがセッションに無い場合はloginアクションへリダイレクトしています。falseを返す事で対象のアクション自身が実行されないようにします。
Here's a more involved example that demonstrates all three filter types:import java.util.concurrent.atomic.AtomicLongclass LoggingFilters { private static final AtomicLong REQUEST_NUMBER_COUNTER = new AtomicLong()
private static final String START_TIME_ATTRIBUTE = 'Controller__START_TIME__'
private static final String REQUEST_NUMBER_ATTRIBUTE = 'Controller__REQUEST_NUMBER__' def filters = { logFilter(controller: '*', action: '*') { before = {
if (!log.debugEnabled) return true long start = System.currentTimeMillis()
long currentRequestNumber = REQUEST_NUMBER_COUNTER.incrementAndGet() request[START_TIME_ATTRIBUTE] = start
request[REQUEST_NUMBER_ATTRIBUTE] = currentRequestNumber log.debug "preHandle request #$currentRequestNumber : " +
"'$request.servletPath'/'$request.forwardURI', " +
"from $request.remoteHost ($request.remoteAddr) " +
" at ${new Date()}, Ajax: $request.xhr, controller: $controllerName, " +
"action: $actionName, params: ${new TreeMap(params)}" return true
} after = { Map model -> if (!log.debugEnabled) return true long start = request[START_TIME_ATTRIBUTE]
long end = System.currentTimeMillis()
long requestNumber = request[REQUEST_NUMBER_ATTRIBUTE] def msg = "postHandle request #$requestNumber: end ${new Date()}, " +
"controller total time ${end - start}ms"
if (log.traceEnabled) {
log.trace msg + "; model: $model"
}
else {
log.debug msg
}
} afterView = { Exception e -> if (!log.debugEnabled) return true long start = request[START_TIME_ATTRIBUTE]
long end = System.currentTimeMillis()
long requestNumber = request[REQUEST_NUMBER_ATTRIBUTE] def msg = "afterCompletion request #$requestNumber: " +
"end ${new Date()}, total time ${end - start}ms"
if (e) {
log.debug "$msg \n\texception: $e.message", e
}
else {
log.debug msg
}
}
}
}
}model map in the after filter is mutable. If you need to add or remove items from the model map you can do that in the after filter.
6.6.3 変数とスコープ
フィルタでは、コントローラやタグライブラリで利用できる共通のプロパティとアプリケーションコンテキストを参照できます:
However, filters only support a subset of the methods available to controllers and tag libraries. These include:
フィルタではコントローラやタグライブラリで使用できる一部のメソッドが使用できます:
- redirect - For redirects to other controllers and actions
- render - For rendering custom responses
6.6.4 フィルタ依存関係
In a Filters class, you can specify any other Filters classes that should first be executed using the dependsOn property. This is used when a Filters class depends on the behavior of another Filters class (e.g. setting up the environment, modifying the request/session, etc.) and is defined as an array of Filters classes.
Filtersクラスでは、dependsOnプロパティに他のFiltersクラスを定義して先に実行させることが可能です。この機能はFiltersクラスが他のFiltersクラスの振る舞いに依存する場合等に使用します。Take the following example Filters classes:
Filtersクラスの例を見ていきましょう:class MyFilters {
def dependsOn = [MyOtherFilters] def filters = {
checkAwesome(uri: "/*") {
before = {
if (request.isAwesome) { // do something awesome }
}
} checkAwesome2(uri: "/*") {
before = {
if (request.isAwesome) { // do something else awesome }
}
}
}
}class MyOtherFilters {
def filters = {
makeAwesome(uri: "/*") {
before = {
request.isAwesome = true
}
}
doNothing(uri: "/*") {
before = {
// do nothing
}
}
}
}MyFilters specifically dependsOn MyOtherFilters. This will cause all the filters in MyOtherFilters whose scope matches the current request to be executed before those in MyFilters. For a request of "/test", which will match the scope of every filter in the example, the execution order would be as follows:
MyFiltersには、dependsOnにMyOtherFiltersを指定しています。これにより、リクエストがフィルタ範囲にマッチしたMyOtherFiltersのフィルタがMyFiltersの前に実行されます。この例では"/test"とリクエストした場合全てのフィルタにマッチします。フィルタ実行順は次のようになります:
- MyOtherFilters - makeAwesome
- MyOtherFilters - doNothing
- MyFilters - checkAwesome
- MyFilters - checkAwesome2
The filters within the MyOtherFilters class are processed in order first, followed by the filters in the MyFilters class. Execution order between Filters classes are enabled and the execution order of filters within each Filters class are preserved.
MyOtherFiltersクラスのフィルタが先に実行されて、MyFiltersクラスのフィルタへと続きます。Filtersクラスの実行順が可能になり、各Filtersクラスのフィルタ実行順も保っています。If any cyclical dependencies are detected, the filters with cyclical dependencies will be added to the end of the filter chain and processing will continue. Information about any cyclical dependencies that are detected will be written to the logs. Ensure that your root logging level is set to at least WARN or configure an appender for the Grails Filters Plugin (org.codehaus.groovy.grails.plugins.web.filters.FiltersGrailsPlugin) when debugging filter dependency issues.
循環依存関係を検出したら、循環依存関係のあるフィルタをフィルタチェインの最後に追加して処理を続行します。その後、循環依存関係を検出した事をログへ出力します。ログを出力するには、ルートロガーレベルがWARNに設定されFilers用のログ定義をする必要があります。
6.7 Ajax
Ajax is the driving force behind the shift to richer web applications. These types of applications in general are better suited to agile, dynamic frameworks written in languages like
Groovy and
Ruby Grails provides support for building Ajax applications through its Ajax tag library. For a full list of these see the Tag Library Reference.
6.7.1 Ajax対応
Grailsはデフォルトで jQuery を使用しています。他のライブラリ、Prototype、 Dojo、 Yahoo UI、 Google Web Toolkit等もプラグインで提供しています。This section covers Grails' support for Ajax in general. To get started, add this line to the <head> tag of your page:
このセクションでは全般的なAjax対応の説明をします。先ずはじめに、ページの<head>タグ内に以下を追加します:<g:javascript library="jquery" />
You can replace jQuery with any other library supplied by a plugin you have installed. This works because of Grails' support for adaptive tag libraries. Thanks to Grails' plugin system there is support for a number of different Ajax libraries including (but not limited to):
プラグインで提供された他のライブラリを使用する際は、jqueryの部分を入れ換えます。これはGrailsの適用性のあるタグライブラリで可能にしています。Grailsのプラグインには、次の様々なAjaxライブラリが存在します(これは一部です):
- jQuery
- Prototype
- Dojo
- YUI
- MooTools
6.7.1.1 リモートリンク
Remote content can be loaded in a number of ways, the most commons way is through the
remoteLink tag. This tag allows the creation of HTML anchor tags that perform an asynchronous request and optionally set the response in an element. The simplest way to create a remote link is as follows:
<g:remoteLink action="delete" id="1">Delete Book</g:remoteLink>
The above link sends an asynchronous request to the delete action of the current controller with an id of 1.
上記の例で生成されたタグは、id:1をリクエストパラメータとしてdeleteアクションに非同期リクエストを送信します。
6.7.1.2 コンテンツの更新
This is great, but usually you provide feedback to the user about what happened:
先ほどの例で非同期送信を行いましたが、通常ユーザへ何が行われたかのフィードバックを提供する必要があります:def delete() {
def b = Book.get(params.id)
b.delete()
render "Book ${b.id} was deleted"
}GSP code:
GSPコード:<div id="message"></div>
<g:remoteLink action="delete" id="1" update="message">
Delete Book
</g:remoteLink>
The above example will call the action and set the contents of the message div to the response in this case "Book 1 was deleted". This is done by the update attribute on the tag, which can also take a Map to indicate what should be updated on failure:
この例では対象のアクションをコールしてレスポンスをmessegeのidをもったdivエレメントの内容を"Book 1 was deleted"に更新します。この更新動作は、タグのupdate属性で対象を指定しています。さらにMapを使用して更新失敗時の表示先も指定できます:
<div id="message"></div>
<div id="error"></div>
<g:remoteLink update="[success: 'message', failure: 'error']"
action="delete" id="1">
Delete Book
</g:remoteLink>Here the error div will be updated if the request failed.
この例ではリクエストに失敗すると、errorのIDをもつdivタグ内が更新されます。
An HTML form can also be submitted asynchronously in one of two ways. Firstly using the
formRemote tag which expects similar attributes to those for the
remoteLink tag:
<g:formRemote url="[controller: 'book', action: 'delete']"
update="[success: 'message', failure: 'error']">
<input type="hidden" name="id" value="1" />
<input type="submit" value="Delete Book!" />
</g:formRemote >Or alternatively you can use the
submitToRemote tag to create a submit button. This allows some buttons to submit remotely and some not depending on the action:
<form action="delete">
<input type="hidden" name="id" value="1" />
<g:submitToRemote action="delete"
update="[success: 'message', failure: 'error']" />
</form>6.7.1.4 Ajaxイベント
Specific JavaScript can be called if certain events occur, all the events start with the "on" prefix and let you give feedback to the user where appropriate, or take other action:
指定したJavaScriptを、イベントが発生した際にコールすることができます。全てのイベントは接頭辞"on"で指定します:<g:remoteLink action="show"
id="1"
update="success"
onLoading="showProgress()"
onComplete="hideProgress()">Show Book 1</g:remoteLink>The above code will execute the "showProgress()" function which may show a progress bar or whatever is appropriate. Other events include:
上記のコードでは、実行されると、ロード時に指定した"showProgress()"ファンクションがプログレスバーを表示する等ファンクションの実装に対応した動作を行います。他に以下のイベントが使用可能です:
onSuccess - The JavaScript function to call if successfulonFailure - The JavaScript function to call if the call failedon_ERROR_CODE - The JavaScript function to call to handle specified error codes (eg on404="alert('not found!')")onUninitialized - The JavaScript function to call the a Ajax engine failed to initialiseonLoading - The JavaScript function to call when the remote function is loading the responseonLoaded - The JavaScript function to call when the remote function is completed loading the responseonComplete - The JavaScript function to call when the remote function is complete, including any updates
onSuccess - 成功した時に呼び出すJavaScriptファンクションonFailure - 失敗した時に呼び出すJavaScriptファンクションon_ERROR_CODE - 指定したエラーコードを取得したら呼び出すJavaScriptファンクション (eg on404="alert('not found!')")onUninitialized - Ajaxエンジンの初期化に失敗したときに呼び出すJavaScriptファンクションonLoading - レスポンスを読み込み中に呼び出すJavaScriptファンクションonLoaded - レスポンスの読み込み完了時に呼び出すJavaScriptファンクションonComplete - リモートファンクションが完全に完了(更新を含む)したら呼び出すJavaScriptファンクション
If you need a reference to the XmlHttpRequest object you can use the implicit event parameter e to obtain it:
XmlHttpRequestオブジェクトを参照する場合は、以下のように、e等のイベントパラメータ使用して取得します:<g:javascript>
function fireMe(e) {
alert("XmlHttpRequest = " + e)
}
}
</g:javascript>
<g:remoteLink action="example"
update="success"
onSuccess="fireMe(e)">Ajax Link</g:remoteLink>6.7.2 Prototypeを使用したAjax
Grails features an external plugin to add
Prototype support to Grails. To install the plugin type the following command from the root of your project in a terminal window:
grails install-plugin prototype
This will download the current supported version of the Prototype plugin and install it into your Grails project. With that done you can add the following reference to the top of your page:
このコマンドでPrototypeプラグインがダウンロードされプロジェクトにインストールされます。そして次のようにページのトップに記述します:<g:javascript library="prototype" />
If you require
Scriptaculous too you can do the following instead:
<g:javascript library="scriptaculous" />
6.7.3 Dojoを使用したAjax
Grails features an external plugin to add
Dojo support to Grails. To install the plugin type the following command from the root of your project in a terminal window:
grails install-plugin dojo
This will download the current supported version of Dojo and install it into your Grails project. With that done you can add the following reference to the top of your page:
このコマンドでDojoプラグインがダウンロードされプロジェクトにインストールされます。そして次のようにページのトップに記述します:<g:javascript library="dojo" />
6.7.4 GWTを使用したAjax
Google Web Toolkit をプラグインでサポートしています。詳しくはドキュメントを参照してください。
6.7.5 Ajax使用時のサーバサイド
There are a number of different ways to implement Ajax which are typically broken down into:
Ajaxを実装するには幾つかの方法があります。通常次のように分類できます:
- Content Centric Ajax - Where you just use the HTML result of a remote call to update the page
- Data Centric Ajax - Where you actually send an XML or JSON response from the server and programmatically update the page
- Script Centric Ajax - Where the server sends down a stream of JavaScript to be evaluated on the fly
- コンテント中心なAjax - リモートコールの結果HTMLページを更新する。
- データ中心なAjax - XMLまたはJSONをサーバから送信してページをプログラムで更新する。
- スクリプトを使用したAjax - サーバからJavascriptを送信して実行させる。
Most of the examples in the
Ajax section cover Content Centric Ajax where you are updating the page, but you may also want to use Data Centric or Script Centric. This guide covers the different styles of Ajax.
コンテント中心のAjax
Content Centric Ajax
Just to re-cap, content centric Ajax involves sending some HTML back from the server and is typically done by rendering a template with the
render method:
def showBook() {
def b = Book.get(params.id) render(template: "bookTemplate", model: [book: b])
}Calling this on the client involves using the
remoteLink tag:
<g:remoteLink action="showBook" id="${book.id}"
update="book${book.id}">Update Book</g:remoteLink><div id="book${book.id}">
</div>JSONを使用したデータ中心のAjax
Data Centric Ajax with JSON
Data Centric Ajax typically involves evaluating the response on the client and updating programmatically. For a JSON response with Grails you would typically use Grails'
JSON marshalling capability:
import grails.converters.JSONdef showBook() {
def b = Book.get(params.id) render b as JSON
}And then on the client parse the incoming JSON request using an Ajax event handler:
クライアント側で取得したJSONをAjaxイベントハンドラを使って処理します:<g:javascript>
function updateBook(e) {
var book = eval("("+e.responseText+")") // evaluate the JSON
$("book" + book.id + "_title").innerHTML = book.title
}
<g:javascript>
<g:remoteLink action="test" update="foo" onSuccess="updateBook(e)">
Update Book
</g:remoteLink>
<g:set var="bookId">book${book.id}</g:set>
<div id="${bookId}">
<div id="${bookId}_title">The Stand</div>
</div>XMLを使用したデータ中心のAjax
Data Centric Ajax with XML
On the server side using XML is equally simple:
サーバサイドでXMLをえお扱うのも簡単です:import grails.converters.XMLdef showBook() {
def b = Book.get(params.id) render b as XML
}However, since DOM is involved the client gets more complicated:
しかしクライアント側でのDOM操作は複雑になります:<g:javascript>
function updateBook(e) {
var xml = e.responseXML
var id = xml.getElementsByTagName("book").getAttribute("id")
$("book" + id + "_title") = xml.getElementsByTagName("title")[0].textContent
}
<g:javascript>
<g:remoteLink action="test" update="foo" onSuccess="updateBook(e)">
Update Book
</g:remoteLink>
<g:set var="bookId">book${book.id}</g:set>
<div id="${bookId}">
<div id="${bookId}_title">The Stand</div>
</div>スクリプトを使用したAjax
Script Centric Ajax with JavaScript
Script centric Ajax involves actually sending JavaScript back that gets evaluated on the client. An example of this can be seen below:
スクリプトを使用したAjaxは、Javascriptを返してクライアント側で動作(評価)させます。以下が例になります:def showBook() {
def b = Book.get(params.id) response.contentType = "text/javascript"
String title = b.title.encodeAsJavascript()
render "$('book${b.id}_title')='${title}'"
}The important thing to remember is to set the contentType to text/javascript. If you use Prototype on the client the returned JavaScript will automatically be evaluated due to this contentType setting.
重要な部分としてcontentTypeをtext/javascriptにすることを思えて起きましょう。Prototypeを使用した場合はこのcontentTypeで自動的にJavaScriptを評価します。Obviously in this case it is critical that you have an agreed client-side API as you don't want changes on the client breaking the server. This is one of the reasons Rails has something like RJS. Although Grails does not currently have a feature such as RJS there is a
Dynamic JavaScript Plugin that offers similar capabilities.
AjaxとAjaxでない両方へのレスポンス
Responding to both Ajax and non-Ajax requests
It's straightforward to have the same Grails controller action handle both Ajax and non-Ajax requests. Grails adds the isXhr() method to HttpServletRequest which can be used to identify Ajax requests. For example you could render a page fragment using a template for Ajax requests or the full page for regular HTTP requests:
AjaxとAjaxではないリクエストを同じコントローラアクションで処理ができます。Grailsでは、Ajaxリクエスト判別用に、HttpServletRequestにisXhr()メソッドを追加しています。例として、Ajaxリクエストの場合はテンプレートでページの一部を描写し、それ以外は全ページ描写を行う場合:def listBooks() {
def books = Book.list(params)
if (request.xhr) {
render template: "bookTable", model: [books: books]
} else {
render view: "list", model: [books: books]
}
}6.8 コンテントネゴシエーション
Grails has built in support for
Content negotiation using either the HTTP
Accept header, an explicit format request parameter or the extension of a mapped URI.
AcceptヘッダーまたはマップされたURIの拡張子でのコンテントネゴシエーションに対応しています。Mimeタイプの定義
Configuring Mime Types
Before you can start dealing with content negotiation you need to tell Grails what content types you wish to support. By default Grails comes configured with a number of different content types within grails-app/conf/Config.groovy using the grails.mime.types setting:
コンテントネゴシエーションの処理を行うには、どのコンテントタイプをサポートするかをGrailsに教える必要があります。grails-app/conf/Config.groovyのgrails.mime.types設定に幾つかのコンテントタイプがデフォルトで定義されています:grails.mime.types = [ xml: ['text/xml', 'application/xml'],
text: 'text-plain',
js: 'text/javascript',
rss: 'application/rss+xml',
atom: 'application/atom+xml',
css: 'text/css',
csv: 'text/csv',
all: '*/*',
json: 'text/json',
html: ['text/html','application/xhtml+xml']
]The above bit of configuration allows Grails to detect to format of a request containing either the 'text/xml' or 'application/xml' media types as simply 'xml'. You can add your own types by simply adding new entries into the map.
この設定の一部を説明すると、'text/xml'または'application/xml'を含むリクエストは単純にコンテントタイプ'xml'としてGrailsが検出するのを可能にします。独自のタイプを追加するには単純にマップにタイプを追加するだけです。Acceptヘッダーを使用したコンテントネゴシエーション
Content Negotiation using the Accept header
Every incoming HTTP request has a special
Accept header that defines what media types (or mime types) a client can "accept". In older browsers this is typically:
Which simply means anything. However, on newer browser something all together more useful is sent such as (an example of a Firefox Accept header):
これは単純に何でも可能という意味です。最新のブラウザではもっと便利になっており次のような内容を送信します(FireFoxのAcceptヘッダーを例として):text/xml, application/xml, application/xhtml+xml, text/html;q=0.9,
text/plain;q=0.8, image/png, */*;q=0.5
Grails parses this incoming format and adds a
property to the
response object that outlines the preferred response format. For the above example the following assertion would pass:
propertyをresponseオブジェクトに追加します。上記の例では以下のアサーションが通ります:assert 'html' == response.format
Why? The text/html media type has the highest "quality" rating of 0.9, therefore is the highest priority. If you have an older browser as mentioned previously the result is slightly different:
何故でしょう? メディアタイプtext/htmlは、レートでは0.9という高い"特質"を持っているので、優先度が高いからです。先の例で紹介した古いブラウザの場合は少し違います:assert 'all' == response.format
In this case 'all' possible formats are accepted by the client. To deal with different kinds of requests from
Controllers you can use the
withFormat method that acts as kind of a switch statement:
import grails.converters.XMLclass BookController { def list() {
def books = Book.list()
withFormat {
html bookList: books
js { render "alert('hello')" }
xml { render books as XML }
}
}
}If the preferred format is html then Grails will execute the html() call only. This causes Grails to look for a view called either grails-app/views/books/list.html.gsp or grails-app/views/books/list.gsp. If the format is xml then the closure will be invoked and an XML response rendered.
優先されたフォーマットがhtmlの場合Grailsはhtml()のみを実行します。この場合Grailsは、grails-app/views/books/list.html.gspまた grails-app/views/books/list.gspのどちらかのビューを探しに行きます。How do we handle the "all" format? Simply order the content-types within your withFormat block so that whichever one you want executed comes first. So in the above example, "all" will trigger the html handler.
ではどのようにフォーマットの"all"を判別するのでしょう?単純にwithFormatブロックのコンテントタイプの順番を指定して一番最初に実行される物を決めます。上記の例では、"all"を受け取った場合は、htmlハンドラを実行します。
When using
withFormat make sure it is the last call in your controller action as the return value of the
withFormat method is used by the action to dictate what happens next.
withFormatでの返値がコントローラアクションで最終の返値となります。
リクエストフォーマット vs レスポンスフォーマット
Request format vs. Response format
As of Grails 2.0, there is a separate notion of the request format and the response format. The request format is dictated by the CONTENT_TYPE header and is typically used to detect if the incoming request can be parsed into XML or JSON, whilst the response format uses the file extension, format parameter or ACCEPT header to attempt to deliver an appropriate response to the client.
Grails 2.0からの対応で、リクエストフォーマットとレスポンスフォーマットでは分離して認識するようになりました。リクエストフォーマットは、CONTENT_TYPEヘッダの指定で入ってくるリクエストを認識してXMLまたJSON等に分類します。レスポンスフォーマットでは、ファイル拡張子、フォーマットパラメータまたはACCEPTヘッダを認識して適したレスポンスをクライアントに返します。The
withFormat available on controllers deals specifically with the response format. If you wish to add logic that deals with the request format then you can do so using a separate
withFormat method available on the request:
withFormatメソッドを使用します:request.withFormat {
xml {
// read XML
}
json {
// read JSON
}
}リクエストパラメータformatでのコンテントネゴシエーション
Content Negotiation with the format Request Parameter
If fiddling with request headers if not your favorite activity you can override the format used by specifying a format request parameter:
リクエストヘッダを参照した方法を行いたく無い場合は、フォーマットを指定するために、リクエストパラメータのformatが使用できます:You can also define this parameter in the
URL Mappings definition:
"/book/list"(controller:"book", action:"list") {
format = "xml"
}URI拡張子でのコンテントネゴシエーション
Content Negotiation with URI Extensions
Grails also supports content negotiation using URI extensions. For example given the following URI:
URI拡張子でのコンテントネゴシエーションにも対応しています。例として次のようなURIがあるとします:Grails will remove the extension and map it to /book/list instead whilst simultaneously setting the content format to xml based on this extension. This behaviour is enabled by default, so if you wish to turn it off, you must set the grails.mime.file.extensions property in grails-app/conf/Config.groovy to false:
Grailsが拡張子を外して、xmlとしてフォーマットをセットして/book/listにマップします。この振る舞いはデフォルトで使用可能です。この機能を外したい場合はgrails-app/conf/Config.groovyのgrails.mime.file.extensionsプロパティをfalseに指定します:grails.mime.file.extensions = false
コンテントネゴシエーションをテスト
Testing Content Negotiation
To test content negotiation in a unit or integration test (see the section on
Testing) you can either manipulate the incoming request headers:
void testJavascriptOutput() {
def controller = new TestController()
controller.request.addHeader "Accept",
"text/javascript, text/html, application/xml, text/xml, */*" controller.testAction()
assertEquals "alert('hello')", controller.response.contentAsString
}Or you can set the format parameter to achieve a similar effect:
または、formatパラメータをセットすることが可能です:void testJavascriptOutput() {
def controller = new TestController()
controller.params.format = 'js' controller.testAction()
assertEquals "alert('hello')", controller.response.contentAsString
}7 バリデーション
Grails validation capability is built on Spring's Validator API and data binding capabilities. However Grails takes this further and provides a unified way to define validation "constraints" with its constraints mechanism.Constraints in Grails are a way to declaratively specify validation rules. Most commonly they are applied to domain classes, however URL Mappings and Command Objects also support constraints.
7.1 制約を宣言
Within a domain class constraints are defined with the constraints property that is assigned a code block:class User {
String login
String password
String email
Integer age static constraints = {
…
}
}class User {
... static constraints = {
login size: 5..15, blank: false, unique: true
password size: 5..15, blank: false
email email: true, blank: false
age min: 18
}
}login property must be between 5 and 15 characters long, it cannot be blank and must be unique. We've also applied other constraints to the password, email and age properties.
By default, all domain class properties are not nullable (i.e. they have an implicit nullable: false constraint). The same is not true for command object properties, which are nullable by default.
A complete reference for the available constraints can be found in the Quick Reference section under the Constraints heading.Note that constraints are only evaluated once which may be relevant for a constraint that relies on a value like an instance of java.util.Date.class User {
... static constraints = {
// this Date object is created when the constraints are evaluated, not
// each time an instance of the User class is validated.
birthDate max: new Date()
}
}A word of warning - referencing domain class properties from constraints
It's very easy to attempt to reference instance variables from the static constraints block, but this isn't legal in Groovy (or Java). If you do so, you will get a MissingPropertyException for your trouble. For example, you may try
class Response {
Survey survey
Answer answer static constraints = {
survey blank: false
answer blank: false, inList: survey.answers
}
}inList constraint references the instance property survey? That won't work. Instead, use a custom validator:class Response {
…
static constraints = {
survey blank: false
answer blank: false, validator: { val, obj -> val in obj.survey.answers }
}
}obj argument to the custom validator is the domain instance that is being validated, so we can access its survey property and return a boolean to indicate whether the new value for the answer property, val, is valid.
7.2 制約をバリデートする
Validation Basics
Call the validate method to validate a domain class instance:def user = new User(params)if (user.validate()) {
// do something with user
}
else {
user.errors.allErrors.each {
println it
}
}errors property on domain classes is an instance of the Spring Errors interface. The Errors interface provides methods to navigate the validation errors and also retrieve the original values.Validation Phases
Within Grails there are two phases of validation, the first one being data binding which occurs when you bind request parameters onto an instance such as:def user = new User(params)
errors property due to type conversion (such as converting Strings to Dates). You can check these and obtain the original input value using the Errors API:if (user.hasErrors()) {
if (user.errors.hasFieldErrors("login")) {
println user.errors.getFieldError("login").rejectedValue
}
}validate before executing, allowing you to write code like:if (user.save()) {
return user
}
else {
user.errors.allErrors.each {
println it
}
}7.3 クライアントサイドバリデーション
Displaying Errors
Typically if you get a validation error you redirect back to the view for rendering. Once there you need some way of displaying errors. Grails supports a rich set of tags for dealing with errors. To render the errors as a list you can use renderErrors:<g:renderErrors bean="${user}" /><g:hasErrors bean="${user}">
<ul>
<g:eachError var="err" bean="${user}">
<li>${err}</li>
</g:eachError>
</ul>
</g:hasErrors>Highlighting Errors
It is often useful to highlight using a red box or some indicator when a field has been incorrectly input. This can also be done with the hasErrors by invoking it as a method. For example:<div class='value ${hasErrors(bean:user,field:'login','errors')}'>
<input type="text" name="login" value="${fieldValue(bean:user,field:'login')}"/>
</div>login field of the user bean has any errors and if so it adds an errors CSS class to the div, allowing you to use CSS rules to highlight the div.Retrieving Input Values
Each error is actually an instance of the FieldError class in Spring, which retains the original input value within it. This is useful as you can use the error object to restore the value input by the user using the fieldValue tag:<input type="text" name="login" value="${fieldValue(bean:user,field:'login')}"/>FieldError in the User bean and if there is obtain the originally input value for the login field.
7.4 バリデーションの国際化
Another important thing to note about errors in Grails is that error messages are not hard coded anywhere. The FieldError class in Spring resolves messages from message bundles using Grails' i18n support.Constraints and Message Codes
The codes themselves are dictated by a convention. For example consider the constraints we looked at earlier:package com.mycompany.myappclass User {
... static constraints = {
login size: 5..15, blank: false, unique: true
password size: 5..15, blank: false
email email: true, blank: false
age min: 18
}
}[Class Name].[Property Name].[Constraint Code]
blank constraint this would be user.login.blank so you would need a message such as the following in your grails-app/i18n/messages.properties file:user.login.blank=Your login name must be specified!
Displaying Messages
The renderErrors tag will automatically look up messages for you using the message tag. If you need more control of rendering you can handle this yourself:<g:hasErrors bean="${user}">
<ul>
<g:eachError var="err" bean="${user}">
<li><g:message error="${err}" /></li>
</g:eachError>
</ul>
</g:hasErrors>error argument to read the message for the given error.
7.5 コマンドオブジェクト、ドメインクラス以外のバリデーション
Domain classes and command objects support validation by default. Other classes may be made validateable by defining the static constraints property in the class (as described above) and then telling the framework about them. It is important that the application register the validateable classes with the framework. Simply defining the constraints property is not sufficient.The Validateable Annotation
Classes which define the static constraints property and are annotated with @Validateable can be made validateable by the framework. Consider this example:// src/groovy/com/mycompany/myapp/User.groovy
package com.mycompany.myappimport grails.validation.Validateable@Validateable
class User {
... static constraints = {
login size: 5..15, blank: false, unique: true
password size: 5..15, blank: false
email email: true, blank: false
age min: 18
}
}Registering Validateable Classes
If a class is not marked with Validateable, it may still be made validateable by the framework. The steps required to do this are to define the static constraints property in the class (as described above) and then telling the framework about the class by assigning a value to the grails.validateable.classes property in Config.groovy@:grails.validateable.classes = [com.mycompany.myapp.User, com.mycompany.dto.Account]
8 サービスレイヤー
Grails defines the notion of a service layer. The Grails team discourages the embedding of core application logic inside controllers, as it does not promote reuse and a clean separation of concerns.
Grailsではサービスレイヤの概念を持っています。再利用や関心事の明確な分離を妨げるといった理由から、Grailsチームは、コントローラ内にアプリケーションのコアロジックを持ち込まないことを推奨します。Services in Grails are the place to put the majority of the logic in your application, leaving controllers responsible for handling request flow with redirects and so on.
Grailsのサービスは、アプリケーション・ロジックの大部分を置く場所と考えられます。コントローラには、リダイレクトなどを介してリクエストの流れを処理する、といった責務が残ります。サービスを作成する
Creating a Service
You can create a Grails service by running the
create-service command from the root of your project in a terminal window:
grails create-service helloworld.simple
If no package is specified with the create-service script, Grails automatically uses the application name as the package name.
create-serviceスクリプト実行した際にパッケージ名を指定しなかった場合は、アプリケーション名をパッケージ名として使用します。
The above example will create a service at the location grails-app/services/helloworld/SimpleService.groovy. A service's name ends with the convention Service, other than that a service is a plain Groovy class:
上記の例では、grails-app/services/helloworld/SimpleService.groovyというサービスが作成されます。サービスの名前は、規約でServiceで終わることになっており、作成されるサービスは、普通のGroovyクラスですpackage helloworldclass SimpleService {
}8.1 断定的なトランザクション
デフォルトの宣言的トランザクション
Default Declarative Transactions
Services are typically involved with coordinating logic between
domain classes, and hence often involved with persistence that spans large operations. Given the nature of services, they frequently require transactional behaviour. You can use programmatic transactions with the
withTransaction method, however this is repetitive and doesn't fully leverage the power of Spring's underlying transaction abstraction.
Services enable transaction demarcation, which is a declarative way of defining which methods are to be made transactional. All services are transactional by default. To disable this set the transactional property to false:
サービスは、トランザクション境界を使用することができ、サービス内のすべてのメソッドをトランザクションにすると宣言する宣言方法です。すべてのサービスは、デフォルトでトランザクション境界が可能です、不可にするにはtransactionalプロパティにfalseを設定します:class CountryService {
static transactional = false
}You may also set this property to true to make it clear that the service is intentionally transactional.
サービスが意図的にトランザクションであるということを明確にするために、このプロパティにtrueを設定することもできます。
Warning:
dependency injection is the
only way that declarative transactions work. You will not get a transactional service if you use the
new operator such as
new BookService()new BookService()のようにnew演算子を使用した場合、トランザクションなサービスを取得するできません。
The result is that all methods are wrapped in a transaction and automatic rollback occurs if a method throws a runtime exception (i.e. one that extends
RuntimeException) or an
Error. The propagation level of the transaction is by default set to
PROPAGATION_REQUIRED.
Checked exceptions do not roll back transactions. Even though Groovy blurs the distinction between checked and unchecked exceptions, Spring isn't aware of this and its default behaviour is used, so it's important to understand the distinction between checked and unchecked exceptions.
カスタムトランザクションの設定
Custom Transaction Configuration
Grails also fully supports Spring's Transactional annotation for cases where you need more fine-grained control over transactions at a per-method level or need specify an alternative propagation level.
メソッド単位のレベルでトランザクションのよりきめの細かいコントロールを必要とする場合や、別のトランザクション伝播レベルを指定する必要がある場合、GrailsはSpringのTransactionalアノテーションもフルサポートしています:
Annotating a service method with Transactional disables the default Grails transactional behavior for that service (in the same way that adding transactional=false does) so if you use any annotations you must annotate all methods that require transactions.
Transactionalアノテーションをメソッドに指定すると、デフォルトの書式(transactional=falseでの定義)でのトランザクションは無効になります。アノテーションを使用する場合は、トランザクションが必要な全てのメソッドに定義する必要があります。
In this example listBooks uses a read-only transaction, updateBook uses a default read-write transaction, and deleteBook is not transactional (probably not a good idea given its name).
この例ではlistBooksがread-onlyトランザクションを使用、updateBookがデフォルトのread-writeトランザクションを使用、deleteBookにはトランザクションは指定されていません(このメソッドの名前的に良くはありませんが)。
import org.springframework.transaction.annotation.Transactionalclass BookService { @Transactional(readOnly = true)
def listBooks() {
Book.list()
} @Transactional
def updateBook() {
// …
} def deleteBook() {
// …
}
}You can also annotate the class to define the default transaction behavior for the whole service, and then override that default per-method. For example, this service is equivalent to one that has no annotations (since the default is implicitly transactional=true):
クラスにアノテーションを指定することで、サービス全体にデフォルトトランザクションを指定して、さらにそれぞれのメソッドでオーバーライドすることができます。例として、このサービスはアノテーションを使用していない物と同等になります(transactional=trueがデフォルトなので):import org.springframework.transaction.annotation.Transactional@Transactional
class BookService { def listBooks() {
Book.list()
} def updateBook() {
// …
} def deleteBook() {
// …
}
}This version defaults to all methods being read-write transactional (due to the class-level annotation), but the listBooks method overrides this to use a read-only transaction:
オーバーライドした、read-onlyトランザクションのlistBooksメソッド以外の、全メソッドがread-writeトランザクションになります(クラスレベルのアノテーションの定義によって)。import org.springframework.transaction.annotation.Transactional@Transactional
class BookService { @Transactional(readOnly = true)
def listBooks() {
Book.list()
} def updateBook() {
// …
} def deleteBook() {
// …
}
}Although updateBook and deleteBook aren't annotated in this example, they inherit the configuration from the class-level annotation.
updateBookとdeleteBookはアノテーション指定されていませんが、クラスレベルアノテーションの定義が受け継がれます。
さらなる情報はSpringユーザガイドのトランザクションセクションを参照してください。Unlike Spring you do not need any prior configuration to use Transactional; just specify the annotation as needed and Grails will detect them up automatically.
Springと違いTransactionalを使用するための特別な定義は必要有りません。必要なアノテーションを記述すればGrailsが自動的に認識します。
8.1.1 トランザクションロールバックとセッション
Understanding Transactions and the Hibernate Session
When using transactions there are important considerations you must take into account with regards to how the underlying persistence session is handled by Hibernate. When a transaction is rolled back the Hibernate session used by GORM is cleared. This means any objects within the session become detached and accessing uninitialized lazy-loaded collections will lead to LazyInitializationExceptions.To understand why it is important that the Hibernate session is cleared. Consider the following example:class Author {
String name
Integer age static hasMany = [books: Book]
}Author.withTransaction { status ->
new Author(name: "Stephen King", age: 40).save()
status.setRollbackOnly()
}Author.withTransaction { status ->
new Author(name: "Stephen King", age: 40).save()
}save() by clearing the Hibernate session. If the Hibernate session were not cleared then both author instances would be persisted and it would lead to very unexpected results.It can, however, be frustrating to get LazyInitializationExceptions due to the session being cleared.For example, consider the following example:class AuthorService { void updateAge(id, int age) {
def author = Author.get(id)
author.age = age
if (author.isTooOld()) {
throw new AuthorException("too old", author)
}
}
}class AuthorController { def authorService def updateAge() {
try {
authorService.updateAge(params.id, params.int("age"))
}
catch(e) {
render "Author books ${e.author.books}"
}
}
}Author's age exceeds the maximum value defined in the isTooOld() method by throwing an AuthorException. The AuthorException references the author but when the books association is accessed a LazyInitializationException will be thrown because the underlying Hibernate session has been cleared.To solve this problem you have a number of options. One is to ensure you query eagerly to get the data you will need:class AuthorService {
…
void updateAge(id, int age) {
def author = Author.findById(id, [fetch:[books:"eager"]])
...books association will be queried when retrieving the Author.
This is the optimal solution as it requires fewer queries then the following suggested solutions.
Another solution is to redirect the request after a transaction rollback:class AuthorController { AuthorService authorService def updateAge() {
try {
authorService.updateAge(params.id, params.int("age"))
}
catch(e) {
flash.message "Can't update age"
redirect action:"show", id:params.id
}
}
}Author again. And, finally a third solution is to retrieve the data for the Author again to make sure the session remains in the correct state:class AuthorController { def authorService def updateAge() {
try {
authorService.updateAge(params.id, params.int("age"))
}
catch(e) {
def author = Author.read(params.id)
render "Author books ${author.books}"
}
}
}Validation Errors and Rollback
A common use case is to rollback a transaction if there are validation errors. For example consider this service:import grails.validation.ValidationExceptionclass AuthorService { void updateAge(id, int age) {
def author = Author.get(id)
author.age = age
if (!author.validate()) {
throw new ValidationException("Author is not valid", author.errors)
}
}
}import grails.validation.ValidationExceptionclass AuthorController { def authorService def updateAge() {
try {
authorService.updateAge(params.id, params.int("age"))
}
catch (ValidationException e) {
def author = Author.read(params.id)
author.errors = e.errors
render view: "edit", model: [author:author]
}
}
}8.2 サービスのスコープ
By default, access to service methods is not synchronised, so nothing prevents concurrent execution of those methods. In fact, because the service is a singleton and may be used concurrently, you should be very careful about storing state in a service. Or take the easy (and better) road and never store state in a service.
デフォルトでは、サービスが持つメソッドへのアクセスは同期されないので、サービスが持つメソッドの同時実行を防ぐことはできません。実際には、サービスはシングルトンで同時に使用することが出来るため、サービスに状態を格納する場合は注意が必要です。簡単な(そしてより良い)方法は、サービスに状態を決して格納しないことです。You can change this behaviour by placing a service in a particular scope. The supported scopes are:
特定のスコープにサービスを置くことで、この振る舞いを変えることができます。サポートされているスコープは次のとおりです:
prototype - A new service is created every time it is injected into another classrequest - A new service will be created per requestflash - A new service will be created for the current and next request onlyflow - In web flows the service will exist for the scope of the flowconversation - In web flows the service will exist for the scope of the conversation. ie a root flow and its sub flowssession - A service is created for the scope of a user sessionsingleton (default) - Only one instance of the service ever exists
prototype - クラスへの注入時にサービスが生成されるrequest - リクエスト毎にサービスが生成されるflash - 現在とその次のリクエスト用にサービスが生成されるflow - フローの開始から終了まてのサービス(サブフロー含まず)conversation - フローの開始から終了まてのサービス(サブフロー含む)session - ユーザセッション毎にサービスが生成されるsingleton (デフォルト) - サービスが1つのみ生成される
If your service is
flash,
flow or
conversation scoped it must implement
java.io.Serializable and can only be used in the context of a
Web Flowflash、flowあるいはconversationの場合、java.io.Serializableを実装する必要があり、Webフローのコンテキストの中でだけ使うことができます。
To enable one of the scopes, add a static scope property to your class whose value is one of the above, for example
スコープのいずれかを有効にするには、クラスにstaticのscopeプロパティを追加し、プロパティの値を上記のいずれかにします:
8.3 依存注入とサービス
依存性の注入の基本
Dependency Injection Basics
A key aspect of Grails services is the ability to use
Spring Framework's dependency injection features. Grails supports "dependency injection by convention". In other words, you can use the property name representation of the class name of a service to automatically inject them into controllers, tag libraries, and so on.
As an example, given a service called BookService, if you define a property called bookService in a controller as follows:
例として、BookServiceというサービスが与えられた場合、次のようにコントローラの中にbookServiceという名前のプロパティを配置します:class BookController {
def bookService
…
}In this case, the Spring container will automatically inject an instance of that service based on its configured scope. All dependency injection is done by name. You can also specify the type as follows:
この場合、Springコンテナが設定されたスコープに基づいてサービスのインスタンスを自動的に注入します。すべての依存性の注入は、名前によって行われます。次のように型を指定することもできます:class AuthorService {
BookService bookService
}
NOTE: Normally the property name is generated by lower casing the first letter of the type. For example, an instance of the BookService class would map to a property named bookService.
注:通常、プロパティ名は、型の最初の文字を小文字のにして生成します。たとえば、BookServiceクラスのインスタンスは、bookServiceという名前のプロパティにマップされます。To be consistent with standard JavaBean conventions, if the first 2 letters of the class name are upper case, the property name is the same as the class name. For example, the property name of the JDBCHelperService class would be JDBCHelperService, not jDBCHelperService or jdbcHelperService.
標準のJavaBean規約と整合をとるため、クラス名の最初の2文字が大文字の場合、プロパティ名はクラス名と同じになります。たとえばJDBCHelperServiceクラスは、jDBCHelperServiceまたjdbcHelperServiceでは無く、JDBCHelperServiceという名前のプロパティにマップされます。See section 8.8 of the JavaBean specification for more information on de-capitalization rules.
小文字への変換規則の詳細については、JavaBeanの仕様のセクション8.8を参照してください。
依存性注入とサービス
Dependency Injection and Services
You can inject services in other services with the same technique. If you had an AuthorService that needed to use the BookService, declaring the AuthorService as follows would allow that:
同じ方法で他のサービスにサービスを注入することができます。たとえば、AuthorServiceがBookService使用する場合、 次のようにAuthorServiceを宣言することで使用することができます:class AuthorService {
def bookService
}依存性注入とドメインクラス/タグライブラリ
Dependency Injection and Domain Classes / Tag Libraries
You can even inject services into domain classes and tag libraries, which can aid in the development of rich domain models and views:
ドメインクラスとタグライブラリにもサービスを注入することでき、豊富なドメインモデルやビューの開発を支援することができます:class Book {
…
def bookService def buyBook() {
bookService.buyBook(this)
}
}8.4 Javaからサービスを使う
One of the powerful things about services is that since they encapsulate re-usable logic, you can use them from other classes, including Java classes. There are a couple of ways you can reuse a service from Java. The simplest way is to move your service into a package within the grails-app/services directory. The reason this is important is that it is not possible to import classes into Java from the default package (the package used when no package declaration is present). So for example the BookService below cannot be used from Java as it stands:
サービスについての強力な事の一つは、サービスは再利用可能なロジックをカプセル化するため、Javaのクラスを含む他のクラスからサービスを使用することができるということです。Javaからサービスを再利用する方法はいくつかあります。最も簡単な方法は、grails-app/servicesディレクトリ下で、パッケージの中にサービスを移動することです。これが重要な手順である理由は、デフォルトパッケージ(パッケージの宣言がない場合に使用されるパッケージ)からJavaにクラスをインポートできないからです。したがって、たとえば以下のBookServiceは、そのままではJavaから使用できません:class BookService {
void buyBook(Book book) {
// logic
}
}However, this can be rectified by placing this class in a package, by moving the class into a sub directory such as grails-app/services/bookstore and then modifying the package declaration:
しかし、このクラスをパッケージの中に置き、grails-app/services/bookstoreといったサブディレクトリの中にクラスを移動し、パッケージ宣言を修正することで、是正できます:package bookstoreclass BookService {
void buyBook(Book book) {
// logic
}
}An alternative to packages is to instead have an interface within a package that the service implements:
パッケージに代わる別の方法として、パッケージ内のインターフェイスをサービスが実装することです:package bookstoreinterface BookStore {
void buyBook(Book book)
}And then the service:
そしてサービスは:class BookService implements bookstore.BookStore {
void buyBook(Book b) {
// logic
}
}This latter technique is arguably cleaner, as the Java side only has a reference to the interface and not to the implementation class (although it's always a good idea to use packages). Either way, the goal of this exercise to enable Java to statically resolve the class (or interface) to use, at compile time.
この後者の方法の方が、間違いなくクリーンです。Java側は、実装クラスではなくインタフェースへの参照を持てばよいからです。いずれにせよ、この実行の目的は、Javaがコンパイル時に使用するクラス(またはインターフェイス)を静的に解決できるようにすることです。Now that this is done you can create a Java class within the src/java directory and add a setter that uses the type and the name of the bean in Spring:
これで、src/javaディレクトリのパッケージにJavaクラスを作ることができ、Springビーンの型と名前を使うセッターを提供することができます:// src/java/bookstore/BookConsumer.java
package bookstore;public class BookConsumer { private BookStore store; public void setBookStore(BookStore storeInstance) {
this.store = storeInstance;
}
…
}Once this is done you can configure the Java class as a Spring bean in
grails-app/conf/spring/resources.xml (for more information see the section on
Grails and Spring):
grails-app/conf/spring/resources.xmlの中にSpringビーンとしてJavaクラスを設定することができます(詳細は、GrailsとSpringセクションを参照してください)<bean id="bookConsumer" class="bookstore.BookConsumer">
<property name="bookStore" ref="bookService" />
</bean>or in grails-app/conf/spring/resources.groovy:
または、 grails-app/conf/spring/resources.groovyに:import bookstore.BookConsumerbeans = {
bookConsumer(BookConsumer) {
bookStore = ref("bookService")
}
}9 テスト
Automated testing is a key part of Grails. Hence, Grails provides many ways to making testing easier from low level unit testing to high level functional tests. This section details the different capabilities that Grails offers for testing.
Grails 1.3.x and below used the grails.test.GrailsUnitTestCase class hierarchy for testing in a JUnit 3 style. Grails 2.0.x and above deprecates these test harnesses in favour of mixins that can be applied to a range of different kinds of tests (JUnit 3, Junit 4, Spock etc.) without subclassing
The first thing to be aware of is that all of the create-* and generate-* commands create unit or integration tests automatically. For example if you run the create-controller command as follows:grails create-controller com.acme.app.simple
grails-app/controllers/com/acme/app/SimpleController.groovy, and also a unit test at test/unit/com/acme/app/SimpleControllerTests.groovy. What Grails won't do however is populate the logic inside the test! That is left up to you.
The default class name suffix is Tests but as of Grails 1.2.2, the suffix of Test is also supported.
Running Tests
Tests are run with the test-app command:The command will produce output such as:-------------------------------------------------------
Running Unit Tests…
Running test FooTests...FAILURE
Unit Tests Completed in 464ms …
-------------------------------------------------------Tests failed: 0 errors, 1 failures
You can force a clean before running tests by passing -clean to the test-app command.
Grails writes both plain text and HTML test reports to the target/test-reports directory, along with the original XML files. The HTML reports are generally the best ones to look at.Using Grails' interactive mode confers some distinct advantages when executing tests. First, the tests will execute significantly faster on the second and subsequent runs. Second, a shortcut is available to open the HTML reports in your browser:You can also run your unit tests from within most IDEs.Targeting Tests
You can selectively target the test(s) to be run in different ways. To run all tests for a controller named SimpleController you would run:grails test-app SimpleController
SimpleController. Wildcards can be used...grails test-app *Controller
Controller. Package names can optionally be specified...grails test-app some.org.*Controller
grails test-app some.org.*
grails test-app some.org.**.*
grails test-app SimpleController.testLogin
testLogin test in the SimpleController tests. You can specify as many patterns in combination as you like...grails test-app some.org.* SimpleController.testLogin BookController
Targeting Test Types and/or Phases
In addition to targeting certain tests, you can also target test types and/or phases by using the phase:type syntax.
Grails organises tests by phase and by type. A test phase relates to the state of the Grails application during the tests, and the type relates to the testing mechanism.Grails comes with support for 4 test phases (unit, integration, functional and other) and JUnit test types for the unit and integration phases. These test types have the same name as the phase.Testing plugins may provide new test phases or new test types for existing phases. Refer to the plugin documentation.
To execute the JUnit integration tests you can run:grails test-app integration:integration
phase and type are optional. Their absence acts as a wildcard. The following command will run all test types in the unit phase:The Grails Spock Plugin is one plugin that adds new test types to Grails. It adds a spock test type to the unit, integration and functional phases. To run all spock tests in all phases you would run the following:To run the all of the spock tests in the functional phase you would run...grails test-app functional:spock
grails test-app unit:spock integration:spock
Targeting Tests in Types and/or Phases
Test and type/phase targetting can be applied at the same time:grails test-app integration: unit: some.org.**.*
integration and unit phases that are in the package some.org or a subpackage.
9.1 Unitテスト
Unit testing are tests at the "unit" level. In other words you are testing individual methods or blocks of code without consideration for surrounding infrastructure. Unit tests are typically run without the presence of physical resources that involve I/O such databases, socket connections or files. This is to ensure they run as quick as possible since quick feedback is important.Since Grails 2.0, a collection of unit testing mixins is provided by Grails that lets you enhance the behavior of a typical JUnit 3, JUnit 4 or Spock test. The following sections cover the usage of these mixins.
The previous JUnit 3-style GrailsUnitTestCase class hierarchy is still present in Grails for backwards compatibility, but is now deprecated. The previous documentation on the subject can be found in the Grails 1.3.x documentation
You won't normally have to import any of the testing classes because Grails does that for you. But if you find that your IDE for example can't find the classes, here they all are:
grails.test.mixin.TestForgrails.test.mixin.TestMixingrails.test.mixin.Mockgrails.test.mixin.support.GrailsUnitTestMixingrails.test.mixin.domain.DomainClassUnitTestMixingrails.test.mixin.services.ServiceUnitTestMixingrails.test.mixin.web.ControllerUnitTestMixingrails.test.mixin.web.FiltersUnitTestMixingrails.test.mixin.web.GroovyPageUnitTestMixingrails.test.mixin.web.UrlMappingsUnitTestMixingrails.test.mixin.webflow/WebFlowUnitTestMixin
Note that you're only ever likely to use the first two explicitly. The rest are there for reference.
9.1.1 コントローラUnitテスト
The Basics
You use the grails.test.mixin.TestFor annotation to unit test controllers. Using TestFor in this manner activates the grails.test.mixin.web.ControllerUnitTestMixin and its associated API. For example:import grails.test.mixin.TestFor@TestFor(SimpleController)
class SimpleControllerTests {
void testSomething() { }
}TestFor annotation to a controller causes a new controller field to be automatically created for the controller under test.
The TestFor annotation will also automatically annotate any public methods starting with "test" with JUnit 4's @Test annotation. If any of your test method don't start with "test" just add this manually
To test the simplest "Hello World"-style example you can do the following:// Test class
class SimpleController {
def hello() {
render "hello"
}
}void testHello() {
controller.hello() assert response.text == 'hello'
}response object is an instance of GrailsMockHttpServletResponse (from the package org.codehaus.groovy.grails.plugins.testing) which extends Spring's MockHttpServletResponse class and has a number of useful methods for inspecting the state of the response.For example to test a redirect you can use the redirectedUrl property:// Test class
class SimpleController {
def index() {
redirect action: 'hello'
}
…
}void testIndex() {
controller.index() assert response.redirectedUrl == '/simple/hello'
}params variable:void testList() {
params.sort = "name"
params.max = 20
params.offset = 0 controller.list()
…
}method property of the mock request:void testSave() {
request.method = "POST"
controller.save()
…
}void testGetPage() {
request.method = "POST"
request.makeAjaxRequest()
controller.getPage()
…
}xhr property on the request.Testing View Rendering
To test view rendering you can inspect the state of the controller's modelAndView property (an instance of org.springframework.web.servlet.ModelAndView) or you can use the view and model properties provided by the mixin:// Test class
class SimpleController {
def home() {
render view: "homePage", model: [title: "Hello World"]
}
…
}void testIndex() {
controller.home() assert view == "/simple/homePage"
assert model.title == "Hello World"
}Testing Template Rendering
Unlike view rendering, template rendering will actually attempt to write the template directly to the response rather than returning a ModelAndView hence it requires a different approach to testing.Consider the following controller action:class SimpleController {
def display() {
render template:"snippet"
}
}grails-app/views/simple/_snippet.gsp. You can test this as follows:void testDisplay() {
controller.display()
assert response.text == 'contents of template'
}void testDisplay() {
views['/simple/_snippet.gsp'] = 'mock contents'
controller.display()
assert response.text == 'mock contents'
}Testing XML and JSON Responses
XML and JSON response are also written directly to the response. Grails' mocking capabilities provide some conveniences for testing XML and JSON response. For example consider the following action:def renderXml() {
render(contentType:"text/xml") {
book(title:"Great")
}
}xml property of the response:void testRenderXml() {
controller.renderXml()
assert "<book title='Great'/>" == response.text
assert "Great" == response.xml.@title.text()
}xml property is a parsed result from Groovy's XmlSlurper class which is very convenient for parsing XML.Testing JSON responses is pretty similar, instead you use the json property:// controller action
def renderJson() {
render(contentType:"text/json") {
book = "Great"
}
}// test
void testRenderJson() { controller.renderJson() assert '{"book":"Great"}' == response.text
assert "Great" == response.json.book
}json property is an instance of org.codehaus.groovy.grails.web.json.JSONElement which is a map-like structure that is useful for parsing JSON responses.Testing XML and JSON Requests
Grails provides various convenient ways to automatically parse incoming XML and JSON packets. For example you can bind incoming JSON or XML requests using Grails' data binding:def consumeBook() {
def b = new Book(params['book']) render b.title
}xml or json properties. For example the above action can be tested by specifying a String containing the XML:void testConsumeBookXml() {
request.xml = '<book><title>The Shining</title></book>'
controller.consumeBook() assert response.text == 'The Shining'
}void testConsumeBookXml() {
request.xml = new Book(title:"The Shining")
controller.consumeBook() assert response.text == 'The Shining'
}void testConsumeBookJson() {
request.json = new Book(title:"The Shining")
controller.consumeBook() assert response.text == 'The Shining'
}def consume() {
request.withFormat {
xml {
render request.XML.@title
}
json {
render request.JSON.title
}
}
}void testConsumeXml() {
request.xml = '<book title="The Stand" />' controller.consume() assert response.text == 'The Stand'
}void testConsumeJson() {
request.json = '{title:"The Stand"}'
controller.consume() assert response.text == 'The Stand'
}Testing Spring Beans
When using TestFor only a subset of the Spring beans available to a running Grails application are available. If you wish to make additional beans available you can do so with the defineBeans method of GrailsUnitTestMixin:class SimpleController {
SimpleService simpleService
def hello() {
render simpleService.sayHello()
}
}void testBeanWiring() {
defineBeans {
simpleService(SimpleService)
} controller.hello() assert response.text == "Hello World"
}void testAutowiringViaNew() {
defineBeans {
simpleService(SimpleService)
} def controller1 = new SimpleController()
def controller2 = new SimpleController() assert controller1.simpleService != null
assert controller2.simpleService != null
}Testing Mime Type Handling
You can test mime type handling and the withFormat method quite simply by setting the response's format attribute:// controller action
def sayHello() {
def data = [Hello:"World"]
withFormat {
xml { render data as XML }
html data
}
}// test
void testSayHello() {
response.format = 'xml'
controller.sayHello() String expected = '<?xml version="1.0" encoding="UTF-8"?>' +
'<map><entry key="Hello">World</entry></map>' assert expected == response.text
}Testing Duplicate Form Submissions
Testing duplicate form submissions is a little bit more involved. For example if you have an action that handles a form such as:def handleForm() {
withForm {
render "Good"
}.invalidToken {
render "Bad"
}
}void testDuplicateFormSubmission() {
controller.handleForm()
assert "Bad" == response.text
}SynchronizerToken:import org.codehaus.groovy.grails.web.servlet.mvc.SynchronizerToken
...void testValidFormSubmission() {
def token = SynchronizerToken.store(session)
params[SynchronizerToken.KEY] = token.currentToken.toString() controller.handleForm()
assert "Good" == response.text
}controller.handleForm() // first execution
…
response.reset()
…
controller.handleForm() // second execution
Testing File Upload
You use the GrailsMockMultipartFile class to test file uploads. For example consider the following controller action:def uploadFile() {
MultipartFile file = request.getFile("myFile")
file.transferTo(new File("/local/disk/myFile"))
}GrailsMockMultipartFile with the request:void testFileUpload() {
final file = new GrailsMockMultipartFile("myFile", "foo".bytes)
request.addFile(file)
controller.uploadFile() assert file.targetFileLocation.path == "/local/disk/myFile"
}GrailsMockMultipartFile constructor arguments are the name and contents of the file. It has a mock implementation of the transferTo method that simply records the targetFileLocation and doesn't write to disk.Testing Command Objects
Special support exists for testing command object handling with the mockCommandObject method. For example consider the following action:def handleCommand(SimpleCommand simple) {
if (simple.hasErrors()) {
render "Bad"
}
else {
render "Good"
}
}void testInvalidCommand() {
def cmd = mockCommandObject(SimpleCommand)
cmd.name = '' // doesn't allow blank names cmd.validate()
controller.handleCommand(cmd) assert response.text == 'Bad'
}Testing Calling Tag Libraries
You can test calling tag libraries using ControllerUnitTestMixin, although the mechanism for testing the tag called varies from tag to tag. For example to test a call to the message tag, add a message to the messageSource. Consider the following action:def showMessage() {
render g.message(code: "foo.bar")
}void testRenderBasicTemplateWithTags() {
messageSource.addMessage("foo.bar", request.locale, "Hello World") controller.showMessage() assert response.text == "Hello World"
}9.1.2 タグライブラリUnitテスト
The Basics
Tag libraries and GSP pages can be tested with the grails.test.mixin.web.GroovyPageUnitTestMixin mixin. To use the mixin declare which tag library is under test with the TestFor annotation:@TestFor(SimpleTagLib)
class SimpleTagLibTests {}ControllerUnitTestMixin and the GroovyPageUnitTestMixin using the Mock annotation:@TestFor(SimpleController)
@Mock(SimpleTagLib)
class GroovyPageUnitTestMixinTests {}Testing Custom Tags
The core Grails tags don't need to be enabled during testing, however custom tag libraries do. The GroovyPageUnitTestMixin class provides a mockTagLib() method that you can use to mock a custom tag library. For example consider the following tag library:class SimpleTagLib { static namespace = 's' def hello = { attrs, body ->
out << "Hello ${attrs.name ?: 'World'}"
}
}TestFor and supplying the name of the tag library:@TestFor(SimpleTagLib)
class SimpleTagLibTests {
void testHelloTag() {
assert applyTemplate('<s:hello />') == 'Hello World'
assert applyTemplate('<s:hello name="Fred" />') == 'Hello Fred'
}
}TestMixin annotation and mock multiple tag libraries using the mockTagLib() method:@grails.test.mixin.TestMixin(GroovyPageUnitTestMixin)
class MultipleTagLibraryTests { @Test
void testMuliple() {
mockTagLib(FirstTagLib)
mockTagLib(SecondTagLib) …
}
}GroovyPageUnitTestMixin provides convenience methods for asserting that the template output equals or matches an expected value.@grails.test.mixin.TestMixin(GroovyPageUnitTestMixin)
class MultipleTagLibraryTests { @Test
void testMuliple() {
mockTagLib(FirstTagLib)
mockTagLib(SecondTagLib)
assertOutputEquals ('Hello World', '<s:hello />')
assertOutputMatches (/.*Fred.*/, '<s:hello name="Fred" />')
}
}Testing View and Template Rendering
You can test rendering of views and templates in grails-app/views via the render(Map) method provided by GroovyPageUnitTestMixin :def result = render(template: "/simple/hello")
assert result == "Hello World"
grails-app/views/simple/_hello.gsp. Note that if the template depends on any custom tag libraries you need to call mockTagLib as described in the previous section.
9.1.3 ドメインUnitテスト
Overview
The mocking support described here is best used when testing non-domain artifacts that use domain classes, to let you focus on testing the artifact without needing a database. But when testing persistence it's best to use integration tests which configure Hibernate and use a database.
Domain class interaction can be tested without involving a database connection using DomainClassUnitTestMixin. This implementation mimics the behavior of GORM against an in-memory ConcurrentHashMap implementation. Note that this has limitations compared to a real GORM implementation. The following features of GORM for Hibernate can only be tested within an integration test:
- String-based HQL queries
- composite identifiers
- dirty checking methods
- any direct interaction with Hibernate
However a large, commonly-used portion of the GORM API can be mocked using DomainClassUnitTestMixin including:
- Simple persistence methods like
save(), delete() etc.
- Dynamic Finders
- Named Queries
- Query-by-example
- GORM Events
If something isn't supported then GrailsUnitTestMixin's mockFor method can come in handy to mock the missing pieces. Alternatively you can write an integration test which bootstraps the complete Grails environment at a cost of test execution time.The Basics
DomainClassUnitTestMixin is typically used in combination with testing either a controller, service or tag library where the domain is a mock collaborator defined by the Mock annotation:import grails.test.mixin.*@TestFor(SimpleController)
@Mock(Simple)
class SimpleControllerTests {}SimpleController class and mocks the behavior of the Simple domain class as well. For example consider a typical scaffolded save controller action:class BookController {
def save() {
def book = new Book(params)
if (book.save(flush: true)) {
flash.message = message(
code: 'default.created.message',
args: [message(code: 'book.label',
default: 'Book'), book.id])}"
redirect(action: "show", id: book.id)
}
else {
render(view: "create", model: [bookInstance: book])
}
}
}import grails.test.mixin.*@TestFor(BookController)
@Mock(Book)
class BookControllerTests { void testSaveInvalidBook() {
controller.save() assert model.bookInstance != null
assert view == '/book/create'
} void testSaveValidBook() {
params.title = "The Stand"
params.pages = "500" controller.save() assert response.redirectedUrl == '/book/show/1'
assert flash.message != null
assert Book.count() == 1
}
}Mock annotation also supports a list of mock collaborators if you have more than one domain to mock:@TestFor(BookController)
@Mock([Book, Author])
class BookControllerTests {
…
}DomainClassUnitTestMixin directly with the TestMixin annotation:import grails.test.mixin.domain.DomainClassUnitTestMixin@TestFor(BookController)
@TestMixin(DomainClassUnitTestMixin)
class BookControllerTests {
…
}mockDomain method to mock domains during your test:void testSave() {
mockDomain(Author)
mockDomain(Book)
}mockDomain method also includes an additional parameter that lets you pass a Map of Maps to configure a domain, which is useful for fixture-like data:void testSave() {
mockDomain(Book, [
[title: "The Stand", pages: 1000],
[title: "The Shining", pages: 400],
[title: "Along Came a Spider", pages: 300] ])
}Testing Constraints
Your constraints contain logic and that logic is highly susceptible to bugs - the kind of bugs that can be tricky to track down (particularly as by default save() doesn't throw an exception when it fails). If your answer is that it's too hard or fiddly, that is no longer an excuse. Enter the mockForConstraintsTests() method.This method is like a much reduced version of the mockDomain() method that simply adds a validate() method to a given domain class. All you have to do is mock the class, create an instance with populated data, and then call validate(). You can then access the errors property to determine if validation failed. So if all we are doing is mocking the validate() method, why the optional list of test instances? That is so that we can test the unique constraint as you will soon see.So, suppose we have a simple domain class:class Book { String title
String author static constraints = {
title blank: false, unique: true
author blank: false, minSize: 5
}
}@TestFor(Book)
class BookTests {
void testConstraints() { def existingBook = new Book(
title: "Misery",
author: "Stephen King") mockForConstraintsTests(Book, [existingBook]) // validation should fail if both properties are null
def book = new Book() assert !book.validate()
assert "nullable" == book.errors["title"]
assert "nullable" == book.errors["author"] // So let's demonstrate the unique and minSize constraints book = new Book(title: "Misery", author: "JK")
assert !book.validate()
assert "unique" == book.errors["title"]
assert "minSize" == book.errors["author"] // Validation should pass!
book = new Book(title: "The Shining", author: "Stephen King")
assert book.validate()
}
}errors property is used. First, is a real Spring Errors instance, so you can access all the properties and methods you would normally expect. Second, this particular Errors object also has map/property access as shown. Simply specify the name of the field you are interested in and the map/property access will return the name of the constraint that was violated. Note that it is the constraint name, not the message code (as you might expect).That's it for testing constraints. One final thing we would like to say is that testing the constraints in this way catches a common error: typos in the "constraints" property name! It is currently one of the hardest bugs to track down normally, and yet a unit test for your constraints will highlight the problem straight away.
9.1.4 フィルタUnitテスト
Unit testing filters is typically a matter of testing a controller where a filter is a mock collaborator. For example consider the following filters class:class CancellingFilters {
def filters = {
all(controller:"simple", action:"list") {
before = {
redirect(controller:"book")
return false
}
}
}
}list action of the simple controller and redirects to the book controller. To test this filter you start off with a test that targets the SimpleController class and add the CancellingFilters as a mock collaborator:@TestFor(SimpleController)
@Mock(CancellingFilters)
class SimpleControllerTests {}withFilters method to wrap the call to an action in filter execution:void testInvocationOfListActionIsFiltered() {
withFilters(action:"list") {
controller.list()
}
assert response.redirectedUrl == '/book'
}action parameter is required because it is unknown what the action to invoke is until the action is actually called. The controller parameter is optional and taken from the controller under test. If it is a another controller you are testing then you can specify it:withFilters(controller:"book",action:"list") {
controller.list()
}9.1.5 URLマッピングUnitテスト
The Basics
Testing URL mappings can be done with the TestFor annotation testing a particular URL mappings class. For example to test the default URL mappings you can do the following:@TestFor(UrlMappings)
class UrlMappingsTests {}
Note that since the default UrlMappings class is in the default package your test must also be in the default package
With that done there are a number of useful methods that are defined by the grails.test.mixin.web.UrlMappingsUnitTestMixin for testing URL mappings. These include:
assertForwardUrlMapping - Asserts a URL mapping is forwarded for the given controller class (note that controller will need to be defined as a mock collaborate for this to work)assertReverseUrlMapping - Asserts that the given URL is produced when reverse mapping a link to a given controller and actionassertUrlMapping - Asserts a URL mapping is valid for the given URL. This combines the assertForwardUrlMapping and assertReverseUrlMapping assertions
Asserting Forward URL Mappings
You use assertForwardUrlMapping to assert that a given URL maps to a given controller. For example, consider the following URL mappings:static mappings = {
"/action1"(controller: "simple", action: "action1")
"/action2"(controller: "simple", action: "action2")
}void testUrlMappings() { assertForwardUrlMapping("/action1", controller: 'simple',
action: "action1") assertForwardUrlMapping("/action2", controller: 'simple',
action: "action2") shouldFail {
assertForwardUrlMapping("/action2", controller: 'simple',
action: "action1")
}
}Assert Reverse URL Mappings
You use assertReverseUrlMapping to check that correct links are produced for your URL mapping when using the link tag in GSP views. An example test is largely identical to the previous listing except you use assertReverseUrlMapping instead of assertForwardUrlMapping. Note that you can combine these 2 assertions with assertUrlMapping.Simulating Controller Mapping
In addition to the assertions to check the validity of URL mappings you can also simulate mapping to a controller by using your UrlMappings as a mock collaborator and the mapURI method. For example:@TestFor(SimpleController)
@Mock(UrlMappings)
class SimpleControllerTests { void testControllerMapping() { SimpleController controller = mapURI('/simple/list')
assert controller != null def model = controller.list()
assert model != null
}
}9.1.6 モッキングコラボレータ
Beyond the specific targeted mocking APIs there is also an all-purpose mockFor() method that is available when using the TestFor annotation. The signature of mockFor is:mockFor(class, loose = false)
def strictControl = mockFor(MyService)
strictControl.demand.someMethod(0..2) { String arg1, int arg2 -> … }
strictControl.demand.static.aStaticMethod {-> … }mockControl.createMock() to get an actual mock instance of the class that you are mocking. You can call this multiple times to create as many mock instances as you need. And once you have executed the test method, call mockControl.verify() to check that the expected methods were called.Lastly, the call:def looseControl = mockFor(MyService, true)
9.2 統合テスト
Integration tests differ from unit tests in that you have full access to the Grails environment within the test. Grails uses an in-memory H2 database for integration tests and clears out all the data from the database between tests.One thing to bear in mind is that logging is enabled for your application classes, but it is different from logging in tests. So if you have something like this:class MyServiceTests extends GroovyTestCase {
void testSomething() {
log.info "Starting tests"
…
}
}log property in the example above is an instance of java.util.logging.Logger (inherited from the base class, not injected by Grails), which doesn't have the same methods as the log property injected into your application artifacts. For example, it doesn't have debug() or trace() methods, and the equivalent of warn() is in fact warning().Transactions
Integration tests run inside a database transaction by default, which is rolled back at the end of the each test. This means that data saved during a test is not persisted to the database. Add a transactional property to your test class to check transactional behaviour:class MyServiceTests extends GroovyTestCase {
static transactional = false void testMyTransactionalServiceMethod() {
…
}
}tearDown method, so these tests don't interfere with standard transactional tests that expect a clean database.Testing Controllers
To test controllers you first have to understand the Spring Mock Library.Grails automatically configures each test with a MockHttpServletRequest, MockHttpServletResponse, and MockHttpSession that you can use in your tests. For example consider the following controller:class FooController { def text() {
render "bar"
} def someRedirect() {
redirect(action:"bar")
}
}class FooControllerTests extends GroovyTestCase { void testText() {
def fc = new FooController()
fc.text()
assertEquals "bar", fc.response.contentAsString
} void testSomeRedirect() {
def fc = new FooController()
fc.someRedirect()
assertEquals "/foo/bar", fc.response.redirectedUrl
}
}response is an instance of MockHttpServletResponse which we can use to obtain the generated content with contentAsString (when writing to the response) or the redirected URL. These mocked versions of the Servlet API are completely mutable (unlike the real versions) and hence you can set properties on the request such as the contextPath and so on.Grails does not invoke interceptors or servlet filters when calling actions during integration testing. You should test interceptors and filters in isolation, using functional testing if necessary.Testing Controllers with Services
If your controller references a service (or other Spring beans), you have to explicitly initialise the service from your test.Given a controller using a service:class FilmStarsController {
def popularityService def update() {
// do something with popularityService
}
}class FilmStarsTests extends GroovyTestCase {
def popularityService void testInjectedServiceInController () {
def fsc = new FilmStarsController()
fsc.popularityService = popularityService
fsc.update()
}
}Testing Controller Command Objects
With command objects you just supply parameters to the request and it will automatically do the command object work for you when you call your action with no parameters:Given a controller using a command object:class AuthenticationController {
def signup(SignupForm form) {
…
}
}def controller = new AuthenticationController()
controller.params.login = "marcpalmer"
controller.params.password = "secret"
controller.params.passwordConfirm = "secret"
controller.signup()
signup() as a call to the action and populates the command object from the mocked request parameters. During controller testing, the params are mutable with a mocked request supplied by Grails.Testing Controllers and the render Method
The render method lets you render a custom view at any point within the body of an action. For instance, consider the example below:def save() {
def book = Book(params)
if (book.save()) {
// handle
}
else {
render(view:"create", model:[book:book])
}
}modelAndView property of the controller. The modelAndView property is an instance of Spring MVC's ModelAndView class and you can use it to the test the result of an action:def bookController = new BookController()
bookController.save()
def model = bookController.modelAndView.model.book
Simulating Request Data
You can use the Spring MockHttpServletRequest to test an action that requires request data, for example a REST web service. For example consider this action which performs data binding from an incoming request:def create() {
[book: new Book(params.book)]
}void testCreateWithXML() { def controller = new BookController() controller.request.contentType = 'text/xml'
controller.request.content = '''\
<?xml version="1.0" encoding="ISO-8859-1"?>
<book>
<title>The Stand</title>
…
</book>
'''.stripIndent().getBytes() // note we need the bytes def model = controller.create()
assert model.book
assertEquals "The Stand", model.book.title
}void testCreateWithJSON() { def controller = new BookController() controller.request.contentType = "text/json"
controller.request.content =
'{"id":1,"class":"Book","title":"The Stand"}'.getBytes() def model = controller.create()
assert model.book
assertEquals "The Stand", model.book.title
}
With JSON don't forget the class property to specify the name the target type to bind to. In XML this is implicit within the name of the <book> node, but this property is required as part of the JSON packet.
For more information on the subject of REST web services see the section on REST.Testing Web Flows
Testing Web Flows requires a special test harness called grails.test.WebFlowTestCase which subclasses Spring Web Flow's AbstractFlowExecutionTests class.
Subclasses of WebFlowTestCase must be integration tests
For example given this simple flow:class ExampleController { def exampleFlow() {
start {
on("go") {
flow.hello = "world"
}.to "next"
}
next {
on("back").to "start"
on("go").to "subber"
}
subber {
subflow(action: "sub")
on("end").to("end")
}
end()
} def subFlow() {
subSubflowState {
subflow(controller: "other", action: "otherSub")
on("next").to("next")
}
…
}
}getFlow
method:import grails.test.WebFlowTestCaseclass ExampleFlowTests extends WebFlowTestCase {
def getFlow() { new ExampleController().exampleFlow }
…
}getFlowId method, otherwise the default is test:
import grails.test.WebFlowTestCaseclass ExampleFlowTests extends WebFlowTestCase {
String getFlowId() { "example" }
…
}protected void setUp() {
super.setUp() registerFlow("other/otherSub") { // register a simplified mock
start {
on("next").to("end")
}
end()
} // register the original subflow
registerFlow("example/sub", new ExampleController().subFlow)
}startFlow method:void testExampleFlow() {
def viewSelection = startFlow()
…
}signalEvent method to trigger an event:void testExampleFlow() {
…
signalEvent("go")
assert "next" == flowExecution.activeSession.state.id
assert "world" == flowScope.hello
}hello variable into the flow scope.Testing Tag Libraries
Testing tag libraries is simple because when a tag is invoked as a method it returns its result as a string (technically a StreamCharBuffer but this class implements all of the methods of String). So for example if you have a tag library like this:class FooTagLib { def bar = { attrs, body ->
out << "<p>Hello World!</p>"
} def bodyTag = { attrs, body ->
out << "<${attrs.name}>"
out << body()
out << "</${attrs.name}>"
}
}class FooTagLibTests extends GroovyTestCase { void testBarTag() {
assertEquals "<p>Hello World!</p>",
new FooTagLib().bar(null, null).toString()
} void testBodyTag() {
assertEquals "<p>Hello World!</p>",
new FooTagLib().bodyTag(name: "p") {
"Hello World!"
}.toString()
}
}testBodyTag, we pass a block that returns the body of the tag. This is convenient to representing the body as a String.Testing Tag Libraries with GroovyPagesTestCase
In addition to doing simple testing of tag libraries like in the above examples, you can also use the grails.test.GroovyPagesTestCase class to test tag libraries with integration tests.The GroovyPagesTestCase class is a subclass of the standard GroovyTestCase class and adds utility methods for testing the output of GSP rendering.
GroovyPagesTestCase can only be used in an integration test.
For example, consider this date formatting tag library:import java.text.SimpleDateFormatclass FormatTagLib {
def dateFormat = { attrs, body ->
out << new SimpleDateFormat(attrs.format) << attrs.date
}
}class FormatTagLibTests extends GroovyPagesTestCase {
void testDateFormat() {
def template =
'<g:dateFormat format="dd-MM-yyyy" date="${myDate}" />' def testDate = … // create the date
assertOutputEquals('01-01-2008', template, [myDate:testDate])
}
}applyTemplate method of the GroovyPagesTestCase class:class FormatTagLibTests extends GroovyPagesTestCase {
void testDateFormat() {
def template =
'<g:dateFormat format="dd-MM-yyyy" date="${myDate}" />' def testDate = … // create the date
def result = applyTemplate(template, [myDate:testDate]) assertEquals '01-01-2008', result
}
}Testing Domain Classes
Testing domain classes is typically a simple matter of using the GORM API, but there are a few things to be aware of. Firstly, when testing queries you often need to "flush" to ensure the correct state has been persisted to the database. For example take the following example:void testQuery() {
def books = [
new Book(title: "The Stand"),
new Book(title: "The Shining")]
books*.save() assertEquals 2, Book.list().size()
}Book instances when called. Calling save only indicates to Hibernate that at some point in the future these instances should be persisted. To commit changes immediately you "flush" them:void testQuery() {
def books = [
new Book(title: "The Stand"),
new Book(title: "The Shining")]
books*.save(flush: true) assertEquals 2, Book.list().size()
}flush with a value of true the updates will be persisted immediately and hence will be available to the query later on.
9.3 機能テスト
Functional tests involve making HTTP requests against the running application and verifying the resultant behaviour. Grails does not ship with any support for writing functional tests directly, but there are several plugins available for this.
Consult the documentation for each plugin for its capabilities.Common Options
There are options that are common to all plugins that control how the Grails application is launched, if at all.inline
The -inline option specifies that the grails application should be started inline (i.e. like run-app).This option is implicitly set unless the baseUrl or war options are setwar
The -war option specifies that the grails application should be packaged as a war and started. This is useful as it tests your application in a production-like state, but it has a longer startup time than the -inline option. It also runs the war in a forked JVM, meaning that you cannot access any internal application objects.grails test-app functional: -war
https
The -https option results in the application being able to receive https requests as well as http requests. It is compatible with both the -inline and -war options.grails test-app functional: -https
-httpsBaseUrl option is also given.httpsBaseUrl
The -httpsBaseUrl causes the implicit base url to be used for tests to be a https url.grails test-app functional: -httpsBaseUrl
-baseUrl option is specified.baseUrl
The baseUrl option allows the base url for tests to be specified.grails test-app functional: -baseUrl=http://mycompany.com/grailsapp
-inline or -war are given as well. To use a custom base url but still test against the local Grails application you must specify one of either the -inline or -war options.
10 国際化
Grails supports Internationalization (i18n) out of the box by leveraging the underlying Spring MVC internationalization support. With Grails you are able to customize the text that appears in a view based on the user's Locale. To quote the javadoc for the
Locale class:
A Locale object represents a specific geographical, political, or cultural region. An operation that requires a Locale to perform its task is called locale-sensitive and uses the Locale to tailor information for the user. For example, displaying a number is a locale-sensitive operation--the number should be formatted according to the customs/conventions of the user's native country, region, or culture.
Locale オブジェクトは、特定の地理的、国家的、または文化的地域を表すためのものです。ある操作で Locale を必要とするタスクがある場合、その操作をロケールに依存する操作といいます。この場合、情報は Locale によりユーザに合わせて調整されます。たとえば、数値を表示するのは、ロケールに依存する操作です。この数値は、ユーザの国や地域、文化の習慣や規則に従ってフォーマットする必要があります。
A Locale is made up of a
language code and a
country code. For example "en_US" is the code for US english, whilst "en_GB" is the for British English.
10.1 メッセージバンドルを理解する
Now that you have an idea of locales, to use them in Grails you create message bundle file containing the different languages that you wish to render. Message bundles in Grails are located inside the grails-app/i18n directory and are simple Java properties files.
複数ロケールの表示に対応するには、それぞれの言語ごと複数のメッセージバンドルを用意します。メッセージバンドルはシンプルなJavaのプロパティファイルとしてgrails-app/i18nディレクトリに配置します。Each bundle starts with the name messages by convention and ends with the locale. Grails ships with several message bundles for a whole range of languages within the grails-app/i18n directory. For example:
各メッセージバンドルファイル名はmessagesからはじまり、ロケール名称で終わります。Grailsでは幾つかの言語のメッセージバンドルをgrails-app/i18nディレクトリに同梱しています。例として:
- messages.properties
- messages_da.properties
- messages_de.properties
- messages_es.properties
- messages_fr.properties
- ...
By default Grails looks in messages.properties for messages unless the user has specified a locale. You can create your own message bundle by simply creating a new properties file that ends with the locale you are interested. For example messages_en_GB.properties for British English.
ユーザがロケールを指定していない場合、デフォルトでmessages.propertiesを参照します。
独自のメッセージバンドルを作成するには、末尾がロケールのプロパティファイルを新規に作成します。たとえば、messages_ja_JP.propertiesとすれば日本国+日本語になります。
10.2 ロケールの変更
By default the user locale is detected from the incoming Accept-Language header. However, you can provide users the capability to switch locales by simply passing a parameter called lang to Grails as a request parameter:
デフォルトでAccept-Languagヘッダーによりロケールが決まります。リクエストパラメータにlangを指定することでロケールを変更できます。Grails will automatically switch the user's locale and store it in a cookie so subsequent requests will have the new header.
この指定でGrailsがユーザのロケールを変更して、後のリクエストでも使用できるようにクッキーに保存します。
10.3 メッセージ読込
ビュー内でのメッセージ読み込み
Reading Messages in the View
The most common place that you need messages is inside the view. Use the
message tag for this:
<g:message code="my.localized.content" />
As long as you have a key in your messages.properties (with appropriate locale suffix) such as the one below then Grails will look up the message:
以下のようなキーがmessages.properties(妥当なロケール接尾辞が付いている)に有る場合、Grailsがメッセージを取得できます:my.localized.content=Hola, Me llamo John. Hoy es domingo.
Messages can also include arguments, for example:
メッセージは引数を含めることも可能です。例として:<g:message code="my.localized.content" args="${ ['Juan', 'lunes'] }" />The message declaration specifies positional parameters which are dynamically specified:
位置パラメータがメッセージに指定されていると動的に設定されます:my.localized.content=Hola, Me llamo {0}. Hoy es {1}.コントローラとタグライブラリ内でのメッセージ読み込み
Reading Messages in Controllers and Tag Libraries
It's simple to read messages in a controller since you can invoke tags as methods:
コントローラでメッセージを読み込む場合はタグをメソッドとして実行します:def show() {
def msg = message(code: "my.localized.content", args: ['Juan', 'lunes'])
}The same technique can be used in
tag libraries, but if your tag library uses a custom
namespace then you must prefix the call with
g.:
g.を使用します:def myTag = { attrs, body ->
def msg = g.message(code: "my.localized.content", args: ['Juan', 'lunes'])
}10.4 スカッフォルドとi18n
Grails
scaffolding templates for controllers and views are fully i18n-aware. The GSPs use the
message tag for labels, buttons etc. and controller
flash messages use i18n to resolve locale-specific messages.
flashメッセージを使用して国際化にロケール対応メッセージを使用しています。
11 セキュリティ
Grails is no more or less secure than Java Servlets. However, Java servlets (and hence Grails) are extremely secure and largely immune to common buffer overrun and malformed URL exploits due to the nature of the Java Virtual Machine underpinning the code.Web security problems typically occur due to developer naivety or mistakes, and there is a little Grails can do to avoid common mistakes and make writing secure applications easier to write.What Grails Automatically Does
Grails has a few built in safety mechanisms by default.
- All standard database access via GORM domain objects is automatically SQL escaped to prevent SQL injection attacks
- The default scaffolding templates HTML escape all data fields when displayed
- Grails link creating tags (link, form, createLink, createLinkTo and others) all use appropriate escaping mechanisms to prevent code injection
- Grails provides codecs to let you trivially escape data when rendered as HTML, JavaScript and URLs to prevent injection attacks here.
11.1 攻撃からの防御
SQL injection
Hibernate, which is the technology underlying GORM domain classes, automatically escapes data when committing to database so this is not an issue. However it is still possible to write bad dynamic HQL code that uses unchecked request parameters. For example doing the following is vulnerable to HQL injection attacks:def vulnerable() {
def books = Book.find("from Book as b where b.title ='" + params.title + "'")
}def vulnerable() {
def books = Book.find("from Book as b where b.title ='${params.title}'")
}def safe() {
def books = Book.find("from Book as b where b.title = ?",
[params.title])
}def safe() {
def books = Book.find("from Book as b where b.title = :title",
[title: params.title])
}Phishing
This really a public relations issue in terms of avoiding hijacking of your branding and a declared communication policy with your customers. Customers need to know how to identify valid emails.XSS - cross-site scripting injection
It is important that your application verifies as much as possible that incoming requests were originated from your application and not from another site. Ticketing and page flow systems can help this and Grails' support for Spring Web Flow includes security like this by default.It is also important to ensure that all data values rendered into views are escaped correctly. For example when rendering to HTML or XHTML you must call encodeAsHTML on every object to ensure that people cannot maliciously inject JavaScript or other HTML into data or tags viewed by others. Grails supplies several Dynamic Encoding Methods for this purpose and if your output escaping format is not supported you can easily write your own codec.You must also avoid the use of request parameters or data fields for determining the next URL to redirect the user to. If you use a successURL parameter for example to determine where to redirect a user to after a successful login, attackers can imitate your login procedure using your own site, and then redirect the user back to their own site once logged in, potentially allowing JavaScript code to then exploit the logged-in account on the site.Cross-site request forgery
CSRF involves unauthorized commands being transmitted from a user that a website trusts. A typical example would be another website embedding a link to perform an action on your website if the user is still authenticated.The best way to decrease risk against these types of attacks is to use the useToken attribute on your forms. See Handling Duplicate Form Submissions for more information on how to use it. An additional measure would be to not use remember-me cookies.HTML/URL injection
This is where bad data is supplied such that when it is later used to create a link in a page, clicking it will not cause the expected behaviour, and may redirect to another site or alter request parameters.HTML/URL injection is easily handled with the codecs supplied by Grails, and the tag libraries supplied by Grails all use encodeAsURL where appropriate. If you create your own tags that generate URLs you will need to be mindful of doing this too.Denial of service
Load balancers and other appliances are more likely to be useful here, but there are also issues relating to excessive queries for example where a link is created by an attacker to set the maximum value of a result set so that a query could exceed the memory limits of the server or slow the system down. The solution here is to always sanitize request parameters before passing them to dynamic finders or other GORM query methods:def safeMax = Math.max(params.max?.toInteger(), 100) // limit to 100 results
return Book.list(max:safeMax)
Guessable IDs
Many applications use the last part of the URL as an "id" of some object to retrieve from GORM or elsewhere. Especially in the case of GORM these are easily guessable as they are typically sequential integers.Therefore you must assert that the requesting user is allowed to view the object with the requested id before returning the response to the user.Not doing this is "security through obscurity" which is inevitably breached, just like having a default password of "letmein" and so on.You must assume that every unprotected URL is publicly accessible one way or another.
11.2 エンコード・デコードオブジェクト
Grails supports the concept of dynamic encode/decode methods. A set of standard codecs are bundled with Grails. Grails also supports a simple mechanism for developers to contribute their own codecs that will be recognized at runtime.Codec Classes
A Grails codec class is one that may contain an encode closure, a decode closure or both. When a Grails application starts up the Grails framework dynamically loads codecs from the grails-app/utils/ directory.The framework looks under grails-app/utils/ for class names that end with the convention Codec. For example one of the standard codecs that ships with Grails is HTMLCodec.If a codec contains an encode closure Grails will create a dynamic encode method and add that method to the Object class with a name representing the codec that defined the encode closure. For example, the HTMLCodec class defines an encode closure, so Grails attaches it with the name encodeAsHTML.The HTMLCodec and URLCodec classes also define a decode closure, so Grails attaches those with the names decodeHTML and decodeURL respectively. Dynamic codec methods may be invoked from anywhere in a Grails application. For example, consider a case where a report contains a property called 'description' which may contain special characters that must be escaped to be presented in an HTML document. One way to deal with that in a GSP is to encode the description property using the dynamic encode method as shown below:${report.description.encodeAsHTML()}value.decodeHTML() syntax.Standard Codecs
HTMLCodecThis codec performs HTML escaping and unescaping, so that values can be rendered safely in an HTML page without creating any HTML tags or damaging the page layout. For example, given a value "Don't you know that 2 > 1?" you wouldn't be able to show this safely within an HTML page because the > will look like it closes a tag, which is especially bad if you render this data within an attribute, such as the value attribute of an input field.Example of usage:<input name="comment.message" value="${comment.message.encodeAsHTML()}"/>
Note that the HTML encoding does not re-encode apostrophe/single quote so you must use double quotes on attribute values to avoid text with apostrophes affecting your page.
URLCodecURL encoding is required when creating URLs in links or form actions, or any time data is used to create a URL. It prevents illegal characters from getting into the URL and changing its meaning, for example "Apple & Blackberry" is not going to work well as a parameter in a GET request as the ampersand will break parameter parsing.Example of usage:<a href="/mycontroller/find?searchKey=${lastSearch.encodeAsURL()}">
Repeat last search
</a>Your registration code is: ${user.registrationCode.encodeAsBase64()}Element.update('${elementId}',
'${render(template: "/common/message").encodeAsJavaScript()}')Selected colour: #${[255,127,255].encodeAsHex()}Your API Key: ${user.uniqueID.encodeAsMD5()}byte[] passwordHash = params.password.encodeAsMD5Bytes()
Your API Key: ${user.uniqueID.encodeAsSHA1()}byte[] passwordHash = params.password.encodeAsSHA1Bytes()
Your API Key: ${user.uniqueID.encodeAsSHA256()}byte[] passwordHash = params.password.encodeAsSHA256Bytes()
Custom Codecs
Applications may define their own codecs and Grails will load them along with the standard codecs. A custom codec class must be defined in the grails-app/utils/ directory and the class name must end with Codec. The codec may contain a static encode closure, a static decode closure or both. The closure must accept a single argument which will be the object that the dynamic method was invoked on. For Example:class PigLatinCodec {
static encode = { str ->
// convert the string to pig latin and return the result
}
}${lastName.encodeAsPigLatin()}11.3 認証
Grails has no default mechanism for authentication as it is possible to implement authentication in many different ways. It is however, easy to implement a simple authentication mechanism using either interceptors or filters. This is sufficient for simple use cases but it's highly preferable to use an established security framework, for example by using the Spring Security or the Shiro plugin.Filters let you apply authentication across all controllers or across a URI space. For example you can create a new set of filters in a class called grails-app/conf/SecurityFilters.groovy by running:grails create-filters security
class SecurityFilters {
def filters = {
loginCheck(controller: '*', action: '*') {
before = {
if (!session.user && actionName != "login") {
redirect(controller: "user", action: "login")
return false
}
}
}
}
}loginCheck filter intercepts execution before all actions except login are executed, and if there is no user in the session then redirect to the login action.The login action itself is simple too:def login() {
if (request.get) {
return // render the login view
} def u = User.findByLogin(params.login)
if (u) {
if (u.password == params.password) {
session.user = u
redirect(action: "home")
}
else {
render(view: "login", model: [message: "Password incorrect"])
}
}
else {
render(view: "login", model: [message: "User not found"])
}
}11.4 セキュリティプラグイン
If you need more advanced functionality beyond simple authentication such as authorization, roles etc. then you should consider using one of the available security plugins.
11.4.1 Spring Security
The Spring Security plugins are built on the Spring Security project which provides a flexible, extensible framework for building all sorts of authentication and authorization schemes. The plugins are modular so you can install just the functionality that you need for your application. The Spring Security plugins are the official security plugins for Grails and are actively maintained and supported.There is a Core plugin which supports form-based authentication, encrypted/salted passwords, HTTP Basic authentication, etc. and secondary dependent plugins provide alternate functionality such as OpenID authentication, ACL support, single sign-on with Jasig CAS, LDAP authentication, Kerberos authentication, and a plugin providing user interface extensions and security workflows.See the Core plugin page for basic information and the user guide for detailed information.
11.4.2 Shiro
Shiro is a Java POJO-oriented security framework that provides a default domain model that models realms, users, roles and permissions. With Shiro you extend a controller base class called called JsecAuthBase in each controller you want secured and then provide an accessControl block to setup the roles. An example below:class ExampleController extends JsecAuthBase {
static accessControl = {
// All actions require the 'Observer' role.
role(name: 'Observer') // The 'edit' action requires the 'Administrator' role.
role(name: 'Administrator', action: 'edit') // Alternatively, several actions can be specified.
role(name: 'Administrator', only: [ 'create', 'edit', 'save', 'update' ])
}
…
}12 プラグイン
Grails is first and foremost a web application framework, but it is also a platform. By exposing a number of extension points that let you extend anything from the command line interface to the runtime configuration engine, Grails can be customised to suit almost any needs. To hook into this platform, all you need to do is create a plugin.Extending the platform may sound complicated, but plugins can range from trivially simple to incredibly powerful. If you know how to build a Grails application, you'll know how to create a plugin for sharing a data model or some static resources.
12.1 プラグインの作成とインストール
Creating Plugins
Creating a Grails plugin is a simple matter of running the command:grails create-plugin [PLUGIN NAME]
grails create-plugin example would create a new plugin project called example.The structure of a Grails plugin is very nearly the same as a Grails application project's except that in the root of the plugin directory you will find a plugin Groovy file called the "plugin descriptor".Being a regular Grails project has a number of benefits in that you can immediately test your plugin by running:The plugin descriptor name ends with the convention GrailsPlugin and is found in the root of the plugin project. For example:class ExampleGrailsPlugin {
def version = "0.1" …
}
title - short one-sentence description of your pluginversion - The version of your plugin. Valid values include example "0.1", "0.2-SNAPSHOT", "1.1.4" etc.grailsVersion - The version of version range of Grails that the plugin supports. eg. "1.2 > *" (indicating 1.2 or higher)author - plugin author's nameauthorEmail - plugin author's contact e-maildescription - full multi-line description of plugin's featuresdocumentation - URL of the plugin's documentation
Here is an example from the Quartz Grails plugin:class QuartzGrailsPlugin {
def version = "0.1"
def grailsVersion = "1.1 > *"
def author = "Sergey Nebolsin"
def authorEmail = "nebolsin@gmail.com"
def title = "Quartz Plugin"
def description = '''\
The Quartz plugin allows your Grails application to schedule jobs\
to be executed using a specified interval or cron expression. The\
underlying system uses the Quartz Enterprise Job Scheduler configured\
via Spring, but is made simpler by the coding by convention paradigm.\
'''
def documentation = "http://grails.org/plugin/quartz" …
}Installing and Distributing Plugins
To distribute a plugin you navigate to its root directory in a console and run:This will create a zip file of the plugin starting with grails- then the plugin name and version. For example with the example plugin created earlier this would be grails-example-0.1.zip. The package-plugin command will also generate a plugin.xml file which contains machine-readable information about plugin's name, version, author, and so on.Once you have a plugin distribution file you can navigate to a Grails project and run:grails install-plugin /path/to/grails-example-0.1.zip
grails install-plugin http://myserver.com/plugins/grails-example-0.1.zip
Notes on excluded Artefacts
Although the create-plugin command creates certain files for you so that the plugin can be run as a Grails application, not all of these files are included when packaging a plugin. The following is a list of artefacts created, but not included by package-plugin:
grails-app/conf/BootStrap.groovygrails-app/conf/BuildConfig.groovy (although it is used to generate dependencies.groovy)grails-app/conf/Config.groovygrails-app/conf/DataSource.groovy (and any other *DataSource.groovy)grails-app/conf/UrlMappings.groovygrails-app/conf/spring/resources.groovy- Everything within
/web-app/WEB-INF
- Everything within
/web-app/plugins/**
- Everything within
/test/**
- SCM management files within
**/.svn/** and **/CVS/**
If you need artefacts within WEB-INF it is recommended you use the _Install.groovy script (covered later), which is executed when a plugin is installed, to provide such artefacts. In addition, although UrlMappings.groovy is excluded you are allowed to include a UrlMappings definition with a different name, such as MyPluginUrlMappings.groovy.Specifying Plugin Locations
An application can load plugins from anywhere on the file system, even if they have not been installed. Specify the location of the (unpacked) plugin in the application's grails-app/conf/BuildConfig.groovy file:// Useful to test plugins you are developing.
grails.plugin.location.shiro =
"/home/dilbert/dev/plugins/grails-shiro"// Useful for modular applications where all plugins and
// applications are in the same directory.
grails.plugin.location.'grails-ui' = "../grails-grails-ui"
- You are developing a plugin and want to test it in a real application without packaging and installing it first.
- You have split an application into a set of plugins and an application, all in the same "super-project" directory.
Global plugins
Plugins can also be installed globally for all applications for a particular version of Grails using the -global flag, for example:grails install-plugin webtest -global
grails.global.plugins.dir setting in BuildConfig.groovy.
12.2 プラグインリポジトリ
Distributing Plugins in the Grails Central Plugin Repository
The preferred way to distribute plugin is to publish to the official Grails Central Plugin Repository. This will make your plugin visible to the list-plugins command:which lists all plugins that are in the central repository. Your plugin will also be available to the plugin-info command:grails plugin-info [plugin-name]
If you have created a Grails plugin and want it to be hosted in the central repository, you'll find instructions for getting an account on this wiki page.
When you have access to the Grails Plugin repository, install the Release Plugin and execute the publish-plugin command to release your plugin:grails install-plugin release
grails publish-plugin
Configuring Additional Repositories
The process for configuring repositories in Grails differs between versions. For version of Grails 1.2 and earlier please refer to the Grails 1.2 documentation on the subject. The following sections cover Grails 1.3 and above.Grails 1.3 and above use Ivy under the hood to resolve plugin dependencies. The mechanism for defining additional plugin repositories is largely the same as defining repositories for JAR dependencies. For example you can define a remote Maven repository that contains Grails plugins using the following syntax in grails-app/conf/BuildConfig.groovy:repositories {
mavenRepo "http://repository.codehaus.org" // ...or with a name
mavenRepo name: "myRepo",
root: "http://myserver:8081/artifactory/plugins-snapshots-local"
}grailsRepo method:repositories {
grailsRepo "http://myserver/mygrailsrepo" // ...or with a name
grailsRepo "http://myserver/svn/grails-plugins", "mySvnRepo"
}repositories {
grailsCentral()
}repositories {
grailsRepo "http://myserver/mygrailsrepo"
grailsCentral()
}def sshResolver = new SshResolver(user:"myuser", host:"myhost.com")
sshResolver.addArtifactPattern(
"/path/to/repo/grails-[artifact]/tags/" +
"LATEST_RELEASE/grails-[artifact]-[revision].[ext]")
sshResolver.latestStrategy =
new org.apache.ivy.plugins.latest.LatestTimeStrategy()sshResolver.changingPattern = ".*SNAPSHOT"
sshResolver.setCheckmodified(true)Publishing to Maven Compatible Repositories
In general it is recommended for Grails 1.3 and above to use standard Maven-style repositories to self host plugins. The benefits of doing so include the ability for existing tooling and repository managers to interpret the structure of a Maven repository. In addition Maven compatible repositories are not tied to SVN as Grails repositories are.You use the Maven publisher plugin to publish a plugin to a Maven repository. Please refer to the section of the Maven deployment user guide on the subject.Publishing to Grails Compatible Repositories
Specify the grails.plugin.repos.distribution.myRepository setting within the grails-app/conf/BuildConfig.groovy file to publish a Grails plugin to a Grails-compatible repository:grails.plugin.repos.distribution.myRepository =
"https://svn.codehaus.org/grails/trunk/grails-test-plugin-repo"repository argument of the release-plugin command to specify the repository to release the plugin into:grails release-plugin -repository = myRepository
12.3 プラグイン構造を理解する
As as mentioned previously, a plugin is basically a regular Grails application with a plugin descriptor. However when installed, the structure of a plugin differs slightly. For example, take a look at this plugin directory structure:+ grails-app
+ controllers
+ domain
+ taglib
etc.
+ lib
+ src
+ java
+ groovy
+ web-app
+ js
+ cssgrails-app directory will go into a directory such as plugins/example-1.0/grails-app. They will not be copied into the main source tree. A plugin never interferes with a project's primary source tree.Dealing with static resources is slightly different. When developing a plugin, just like an application, all static resources go in the web-app directory. You can then link to static resources just like in an application. This example links to a JavaScript source:<g:resource dir="js" file="mycode.js" />
/js/mycode.js. However, when the plugin is installed into an application the path will automatically change to something like /plugin/example-0.1/js/mycode.js and Grails will deal with making sure the resources are in the right place.There is a special pluginContextPath variable that can be used whilst both developing the plugin and when in the plugin is installed into the application to find out what the correct path to the plugin is.At runtime the pluginContextPath variable will either evaluate to an empty string or /plugins/example depending on whether the plugin is running standalone or has been installed in an applicationJava and Groovy code that the plugin provides within the lib and src/java and src/groovy directories will be compiled into the main project's web-app/WEB-INF/classes directory so that they are made available at runtime.
12.4 基本アーティファクトの提供
Adding a new Script
A plugin can add a new script simply by providing the relevant Gant script in its scripts directory:+ MyPlugin.groovy
+ scripts <-- additional scripts here
+ grails-app
+ controllers
+ services
+ etc.
+ libAdding a new grails-app artifact (Controller, Tag Library, Service, etc.)
A plugin can add new artifacts by creating the relevant file within the grails-app tree. Note that the plugin is loaded from where it is installed and not copied into the main application tree.+ ExamplePlugin.groovy
+ scripts
+ grails-app
+ controllers <-- additional controllers here
+ services <-- additional services here
+ etc. <-- additional XXX here
+ libProviding Views, Templates and View resolution
When a plugin provides a controller it may also provide default views to be rendered. This is an excellent way to modularize your application through plugins. Grails' view resolution mechanism will first look for the view in the application it is installed into and if that fails will attempt to look for the view within the plugin. This means that you can override views provided by a plugin by creating corresponding GSPs in the application's grails-app/views directory.For example, consider a controller called BookController that's provided by an 'amazon' plugin. If the action being executed is list, Grails will first look for a view called grails-app/views/book/list.gsp then if that fails it will look for the same view relative to the plugin.However if the view uses templates that are also provided by the plugin then the following syntax may be necessary:<g:render template="fooTemplate" plugin="amazon"/>
plugin attribute, which contains the name of the plugin where the template resides. If this is not specified then Grails will look for the template relative to the application.Excluded Artefacts
By default Grails excludes the following files during the packaging process:
grails-app/conf/BootStrap.groovygrails-app/conf/BuildConfig.groovy (although it is used to generate dependencies.groovy)grails-app/conf/Config.groovygrails-app/conf/DataSource.groovy (and any other *DataSource.groovy)grails-app/conf/UrlMappings.groovygrails-app/conf/spring/resources.groovy- Everything within
/web-app/WEB-INF
- Everything within
/web-app/plugins/**
- Everything within
/test/**
- SCM management files within
**/.svn/** and **/CVS/**
If your plugin requires files under the web-app/WEB-INF directory it is recommended that you modify the plugin's scripts/_Install.groovy Gant script to install these artefacts into the target project's directory tree.In addition, the default UrlMappings.groovy file is excluded to avoid naming conflicts, however you are free to add a UrlMappings definition under a different name which will be included. For example a file called grails-app/conf/BlogUrlMappings.groovy is fine.The list of excludes is extensible with the pluginExcludes property:// resources that are excluded from plugin packaging
def pluginExcludes = [
"grails-app/views/error.gsp"
]12.5 規約の評価
Before looking at providing runtime configuration based on conventions you first need to understand how to evaluate those conventions from a plugin. Every plugin has an implicit application variable which is an instance of the GrailsApplication interface.The GrailsApplication interface provides methods to evaluate the conventions within the project and internally stores references to all artifact classes within your application.Artifacts implement the GrailsClass interface, which represents a Grails resource such as a controller or a tag library. For example to get all GrailsClass instances you can do:for (grailsClass in application.allClasses) {
println grailsClass.name
}GrailsApplication has a few "magic" properties to narrow the type of artefact you are interested in. For example to access controllers you can use:for (controllerClass in application.controllerClasses) {
println controllerClass.name
}
*Classes - Retrieves all the classes for a particular artefact name. For example application.controllerClasses.get*Class - Retrieves a named class for a particular artefact. For example application.getControllerClass("PersonController")is*Class - Returns true if the given class is of the given artefact type. For example application.isControllerClass(PersonController)
The GrailsClass interface has a number of useful methods that let you further evaluate and work with the conventions. These include:
getPropertyValue - Gets the initial value of the given property on the classhasProperty - Returns true if the class has the specified propertynewInstance - Creates a new instance of this class.getName - Returns the logical name of the class in the application without the trailing convention part if applicablegetShortName - Returns the short name of the class without package prefixgetFullName - Returns the full name of the class in the application with the trailing convention part and with the package namegetPropertyName - Returns the name of the class as a property namegetLogicalPropertyName - Returns the logical property name of the class in the application without the trailing convention part if applicablegetNaturalName - Returns the name of the property in natural terms (eg. 'lastName' becomes 'Last Name')getPackageName - Returns the package name
For a full reference refer to the javadoc API.
12.6 ビルドイベントフック
Post-Install Configuration and Participating in Upgrades
Grails plugins can do post-install configuration and participate in application upgrade process (the upgrade command). This is achieved using two specially named scripts under the scripts directory of the plugin - _Install.groovy and _Upgrade.groovy._Install.groovy is executed after the plugin has been installed and _Upgrade.groovy is executed each time the user upgrades the application (but not the plugin) with upgrade command.These scripts are Gant scripts, so you can use the full power of Gant. An addition to the standard Gant variables there is also a pluginBasedir variable which points at the plugin installation basedir.As an example this _Install.groovy script will create a new directory type under the grails-app directory and install a configuration template:ant.mkdir(dir: "${basedir}/grails-app/jobs")ant.copy(file: "${pluginBasedir}/src/samples/SamplePluginConfig.groovy",
todir: "${basedir}/grails-app/conf")Scripting events
It is also possible to hook into command line scripting events. These are events triggered during execution of Grails target and plugin scripts.For example, you can hook into status update output (i.e. "Tests passed", "Server running") and the creation of files or artefacts.A plugin just has to provide an _Events.groovy script to listen to the required events. Refer the documentation on Hooking into Events for further information.
12.7 ランタイム設定へのフック
Grails provides a number of hooks to leverage the different parts of the system and perform runtime configuration by convention.Hooking into the Grails Spring configuration
First, you can hook in Grails runtime configuration by providing a property called doWithSpring which is assigned a block of code. For example the following snippet is from one of the core Grails plugins that provides i18n support:import org.springframework.web.servlet.i18n.CookieLocaleResolver
import org.springframework.web.servlet.i18n.LocaleChangeInterceptor
import org.springframework.context.support.ReloadableResourceBundleMessageSourceclass I18nGrailsPlugin { def version = "0.1" def doWithSpring = {
messageSource(ReloadableResourceBundleMessageSource) {
basename = "WEB-INF/grails-app/i18n/messages"
}
localeChangeInterceptor(LocaleChangeInterceptor) {
paramName = "lang"
}
localeResolver(CookieLocaleResolver)
}
}messageSource bean and a couple of other beans to manage Locale resolution and switching. It using the Spring Bean Builder syntax to do so.Participating in web.xml Generation
Grails generates the WEB-INF/web.xml file at load time, and although plugins cannot change this file directly, they can participate in the generation of the file. A plugin can provide a doWithWebDescriptor property that is assigned a block of code that gets passed the web.xml as an XmlSlurper GPathResult.Add servlet and servlet-mapping
Consider this example from the ControllersPlugin:def doWithWebDescriptor = { webXml -> def mappingElement = webXml.'servlet-mapping' def lastMapping = mappingElement[mappingElement.size() - 1]
lastMapping + {
'servlet-mapping' {
'servlet-name'("grails")
'url-pattern'("*.dispatch")
}
}
}<servlet-mapping> element and appends Grails' servlet after it using XmlSlurper's ability to programmatically modify XML using closures and blocks.Add filter and filter-mapping
Adding a filter with its mapping works a little differently. The location of the <filter> element doesn't matter since order is not important, so it's simplest to insert your custom filter definition immediately after the last <context-param> element. Order is important for mappings, but the usual approach is to add it immediately after the last <filter> element like so:def doWithWebDescriptor = { webXml -> def contextParam = webXml.'context-param' contextParam[contextParam.size() - 1] + {
'filter' {
'filter-name'('springSecurityFilterChain')
'filter-class'(DelegatingFilterProxy.name)
}
} def filter = webXml.'filter'
filter[filter.size() - 1] + {
'filter-mapping'{
'filter-name'('springSecurityFilterChain')
'url-pattern'('/*')
}
}
}def doWithWebDescriptor = { webXml ->
... // Insert the Spring Security filter after the Spring
// character encoding filter.
def filter = webXml.'filter-mapping'.find {
it.'filter-name'.text() == "charEncodingFilter"
} filter + {
'filter-mapping'{
'filter-name'('springSecurityFilterChain')
'url-pattern'('/*')
}
}
}Doing Post Initialisation Configuration
Sometimes it is useful to be able do some runtime configuration after the Spring ApplicationContext has been built. In this case you can define a doWithApplicationContext closure property.class SimplePlugin { def name = "simple"
def version = "1.1" def doWithApplicationContext = { appCtx ->
def sessionFactory = appCtx.sessionFactory
// do something here with session factory
}
}12.8 起動時のダイナミックメソッド追加
The Basics
Grails plugins let you register dynamic methods with any Grails-managed or other class at runtime. This work is done in a doWithDynamicMethods closure.For Grails-managed classes like controllers, tag libraries and so forth you can add methods, constructors etc. using the ExpandoMetaClass mechanism by accessing each controller's MetaClass:class ExamplePlugin {
def doWithDynamicMethods = { applicationContext ->
for (controllerClass in application.controllerClasses) {
controllerClass.metaClass.myNewMethod = {-> println "hello world" }
}
}
}myNewMethod to each controller. If you know beforehand the class you wish the add a method to you can simply reference its metaClass property.For example we can add a new method swapCase to java.lang.String:class ExamplePlugin { def doWithDynamicMethods = { applicationContext ->
String.metaClass.swapCase = {->
def sb = new StringBuilder()
delegate.each {
sb << (Character.isUpperCase(it as char) ?
Character.toLowerCase(it as char) :
Character.toUpperCase(it as char))
}
sb.toString()
} assert "UpAndDown" == "uPaNDdOWN".swapCase()
}
}Interacting with the ApplicationContext
The doWithDynamicMethods closure gets passed the Spring ApplicationContext instance. This is useful as it lets you interact with objects within it. For example if you were implementing a method to interact with Hibernate you could use the SessionFactory instance in combination with a HibernateTemplate:import org.springframework.orm.hibernate3.HibernateTemplateclass ExampleHibernatePlugin { def doWithDynamicMethods = { applicationContext -> for (domainClass in application.domainClasses) { domainClass.metaClass.static.load = { Long id->
def sf = applicationContext.sessionFactory
def template = new HibernateTemplate(sf)
template.load(delegate, id)
}
}
}
}class MyConstructorPlugin { def doWithDynamicMethods = { applicationContext ->
for (domainClass in application.domainClasses) {
domainClass.metaClass.constructor = {->
return applicationContext.getBean(domainClass.name)
}
}
}
}12.9 自動リロードイベントへの参加
Monitoring Resources for Changes
Often it is valuable to monitor resources for changes and perform some action when they occur. This is how Grails implements advanced reloading of application state at runtime. For example, consider this simplified snippet from the Grails ServicesPlugin:class ServicesGrailsPlugin {
…
def watchedResources = "file:./grails-app/services/*Service.groovy" …
def onChange = { event ->
if (event.source) {
def serviceClass = application.addServiceClass(event.source)
def serviceName = "${serviceClass.propertyName}"
def beans = beans {
"$serviceName"(serviceClass.getClazz()) { bean ->
bean.autowire = true
}
}
if (event.ctx) {
event.ctx.registerBeanDefinition(
serviceName,
beans.getBeanDefinition(serviceName))
}
}
}
}watchedResources as either a String or a List of strings that contain either the references or patterns of the resources to watch. If the watched resources specify a Groovy file, when it is changed it will automatically be reloaded and passed into the onChange closure in the event object.The event object defines a number of useful properties:
event.source - The source of the event, either the reloaded Class or a Spring Resourceevent.ctx - The Spring ApplicationContext instanceevent.plugin - The plugin object that manages the resource (usually this)event.application - The GrailsApplication instanceevent.manager - The GrailsPluginManager instance
These objects are available to help you apply the appropriate changes based on what changed. In the "Services" example above, a new service bean is re-registered with the ApplicationContext when one of the service classes changes.Influencing Other Plugins
In addition to reacting to changes, sometimes a plugin needs to "influence" another.Take for example the Services and Controllers plugins. When a service is reloaded, unless you reload the controllers too, problems will occur when you try to auto-wire the reloaded service into an older controller Class.To get around this, you can specify which plugins another plugin "influences". This means that when one plugin detects a change, it will reload itself and then reload its influenced plugins. For example consider this snippet from the ServicesGrailsPlugin:def influences = ['controllers']
Observing other plugins
If there is a particular plugin that you would like to observe for changes but not necessary watch the resources that it monitors you can use the "observe" property:def observe = ["controllers"]
log property back to any artefact that changes while the application is running.
12.10 プラグインのロード順を理解する
Controlling Plugin Dependencies
Plugins often depend on the presence of other plugins and can adapt depending on the presence of others. This is implemented with two properties. The first is called dependsOn. For example, take a look at this snippet from the Hibernate plugin:class HibernateGrailsPlugin { def version = "1.0" def dependsOn = [dataSource: "1.0",
domainClass: "1.0",
i18n: "1.0",
core: "1.0"]
}dataSource, domainClass, i18n and core plugins.The dependencies will be loaded before the Hibernate plugin and if all dependencies do not load, then the plugin will not load.The dependsOn property also supports a mini expression language for specifying version ranges. A few examples of the syntax can be seen below:def dependsOn = [foo: "* > 1.0"]
def dependsOn = [foo: "1.0 > 1.1"]
def dependsOn = [foo: "1.0 > *"]
- 1.1
- 1.0
- 1.0.1
- 1.0.3-SNAPSHOT
- 1.1-BETA2
Controlling Load Order
Using dependsOn establishes a "hard" dependency in that if the dependency is not resolved, the plugin will give up and won't load. It is possible though to have a weaker dependency using the loadAfter and loadBefore properties:def loadAfter = ['controllers']
controllers plugin if it exists, otherwise it will just be loaded. The plugin can then adapt to the presence of the other plugin, for example the Hibernate plugin has this code in its doWithSpring closure:if (manager?.hasGrailsPlugin("controllers")) {
openSessionInViewInterceptor(OpenSessionInViewInterceptor) {
flushMode = HibernateAccessor.FLUSH_MANUAL
sessionFactory = sessionFactory
}
grailsUrlHandlerMapping.interceptors << openSessionInViewInterceptor
}OpenSessionInViewInterceptor if the controllers plugin has been loaded. The manager variable is an instance of the GrailsPluginManager interface and it provides methods to interact with other plugins.You can also use the loadBefore property to specify one or more plugins that your plugin should load before:def loadBefore = ['rabbitmq']
Scopes and Environments
It's not only plugin load order that you can control. You can also specify which environments your plugin should be loaded in and which scopes (stages of a build). Simply declare one or both of these properties in your plugin descriptor:def environments = ['development', 'test', 'myCustomEnv']
def scopes = [excludes:'war']
development-only plugins to not be packaged for production use.The full list of available scopes are defined by the enum BuildScope, but here's a summary:
test - when running testsfunctional-test - when running functional testsrun - for run-app and run-warwar - when packaging the application as a WAR fileall - plugin applies to all scopes (default)
Both properties can be one of:
- a string - a sole inclusion
- a list - a list of environments or scopes to include
- a map - for full control, with 'includes' and/or 'excludes' keys that can have string or list values
For example,def environments = "test"
def environments = ["development", "test"]
def environments = [includes: ["development", "test"]]
12.11 アーテファクトAPI
You should by now understand that Grails has the concept of artefacts: special types of classes that it knows about and can treat differently from normal Groovy and Java classes, for example by enhancing them with extra properties and methods. Examples of artefacts include domain classes and controllers. What you may not be aware of is that Grails allows application and plugin developers access to the underlying infrastructure for artefacts, which means you can find out what artefacts are available and even enhance them yourself. You can even provide your own custom artefact types.
12.11.1 使用可能なアーテファクトを探す
As a plugin developer, it can be important for you to find out about what domain classes, controllers, or other types of artefact are available in an application. For example, the Searchable plugin needs to know what domain classes exist so it can check them for any searchable properties and index the appropriate ones. So how does it do it? The answer lies with the grailsApplication object, and instance of GrailsApplication that's available automatically in controllers and GSPs and can be injected everywhere else.The grailsApplication object has several important properties and methods for querying artefacts. Probably the most common is the one that gives you all the classes of a particular artefact type:for (cls in grailsApplication.<artefactType>Classes) {
…
}artefactType is the property name form of the artefact type. With core Grails you have:
- domain
- controller
- tagLib
- service
- codec
- bootstrap
- urlMappings
So for example, if you want to iterate over all the domain classes, you use:for (cls in grailsApplication.domainClasses) {
…
}for (cls in grailsApplication.urlMappingsClasses) {
…
}Class:
shortName - the class name of the artefact without the package (equivalent of Class.simpleName).logicalPropertyName - the artefact name in property form without the 'type' suffix. So MyGreatController becomes 'myGreat'.isAbstract() - a boolean indicating whether the artefact class is abstract or not.getPropertyValue(name) - returns the value of the given property, whether it's a static or an instance one. This works best if the property is initialised on declaration, e.g. static transactional = true.
The artefact API also allows you to fetch classes by name and check whether a class is an artefact:
- get<type>Class(String name)
- is<type>Class(Class clazz)
The first method will retrieve the GrailsClass instance for the given name, e.g. 'MyGreatController'. The second will check whether a class is a particular type of artefact. For example, you can use grailsApplication.isControllerClass(org.example.MyGreatController) to check whether MyGreatController is in fact a controller.
12.11.2 アーテファクト型の追加
Plugins can easily provide their own artefacts so that they can easily find out what implementations are available and take part in reloading. All you need to do is create an ArtefactHandler implementation and register it in your main plugin class:class MyGrailsPlugin {
def artefacts = [ org.somewhere.MyArtefactHandler ]
…
}artefacts list can contain either handler classes (as above) or instances of handlers.So, what does an artefact handler look like? Well, put simply it is an implementation of the ArtefactHandler interface. To make life a bit easier, there is a skeleton implementation that can readily be extended: ArtefactHandlerAdapter.In addition to the handler itself, every new artefact needs a corresponding wrapper class that implements GrailsClass. Again, skeleton implementations are available such as AbstractInjectableGrailsClass, which is particularly useful as it turns your artefact into a Spring bean that is auto-wired, just like controllers and services.The best way to understand how both the handler and wrapper classes work is to look at the Quartz plugin:
Another example is the Shiro plugin which adds a realm artefact.
12.12 バイナリープラグイン
Regular Grails plugins are packaged as zip files containing the full source of the plugin. This has some advantages in terms of being an open distribution system (anyone can see the source), in addition to avoiding problems with the source compatibility level used for compilation.
通常のGrailsプラグインはソースコードがzipされたパッケージです。これはオープンソース配布してコンパイル時に互換性を調整したり、様々な問題を解決するには有利です。As of Grails 2.0 you can pre-compile Grails plugins into regular JAR files known as "binary plugins". This has several advantages (and some disadvantages as discussed in the advantages of source plugins above) including:
Grails 2.0から、プラグインを通常のJARファイルとしてプリコンパイルパッケージした、バイナリプラグインを生成配布することが可能になります。バイナリプラグインにすることで以下の利点があります。
- Binary plugins can be published as standard JAR files to a Maven repository
- Binary plugins can be declared like any other JAR dependency
- Commercial plugins are more viable since the source isn't published
- IDEs have a better understanding since binary plugins are regular JAR files containing classes
- Mavenリポジトリで通常のJARファイルで配布可能。
- バイナリプラグインは他のJARと同じように依存管理が行える。
- ソースコードを公開しない商用プラグインが可能
- 通常のJARになることによって、IDE等の環境で扱いやすくなる
パッケージング
Packaging
To package a plugin in binary form you can use the package-plugin command and the --binary flag:
バイナリープラグインをパッケージする際には、package-pluginコマンドに--binaryフラグを使用します
grails package-plugin --binary
Supported artefacts include:
含まれる成果物は:
- Grails artifact classes such as controllers, domain classes and so on
- I18n Message bundles
- GSP Views, layouts and templates
- コントローラ、ドメイン等のGrailsのアーテファクトクラス
- I18nメッセージファイル
- GSPビュー、レイアウト、テンプレート
You can also specify the packaging in the plugin descriptor:
プラグインディスクリプタにフラグを記述することで、パッケージ時のコマンドフラグを省略できます。
in which case the packaging will default to binary.
上記例では、デフォルトでバイナリプラグインになります。
バイナリプラグイン使用方法
Using Binary Plugins
The packaging process creates a JAR file in the target directory of the plugin, for example target/foo-plugin-0.1.jar. There are two ways to incorporate a binary plugin into an application.
パッケージを実行するとJARファイルはプラグインプロジェクトのtargrtディレクトリに生成されます。例としてtarget/foo-plugin-0.1.jar 。 バイナリプラグインを使用するには2つの方法があります。
One is simply placing the plugin JAR file in your application's lib directory. The other is to publish the plugin JAR to a compatible Maven repository and declare it as a dependency in grails-app/conf/BuildConfig.groovy:
一つ目は単純に使用するアプリケーションのlibディレクトリに配置。もう一つの方法は、Mavenリポジトリに配備して、grails-app/conf/BuildConfig.groovyに依存定義を行います。
dependencies {
compile "mycompany:myplugin:0.1"
}
Since binary plugins are packaged as JAR files, they are declared as dependencies in the dependencies block, not in the plugins block as you may be naturally inclined to do. The plugins block is used for declaring traditional source plugins packaged as zip files
バイナリプラグインは依存定義をdependenciesブロックに記述します。pluginsブロックは今までのソースコードがzipされたプラグインで使用します。
13 Webサービス
Web services are all about providing a web API onto your web application and are typically implemented in either
REST or
SOAP
13.1 REST
REST is not really a technology in itself, but more an architectural pattern. REST is very simple and just involves using plain XML or JSON as a communication medium, combined with URL patterns that are "representational" of the underlying system, and HTTP methods such as GET, PUT, POST and DELETE.
RESTは本来SOAPのようなプロトコルではなく、アーキテクチャスタイルです。RESTは非常に単純です。簡素なXMLやJSONを通信媒体に用いて、基本的なシステムとGET、PUT、POSTおよびDELETEといったHTTPメソッドを「表現する」URLパターンを組み合わせています。Each HTTP method maps to an action type. For example GET for retrieving data, PUT for creating data, POST for updating and so on. In this sense REST fits quite well with
CRUD.
URLパターン
URL patterns
The first step to implementing REST with Grails is to provide RESTful
URL mappings:
static mappings = {
"/product/$id?"(resource:"product")
}This maps the URI /product onto a ProductController. Each HTTP method such as GET, PUT, POST and DELETE map to unique actions within the controller as outlined by the table below:
この例では、/productというURIをProductControllerに紐付けます。GET、PUT、POSTおよびDELETEといった各HTTPメソッドは、下表に示したようにコントローラ内の一意のアクションに紐付きます。| メソッド | アクション |
|---|
GET | show |
PUT | update |
POST | save |
DELETE | delete |
In addition, Grails provides automatic XML or JSON marshalling for you.
さらにGrailsではXMLまたJSONでの自動マーシャリングも提供しています。
HTTPメソッドをマップする仕組みを使用して、URLマッピングをHTTPメソッドにハンドルすることが可能です:"/product/$id"(controller: "product") {
action = [GET: "show", PUT: "update", DELETE: "delete", POST: "save"]
}However, unlike the resource argument used previously, in this case Grails will not provide automatic XML or JSON marshalling unless you specify the parseRequest argument:
ただし、この場合は、先のresourceと違い、parseRequest変数をURLマッピングに指定しないと、XMLやJSONのマーシャリングを自動的には行いません:"/product/$id"(controller: "product", parseRequest: true) {
action = [GET: "show", PUT: "update", DELETE: "delete", POST: "save"]
}HTTPメソッド
HTTP Methods
In the previous section you saw how you can easily define URL mappings that map specific HTTP methods onto specific controller actions. Writing a REST client that then sends a specific HTTP method is then easy (example in Groovy's HTTPBuilder module):
前のセクションでは、特定のHTTPメソッドを特定のコントローラのアクションにマップするURLマッピングが、どれほど簡単に定義できるかを見ました。特定のHTTPメソッドを送信するRESTクライアントを作成するのも簡単です。(GroovyのHTTPBuilderモジュールの例):import groovyx.net.http.*
import static groovyx.net.http.ContentType.JSONdef http = new HTTPBuilder("http://localhost:8080/amazon") http.request(Method.GET, JSON) {
url.path = '/book/list'
response.success = { resp, json ->
for (book in json.books) {
println book.title
}
}
}Issuing a request with a method other than
GET or
POST from a regular browser is not possible without some help from Grails. When defining a
form you can specify an alternative method such as
DELETE:
GETまたはPOST以外のメソッドの要求を発行するためには、Grailsの援助が必要となります。フォーム(form)を定義する時に、DELETEのような別のメソッドを指定できます。<g:form controller="book" method="DELETE">
..
</g:form>Grails will send a hidden parameter called _method, which will be used as the request's HTTP method. Another alternative for changing the method for non-browser clients is to use the X-HTTP-Method-Override to specify the alternative method name.
Grailsは_methodというhiddenパラメータを送信し、これをHTTPメソッドの要求として使用します。ブラウザ以外のクライアントでメソッドを変更するためには、X-HTTP-Method-Overrideを使用して代替メソッド名を指定します。XMLマーシャリング - 読み取り
XML Marshalling - Reading
The controller can use Grails'
XML marshalling support to implement the GET method:
import grails.converters.XMLclass ProductController {
def show() {
if (params.id && Product.exists(params.id)) {
def p = Product.findByName(params.id)
render p as XML
}
else {
def all = Product.list()
render all as XML
}
}
..
}If there is an id we search for the Product by name and return it, otherwise we return all Products. This way if we go to /products we get all products, otherwise if we go to /product/MacBook we only get a MacBook.
この例では、検索した内容が存在した場合はそのProductを返し、無い場合は全てを返します。この方法で、/productにアクセスすると全リストが返り、/product/MacBook等指定して存在した場合は、そのProductを返します。XMLマーシャリング - 更新
XML Marshalling - Updating
To support updates such as
PUT and
POST you can use the
params object which Grails enhances with the ability to read an incoming XML packet. Given an incoming XML packet of:
PUTおよびPOSTのような更新をサポートするには、Grailsのparamsオブジェクトを利用してXMLを読み取ることができます。次のようなXMLを受信したとします。<?xml version="1.0" encoding="ISO-8859-1"?>
<product>
<name>MacBook</name>
<vendor id="12">
<name>Apple</name>
</vender>
</product>you can read this XML packet using the same techniques described in the
Data Binding section, using the
params object:
def save() {
def p = new Product(params.product) if (p.save()) {
render p as XML
}
else {
render p.errors
}
}In this example by indexing into the params object using the product key we can automatically create and bind the XML using the Product constructor. An interesting aspect of the line:
この例では、paramsオブジェクトからproductキーを使用して取得し、Productクラスのコンストラクタに渡すことで自動的にバインドします:def p = new Product(params.product)
is that it requires no code changes to deal with a form submission that submits form data, or an XML request, or a JSON request.
興味深い点は、JSONリクエストまたはXMLリクエストの対応は、通常のフォーム送信の対応とそれほど変わりがないということです。
If you require different responses to different clients (REST, HTML etc.) you can use
content negotation
The
Product object is then saved and rendered as XML, otherwise an error message is produced using Grails'
validation capabilities in the form:
Productオブジェクトが保存され、XMLとして描写されます。問題が起きた場合は、Grailsのバリデーション機能によってエラーメッセージが返信されます。<error>
<message>The property 'title' of class 'Person' must be specified</message>
</error>
JAX-RSでのREST
REST with JAX-RS
RESTful Webサービス用のJava APIをベースとしたRESTを、JAX-RSプラグイン構築することも可能です。 (JSR 311: JAX-RS)
13.2 SOAP
There are several plugins that add SOAP support to Grails depending on your preferred approach. For Contract First SOAP services there is a
Spring WS plugin, whilst if you want to generate a SOAP API from Grails services there are several plugins that do this including:
Most of the SOAP integrations integrate with Grails
services via the
exposes static property. This example is taken from the CXF plugin:
exposeプロパティを定義することによって、SOAPを統合することが可能です。下記はCXFプラグインの例です:class BookService { static expose = ['cxf'] Book[] getBooks() {
Book.list() as Book[]
}
}The WSDL can then be accessed at the location: http://127.0.0.1:8080/your_grails_app/services/book?wsdl
WSDLには次のようなロケーションでアクセスすることができます。 http://127.0.0.1:8080/your_grails_app/services/book?wsdl
CXFプラグインについてもっと知りたい方は、ドキュメントを参照しましょう。
13.3 RSSとAtom
No direct support is provided for RSS or Atom within Grails. You could construct RSS or ATOM feeds with the
render method's XML capability. There is however a
Feeds plugin available for Grails that provides a RSS and Atom builder using the popular
ROME library. An example of its usage can be seen below:
def feed() {
render(feedType: "rss", feedVersion: "2.0") {
title = "My test feed"
link = "http://your.test.server/yourController/feed" for (article in Article.list()) {
entry(article.title) {
link = "http://your.test.server/article/${article.id}"
article.content // return the content
}
}
}
}14 GrailsとSpring
This section is for advanced users and those who are interested in how Grails integrates with and builds on the Spring Framework It is also useful for plugin developers considering doing runtime configuration Grails.
14.1 Grailsの土台
Grails is actually a Spring MVC application in disguise. Spring MVC is the Spring framework's built-in MVC web application framework. Although Spring MVC suffers from some of the same difficulties as frameworks like Struts in terms of its ease of use, it is superbly designed and architected and was, for Grails, the perfect framework to build another framework on top of.Grails leverages Spring MVC in the following areas:
- Basic controller logic - Grails subclasses Spring's DispatcherServlet and uses it to delegate to Grails controllers
- Data Binding and Validation - Grails' validation and data binding capabilities are built on those provided by Spring
- Runtime configuration - Grails' entire runtime convention based system is wired together by a Spring ApplicationContext
- Transactions - Grails uses Spring's transaction management in GORM
In other words Grails has Spring embedded running all the way through it.The Grails ApplicationContext
Spring developers are often keen to understand how the Grails ApplicationContext instance is constructed. The basics of it are as follows.
- Grails constructs a parent
ApplicationContext from the web-app/WEB-INF/applicationContext.xml file. This ApplicationContext configures the GrailsApplication instance and the GrailsPluginManager.
- Using this
ApplicationContext as a parent Grails' analyses the conventions with the GrailsApplication instance and constructs a child ApplicationContext that is used as the root ApplicationContext of the web application
Configured Spring Beans
Most of Grails' configuration happens at runtime. Each plugin may configure Spring beans that are registered in the ApplicationContext. For a reference as to which beans are configured, refer to the reference guide which describes each of the Grails plugins and which beans they configure.
14.2 追加ビーンを定義する
Using the Spring Bean DSL
You can easily register new (or override existing) beans by configuring them in grails-app/conf/spring/resources.groovy which uses the Grails Spring DSL. Beans are defined inside a beans property (a Closure):beans = {
// beans here
}import my.company.MyBeanImplbeans = {
myBean(MyBeanImpl) {
someProperty = 42
otherProperty = "blue"
}
}BootStrap.groovy and integration tests) by declaring a public field whose name is your bean's name (in this case myBean):class ExampleController { def myBean
…
}import grails.util.Environment
import my.company.mock.MockImpl
import my.company.MyBeanImplbeans = {
switch(Environment.current) {
case Environment.PRODUCTION:
myBean(MyBeanImpl) {
someProperty = 42
otherProperty = "blue"
}
break case Environment.DEVELOPMENT:
myBean(MockImpl) {
someProperty = 42
otherProperty = "blue"
}
break
}
}GrailsApplication object can be accessed with the application variable and can be used to access the Grails configuration (amongst other things):import grails.util.Environment
import my.company.mock.MockImpl
import my.company.MyBeanImplbeans = {
if (application.config.my.company.mockService) {
myBean(MockImpl) {
someProperty = 42
otherProperty = "blue"
}
} else {
myBean(MyBeanImpl) {
someProperty = 42
otherProperty = "blue"
}
}
}
If you define a bean in resources.groovy with the same name as one previously registered by Grails or an installed plugin, your bean will replace the previous registration. This is a convenient way to customize behavior without resorting to editing plugin code or other approaches that would affect maintainability.
Using XML
Beans can also be configured using a grails-app/conf/spring/resources.xml. In earlier versions of Grails this file was automatically generated for you by the run-app script, but the DSL in resources.groovy is the preferred approach now so it isn't automatically generated now. But it is still supported - you just need to create it yourself.This file is typical Spring XML file and the Spring documentation has an excellent reference on how to configure Spring beans.The myBean bean that we configured using the DSL would be configured with this syntax in the XML file:<bean id="myBean" class="my.company.MyBeanImpl">
<property name="someProperty" value="42" />
<property name="otherProperty" value="blue" />
</bean>class ExampleController { def myBean
}Referencing Existing Beans
Beans declared in resources.groovy or resources.xml can reference other beans by convention. For example if you had a BookService class its Spring bean name would be bookService, so your bean would reference it like this in the DSL:beans = {
myBean(MyBeanImpl) {
someProperty = 42
otherProperty = "blue"
bookService = ref("bookService")
}
}<bean id="myBean" class="my.company.MyBeanImpl">
<property name="someProperty" value="42" />
<property name="otherProperty" value="blue" />
<property name="bookService" ref="bookService" />
</bean>package my.companyclass MyBeanImpl {
Integer someProperty
String otherProperty
BookService bookService // or just "def bookService"
}package my.company;class MyBeanImpl { private BookService bookService;
private Integer someProperty;
private String otherProperty; public void setBookService(BookService theBookService) {
this.bookService = theBookService;
} public void setSomeProperty(Integer someProperty) {
this.someProperty = someProperty;
} public void setOtherProperty(String otherProperty) {
this.otherProperty = otherProperty;
}
}ref (in XML or the DSL) is very powerful since it configures a runtime reference, so the referenced bean doesn't have to exist yet. As long as it's in place when the final application context configuration occurs, everything will be resolved correctly.For a full reference of the available beans see the plugin reference in the reference guide.
14.3 ビーンDSLでSpringランタイム
This Bean builder in Grails aims to provide a simplified way of wiring together dependencies that uses Spring at its core.In addition, Spring's regular way of configuration (via XML and annotations) is static and difficult to modify and configure at runtime, other than programmatic XML creation which is both error prone and verbose. Grails' BeanBuilder changes all that by making it possible to programmatically wire together components at runtime, allowing you to adapt the logic based on system properties or environment variables.This enables the code to adapt to its environment and avoids unnecessary duplication of code (having different Spring configs for test, development and production environments)The BeanBuilder class
Grails provides a grails.spring.BeanBuilder class that uses dynamic Groovy to construct bean definitions. The basics are as follows:import org.apache.commons.dbcp.BasicDataSource
import org.codehaus.groovy.grails.orm.hibernate.ConfigurableLocalSessionFactoryBean
import org.springframework.context.ApplicationContext
import grails.spring.BeanBuilderdef bb = new BeanBuilder()bb.beans { dataSource(BasicDataSource) {
driverClassName = "org.h2.Driver"
url = "jdbc:h2:mem:grailsDB"
username = "sa"
password = ""
} sessionFactory(ConfigurableLocalSessionFactoryBean) {
dataSource = ref('dataSource')
hibernateProperties = ["hibernate.hbm2ddl.auto": "create-drop",
"hibernate.show_sql": "true"]
}
}ApplicationContext appContext = bb.createApplicationContext()
Within plugins and the grails-app/conf/spring/resources.groovy file you don't need to create a new instance of BeanBuilder. Instead the DSL is implicitly available inside the doWithSpring and beans blocks respectively.
This example shows how you would configure Hibernate with a data source with the BeanBuilder class.Each method call (in this case dataSource and sessionFactory calls) maps to the name of the bean in Spring. The first argument to the method is the bean's class, whilst the last argument is a block. Within the body of the block you can set properties on the bean using standard Groovy syntax.Bean references are resolved automatically using the name of the bean. This can be seen in the example above with the way the sessionFactory bean resolves the dataSource reference.Certain special properties related to bean management can also be set by the builder, as seen in the following code:sessionFactory(ConfigurableLocalSessionFactoryBean) { bean ->
// Autowiring behaviour. The other option is 'byType'. [autowire]
bean.autowire = 'byName'
// Sets the initialisation method to 'init'. [init-method]
bean.initMethod = 'init'
// Sets the destruction method to 'destroy'. [destroy-method]
bean.destroyMethod = 'destroy'
// Sets the scope of the bean. [scope]
bean.scope = 'request'
dataSource = ref('dataSource')
hibernateProperties = ["hibernate.hbm2ddl.auto": "create-drop",
"hibernate.show_sql": "true"]
}Using BeanBuilder with Spring MVC
Include the grails-spring-<version>.jar file in your classpath to use BeanBuilder in a regular Spring MVC application. Then add the following <context-param> values to your /WEB-INF/web.xml file:<context-param>
<param-name>contextConfigLocation</param-name>
<param-value>/WEB-INF/applicationContext.groovy</param-value>
</context-param><context-param>
<param-name>contextClass</param-name>
<param-value>
org.codehaus.groovy.grails.commons.spring.GrailsWebApplicationContext
</param-value>
</context-param>/WEB-INF/applicationContext.groovy file that does the rest:import org.apache.commons.dbcp.BasicDataSourcebeans {
dataSource(BasicDataSource) {
driverClassName = "org.h2.Driver"
url = "jdbc:h2:mem:grailsDB"
username = "sa"
password = ""
}
}Loading Bean Definitions from the File System
You can use the BeanBuilder class to load external Groovy scripts that define beans using the same path matching syntax defined here. For example:def bb = new BeanBuilder()
bb.loadBeans("classpath:*SpringBeans.groovy")def applicationContext = bb.createApplicationContext()BeanBuilder loads all Groovy files on the classpath ending with SpringBeans.groovy and parses them into bean definitions. An example script can be seen below:import org.apache.commons.dbcp.BasicDataSource
import org.codehaus.groovy.grails.orm.hibernate.ConfigurableLocalSessionFactoryBeanbeans { dataSource(BasicDataSource) {
driverClassName = "org.h2.Driver"
url = "jdbc:h2:mem:grailsDB"
username = "sa"
password = ""
} sessionFactory(ConfigurableLocalSessionFactoryBean) {
dataSource = dataSource
hibernateProperties = ["hibernate.hbm2ddl.auto": "create-drop",
"hibernate.show_sql": "true"]
}
}Adding Variables to the Binding (Context)
If you're loading beans from a script you can set the binding to use by creating a Groovy Binding:def binding = new Binding()
binding.maxSize = 10000
binding.productGroup = 'finance'def bb = new BeanBuilder()
bb.binding = binding
bb.loadBeans("classpath:*SpringBeans.groovy")def ctx = bb.createApplicationContext()maxSize and productGroup properties in your DSL files.
14.4 ビーンビルダーDSLの解説
Using Constructor Arguments
Constructor arguments can be defined using parameters to each bean-defining method. Put them after the first argument (the Class):
bb.beans {
exampleBean(MyExampleBean, "firstArgument", 2) {
someProperty = [1, 2, 3]
}
}MyExampleBean with a constructor that looks like this:MyExampleBean(String foo, int bar) {
…
}Configuring the BeanDefinition (Using factory methods)
The first argument to the closure is a reference to the bean configuration instance, which you can use to configure factory methods and invoke any method on the AbstractBeanDefinition class:bb.beans {
exampleBean(MyExampleBean) { bean ->
bean.factoryMethod = "getInstance"
bean.singleton = false
someProperty = [1, 2, 3]
}
}bb.beans {
def example = exampleBean(MyExampleBean) {
someProperty = [1, 2, 3]
}
example.factoryMethod = "getInstance"
}Using Factory beans
Spring defines the concept of factory beans and often a bean is created not directly from a new instance of a Class, but from one of these factories. In this case the bean has no Class argument and instead you must pass the name of the factory bean to the bean defining method:bb.beans { myFactory(ExampleFactoryBean) {
someProperty = [1, 2, 3]
} myBean(myFactory) {
name = "blah"
}
}bb.beans { myFactory(ExampleFactoryBean) {
someProperty = [1, 2, 3]
} myBean(myFactory: "getInstance") {
name = "blah"
}
}getInstance method on the ExampleFactoryBean bean will be called to create the myBean bean.Creating Bean References at Runtime
Sometimes you don't know the name of the bean to be created until runtime. In this case you can use a string interpolation to invoke a bean defining method dynamically:def beanName = "example"
bb.beans {
"${beanName}Bean"(MyExampleBean) {
someProperty = [1, 2, 3]
}
}beanName variable defined earlier is used when invoking a bean defining method. The example has a hard-coded value but would work just as well with a name that is generated programmatically based on configuration, system properties, etc.Furthermore, because sometimes bean names are not known until runtime you may need to reference them by name when wiring together other beans, in this case using the ref method:def beanName = "example"
bb.beans { "${beanName}Bean"(MyExampleBean) {
someProperty = [1, 2, 3]
} anotherBean(AnotherBean) {
example = ref("${beanName}Bean")
}
}AnotherBean is set using a runtime reference to the exampleBean. The ref method can also be used to refer to beans from a parent ApplicationContext that is provided in the constructor of the BeanBuilder:ApplicationContext parent = ...//
der bb = new BeanBuilder(parent)
bb.beans {
anotherBean(AnotherBean) {
example = ref("${beanName}Bean", true)
}
}true specifies that the reference will look for the bean in the parent context.Using Anonymous (Inner) Beans
You can use anonymous inner beans by setting a property of the bean to a block that takes an argument that is the bean type:bb.beans { marge(Person) {
name = "Marge"
husband = { Person p ->
name = "Homer"
age = 45
props = [overweight: true, height: "1.8m"]
}
children = [bart, lisa]
} bart(Person) {
name = "Bart"
age = 11
} lisa(Person) {
name = "Lisa"
age = 9
}
}marge bean's husband property to a block that creates an inner bean reference. Alternatively if you have a factory bean you can omit the type and just use the specified bean definition instead to setup the factory:bb.beans { personFactory(PersonFactory) marge(Person) {
name = "Marge"
husband = { bean ->
bean.factoryBean = "personFactory"
bean.factoryMethod = "newInstance"
name = "Homer"
age = 45
props = [overweight: true, height: "1.8m"]
}
children = [bart, lisa]
}
}Abstract Beans and Parent Bean Definitions
To create an abstract bean definition define a bean without a Class parameter:class HolyGrailQuest {
def start() { println "lets begin" }
}class KnightOfTheRoundTable { String name
String leader
HolyGrailQuest quest KnightOfTheRoundTable(String name) {
this.name = name
} def embarkOnQuest() {
quest.start()
}
}import grails.spring.BeanBuilderdef bb = new BeanBuilder()
bb.beans {
abstractBean {
leader = "Lancelot"
}
…
}leader property with the value of "Lancelot". To use the abstract bean set it as the parent of the child bean:bb.beans {
…
quest(HolyGrailQuest) knights(KnightOfTheRoundTable, "Camelot") { bean ->
bean.parent = abstractBean
quest = ref('quest')
}
}
When using a parent bean you must set the parent property of the bean before setting any other properties on the bean!
If you want an abstract bean that has a Class specified you can do it this way:import grails.spring.BeanBuilderdef bb = new BeanBuilder()
bb.beans { abstractBean(KnightOfTheRoundTable) { bean ->
bean.'abstract' = true
leader = "Lancelot"
} quest(HolyGrailQuest) knights("Camelot") { bean ->
bean.parent = abstractBean
quest = quest
}
}KnightOfTheRoundTable and use the bean argument to set it to abstract. Later we define a knights bean that has no Class defined, but inherits the Class from the parent bean.Using Spring Namespaces
Since Spring 2.0, users of Spring have had easier access to key features via XML namespaces. You can use a Spring namespace in BeanBuilder by declaring it with this syntax:xmlns context:"http://www.springframework.org/schema/context"
context.'component-scan'('base-package': "my.company.domain")xmlns jee:"http://www.springframework.org/schema/jee"jee.'jndi-lookup'(id: "dataSource", 'jndi-name': "java:comp/env/myDataSource")
dataSource by performing a JNDI lookup on the given JNDI name. With Spring namespaces you also get full access to all of the powerful AOP support in Spring from BeanBuilder. For example given these two classes:class Person { int age
String name void birthday() {
++age;
}
}class BirthdayCardSender { List peopleSentCards = [] void onBirthday(Person person) {
peopleSentCards << person
}
}birthday() method is called:xmlns aop:"http://www.springframework.org/schema/aop"fred(Person) {
name = "Fred"
age = 45
}birthdayCardSenderAspect(BirthdayCardSender)aop {
config("proxy-target-class": true) {
aspect(id: "sendBirthdayCard", ref: "birthdayCardSenderAspect") {
after method: "onBirthday",
pointcut: "execution(void ..Person.birthday()) and this(person)"
}
}
}14.5 プロパティプレースフォルダー設定
Grails supports the notion of property placeholder configuration through an extended version of Spring's PropertyPlaceholderConfigurer, which is typically useful in combination with externalized configuration.Settings defined in either ConfigSlurper scripts or Java properties files can be used as placeholder values for Spring configuration in grails-app/conf/spring/resources.xml. For example given the following entries in grails-app/conf/Config.groovy (or an externalized config):database.driver="com.mysql.jdbc.Driver"
database.dbname="mysql:mydb"
resources.xml as follows using the familiar ${..} syntax:<bean id="dataSource"
class="org.springframework.jdbc.datasource.DriverManagerDataSource">
<property name="driverClassName">
<value>${database.driver}</value>
</property>
<property name="url">
<value>jdbc:${database.dbname}</value>
</property>
</bean>14.6 プロパティオーバーライド設定
Grails supports setting of bean properties via configuration. This is often useful when used in combination with externalized configuration.You define a beans block with the names of beans and their values:beans {
bookService {
webServiceURL = "http://www.amazon.com"
}
}[bean name].[property name] = [value]
beans.bookService.webServiceURL=http://www.amazon.com
15 GrailsとHibernate
If GORM (Grails Object Relational Mapping) is not flexible enough for your liking you can alternatively map your domain classes using Hibernate, either with XML mapping files or JPA annotations. You will be able to map Grails domain classes onto a wider range of legacy systems and have more flexibility in the creation of your database schema. Best of all, you will still be able to call all of the dynamic persistent and query methods provided by GORM!
15.1 Hibernate XMLマッピングの使用
Mapping your domain classes with XML is pretty straightforward. Simply create a hibernate.cfg.xml file in your project's grails-app/conf/hibernate directory, either manually or with the create-hibernate-cfg-xml command, that contains the following:<?xml version='1.0' encoding='UTF-8'?>
<!DOCTYPE hibernate-configuration PUBLIC
"-//Hibernate/Hibernate Configuration DTD 3.0//EN"
"http://hibernate.sourceforge.net/hibernate-configuration-3.0.dtd">
<hibernate-configuration>
<session-factory>
<mapping resource="org.example.Book.hbm.xml"/>
…
</session-factory>
</hibernate-configuration>grails-app/conf/hibernate directory. To find out how to map domain classes with XML, check out the Hibernate manual.If the default location of the hibernate.cfg.xml file doesn't suit you, you can change it by specifying an alternative location in grails-app/conf/DataSource.groovy:hibernate {
config.location = "file:/path/to/my/hibernate.cfg.xml"
}hibernate {
config.location = ["file:/path/to/one/hibernate.cfg.xml",
"file:/path/to/two/hibernate.cfg.xml"]
}grails-app/conf/hibernate and either put the Java files in src/java or the classes in the project's lib directory if the domain model is packaged as a JAR. You still need the hibernate.cfg.xml though!
15.2 Hibernateアノテーションでのマッピング
To map a domain class with annotations, create a new class in src/java and use the annotations defined as part of the EJB 3.0 spec (for more info on this see the Hibernate Annotations Docs):package com.books;import javax.persistence.Entity;
import javax.persistence.GeneratedValue;
import javax.persistence.Id;@Entity
public class Book {
private Long id;
private String title;
private String description;
private Date date; @Id
@GeneratedValue
public Long getId() {
return id;
} public void setId(Long id) {
this.id = id;
} public String getTitle() {
return title;
} public void setTitle(String title) {
this.title = title;
} public String getDescription() {
return description;
} public void setDescription(String description) {
this.description = description;
}
}sessionFactory by adding relevant entries to the grails-app/conf/hibernate/hibernate.cfg.xml file as follows:<!DOCTYPE hibernate-configuration SYSTEM
"http://hibernate.sourceforge.net/hibernate-configuration-3.0.dtd">
<hibernate-configuration>
<session-factory>
<mapping package="com.books" />
<mapping class="com.books.Book" />
</session-factory>
</hibernate-configuration>hibernate.cfg.xml file.When Grails loads it will register the necessary dynamic methods with the class. To see what else you can do with a Hibernate domain class see the section on Scaffolding.
15.3 制約の追加
You can still use GORM validation even if you use a Java domain model. Grails lets you define constraints through separate scripts in the src/java directory. The script must be in a directory that matches the package of the corresponding domain class and its name must have a Constraints suffix. For example, if you had a domain class org.example.Book, then you would create the script src/java/org/example/BookConstraints.groovy.Add a standard GORM constraints block to the script:
constraints = {
title blank: false
author blank: false
}16 スカッフォルド
Scaffolding lets you auto-generate a whole application for a given domain class including:
- The necessary views
- Controller actions for create/read/update/delete (CRUD) operations
Dynamic Scaffolding
The simplest way to get started with scaffolding is to enable it with the scaffold property. Set the scaffold property in the controller to true for the Book domain class:class BookController {
static scaffold = true
}BookController follows the same naming convention as the Book domain class. To scaffold a specific domain class we could reference the class directly in the scaffold property:class SomeController {
static scaffold = Author
}
- list
- show
- edit
- delete
- create
- save
- update
A CRUD interface will also be generated. To access this open http://localhost:8080/app/book in a browser.If you prefer to keep your domain model in Java and mapped with Hibernate you can still use scaffolding, simply import the domain class and set its name as the scaffold argument.You can add new actions to a scaffolded controller, for example:class BookController { static scaffold = Book def changeAuthor() {
def b = Book.get(params.id)
b.author = Author.get(params["author.id"])
b.save() // redirect to a scaffolded action
redirect(action:show)
}
}class BookController { static scaffold = Book // overrides scaffolded action to return both authors and books
def list() {
[bookInstanceList: Book.list(),
bookInstanceTotal: Book.count(),
authorInstanceList: Author.list()]
} def show() {
def book = Book.get(params.id)
log.error(book)
[bookInstance : book]
}
}
By default, the size of text areas in scaffolded views is defined in the CSS, so adding 'rows' and 'cols' attributes will have no effect.Also, the standard scaffold views expect model variables of the form <propertyName>InstanceList for collections and <propertyName>Instance for single instances. It's tempting to use properties like 'books' and 'book', but those won't work.
Customizing the Generated Views
The views adapt to Validation constraints. For example you can change the order that fields appear in the views simply by re-ordering the constraints in the builder:def constraints = {
title()
releaseDate()
}inList constraint:def constraints = {
title()
category(inList: ["Fiction", "Non-fiction", "Biography"])
releaseDate()
}range constraint on a number:def constraints = {
age(range:18..65)
}def constraints = {
name(size:0..30)
}Static Scaffolding
Grails also supports "static" scaffolding.The above scaffolding features are useful but in real world situations it's likely that you will want to customize the logic and views. Grails lets you generate a controller and the views used to create the above interface from the command line. To generate a controller type:grails generate-controller Book
grails generate-views Book
grails generate-all com.bookstore.Book
Customizing the Scaffolding templates
The templates used by Grails to generate the controller and views can be customized by installing the templates with the install-templates command.
17 デプロイ
Grails applications can be deployed in a number of ways, each of which has its pros and cons."grails run-app"
You should be very familiar with this approach by now, since it is the most common method of running an application during the development phase. An embedded Tomcat server is launched that loads the web application from the development sources, thus allowing it to pick up an changes to application files.This approach is not recommended at all for production deployment because the performance is poor. Checking for and loading changes places a sizable overhead on the server. Having said that, grails prod run-app removes the per-request overhead and lets you fine tune how frequently the regular check takes place.Setting the system property "disable.auto.recompile" to true disables this regular check completely, while the property "recompile.frequency" controls the frequency. This latter property should be set to the number of seconds you want between each check. The default is currently 3."grails run-war"
This is very similar to the previous option, but Tomcat runs against the packaged WAR file rather than the development sources. Hot-reloading is disabled, so you get good performance without the hassle of having to deploy the WAR file elsewhere.WAR file
When it comes down to it, current java infrastructures almost mandate that web applications are deployed as WAR files, so this is by far the most common approach to Grails application deployment in production. Creating a WAR file is as simple as executing the war command:There are also many ways in which you can customise the WAR file that is created. For example, you can specify a path (either absolute or relative) to the command that instructs it where to place the file and what name to give it:grails war /opt/java/tomcat-5.5.24/foobar.war
grails-app/conf/BuildConfig.groovy that changes the default location and filename:grails.project.war.file = "foobar-prod.war"
grails.war.dependencies in BuildConfig.groovy to either lists of Ant include patterns or closures containing AntBuilder syntax. Closures are invoked from within an Ant "copy" step, so only elements like "fileset" can be included, whereas each item in a pattern list is included. Any closure or pattern assigned to the latter property will be included in addition to grails.war.dependencies.Be careful with these properties: if any of the libraries Grails depends on are missing, the application will almost certainly fail. Here is an example that includes a small subset of the standard Grails dependencies:def deps = [
"hibernate3.jar",
"groovy-all-*.jar",
"standard-${servletVersion}.jar",
"jstl-${servletVersion}.jar",
"oscache-*.jar",
"commons-logging-*.jar",
"sitemesh-*.jar",
"spring-*.jar",
"log4j-*.jar",
"ognl-*.jar",
"commons-*.jar",
"xstream-1.2.1.jar",
"xpp3_min-1.1.3.4.O.jar" ]grails.war.dependencies = {
fileset(dir: "libs") {
for (pattern in deps) {
include(name: pattern)
}
}
}DEFAULT_DEPS and DEFAULT_J5_DEPS variables.The remaining two configuration options available to you are grails.war.copyToWebApp and grails.war.resources. The first of these lets you customise what files are included in the WAR file from the "web-app" directory. The second lets you do any extra processing you want before the WAR file is finally created.// This closure is passed the command line arguments used to start the
// war process.
grails.war.copyToWebApp = { args ->
fileset(dir:"web-app") {
include(name: "js/**")
include(name: "css/**")
include(name: "WEB-INF/**")
}
}// This closure is passed the location of the staging directory that
// is zipped up to make the WAR file, and the command line arguments.
// Here we override the standard web.xml with our own.
grails.war.resources = { stagingDir, args ->
copy(file: "grails-app/conf/custom-web.xml",
tofile: "${stagingDir}/WEB-INF/web.xml")
}Application servers
Ideally you should be able to simply drop a WAR file created by Grails into any application server and it should work straight away. However, things are rarely ever this simple. The Grails website contains an up-to-date list of application servers that Grails has been tested with, along with any additional steps required to get a Grails WAR file working.
18 Grailsに貢献する
Grails is an open source project with an active community and we rely heavily on that community to help make Grails better. As such, there are various ways in which people can contribute to Grails. One of these is by writing useful plugins and making them publicly available. In this chapter, we'll look at some fo the other options.
18.1 JIRAに課題をリポート(バグ報告)
Grails uses JIRA to track issues in both the core framework, its documentation, its website, and in many of the public plugins. If you’ve found a bug or wish to see a particular feature added, this is the place to start. You’ll need to create a (free) JIRA account in order to either submit an issue or comment on an existing one.When submitting issues, please provide as much information as possible and in the case of bugs, make sure you explain which versions of Grails and various plugins you are using. Also, an issue is much more likely to be dealt with if you attach a reproducible sample application (which can be packaged up using the grails bug-report command).
18.2 ソースからビルドしてテストを走らせる
If you're interested in contributing fixes and features to the core framework, you will have to learn how to get hold of the project's source, build it and test it with your own applications. Before you start, make sure you have:
- A JDK (1.6 or above)
- A git client
Once you have all the pre-requisite packages installed, the next step is to download the Grails source code, which is hosted at GitHub in several repositories owned by the "grails" GitHub user. This is a simple case of cloning the repository you're interested in. For example, to getthe core framework run:git clone http://github.com/grails/grails-core.git
Creating a Grails installation
If you look at the project structure, you'll see that it doesn't look much like a standard GRAILS_HOME installation. But, it's very simple to turn it into one. Just run this from the root directory of the project:This will fetch all the standard dependencies required by Grails and then build a GRAILS_HOME installation. Note that this target skips the extensive collection of Grails test classes, which can take some time to complete.Once the above command has finished, simply set the GRAILS_HOME environment variable to the checkout directory and add the "bin" directory to your path. When you next type run the grails command, you'll be using the version you just built.Running the test suite
All you have to do to run the full suite of tests is:These will take a while (15-30 mins), so consider running individual tests using the command line. For example, to run the test case MappingDslTests simply execute the following command:
./gradlew -Dtest.single=MappingDslTest :grails-test-suite-persistence:test
Developing in IntelliJ IDEA
You need to run the following gradle task:
Then open the project file which is generated in IDEA. Simple!Developing in STS / Eclipse
You need to run the following gradle task:
./gradlew cleanEclipse eclipse
- Edit grails-scripts/.classpath and remove the line "<classpathentry kind="src" path="../scripts"/>".
Use "Import->General->Existing Projects into Workspace" to import all projects to STS. There will be a few build errors. To fix them do the following:
- Add "~/.gradle/cache/com.springsource.springloaded/springloaded-core/jars/springloaded-core-XXXX.jar" to grails-core's classpath.
- Remove "src/test/groovy" from grails-plugin-testing's source path GRECLIPSE-1067
- Add "~/.gradle/cache/javax.servlet.jsp/jsp-api/jars/jsp-api-2.1.jar" to the classpath of grails-web
- Fix the source path of grails-scripts. Add linked source folder linking to "../scripts". If you get build errors in grails-scripts, do "../gradlew cleanEclipse eclipse" in that directory and edit the .classpath file again (remove the line "<classpathentry kind="src" path="../scripts"/>"). Remove possible empty "scripts" directory under grails-scripts if you are not able to add the linked folder.
- Do a clean build for the whole workspace.
- To use Eclipse GIT scm team provider: Select all projects (except "Servers") in the navigation and right click -> Team -> Share project (not "Share projects"). Choose "Git". Then check "Use or create repository in parent folder of project" and click "Finish".
- Get the recommended code style settings from the mailing list thread (final style not decided yet, currently profile.xml). Import the code style xml file to STS in Window->Preferences->Java->Code Style->Formatter->Import . Grails code uses spaces instead of tabs for indenting.
Debugging Grails or a Grails application
To enable debugging, run:
and then connect to the JVM remotely via the IDE ("remote debugging") using the port 5005. Of course, if you have modified the grails-debug script to use a different port number, connect using that one.If you need to debug stuff that happens during application startup, then you should modify the "grails-debug" script and change the "suspend" option from 'n' to 'y'. You can read more about the JPDA connection settings TODO here: http://java.sun.com/j2se/1.5.0/docs/guide/jpda/conninv.html#Invocation.It's also possible to get Eclipse to wait for incoming debugger connections and instead of using "-Xrunjdwp:transport=dt_socket,server=y,suspend=n,address=5005" you could use this "-Xrunjdwp:transport=dt_socket,server=n,address=8000" (which assumes the Eclipse default port for remote java applications) Inside eclipse you create a new "Remote Java Application" launch configuration and change the connection type to "Standard (Socket Listen)" and click debug. This allows you to start a debugger session in eclipse and just leave it running and you're free to debug anything without having to keep remembering to relaunch a "Socket Attach" launch configuration. You might find it handy to have 2 scripts, one called "grails-debug", and another called "grails-debug-attach"
18.3 Grailsコアにパッチを送る
If you want to submit patches to the project, you simply need to fork the repository on GitHub rather than clone it directly. Then you will commit your changes to your fork and send a pull request for a core team member to review.Forking and Pull Requests
One of the benefits of GitHub is the way that you can easily contribute to a project by forking the repository and sending pull requests with your changes.What follows are some guidelines to help ensure that your pull requests are speedily dealt with and provide the information we need. They will also make your life easier!Create a local branch for your changes
Your life will be greatly simplified if you create a local branch to make your changes on. For example, as soon as you fork a repository and clone the fork locally, execute
This will create a new local branch called "mine" based off the "master" branch. Of course, you can name the branch whatever you like - you don't have to use "mine".Create JIRAs for non-trivial changes
For any non-trivial changes, raise a JIRA issue if one doesn't already exist. That helps us keep track of what changes go into each new version of Grails.Include JIRA issue ID in commit messages
This may not seem particularly important, but having a JIRA issue ID in a commit message means that we can find out at a later date why a change was made. Include the ID in any and all commits that relate to that issue. If a commit isn't related to an issue, then there's no need to include an issue ID.Make sure your fork is up to date
Since the core developers must merge your commits into the main repository, it makes life much easier if your fork on GitHub is up to date before you send a pull request.Let's say you have the main repository set up as a remote called "upstream" and you want to submit a pull request. Also, all your changes are currently on the local "mine" branch but not on "master". The first step involves pulling any changes from the main repository that have been added since you last fetched and merged:
git checkout master
git pull upstream
git checkout mine
git rebase master
git checkout master
git merge mine
Say what your pull request is for
A pull request can contain any number of commits and it may be related to any number of issues. In the pull request message, please specify the IDs of all issues that the request relates to. Also give a brief description of the work you have done, such as: "I refactored the data binder and added support for custom number editors (GRAILS-xxxx)".
18.4 Grailsドキュメントにパッチを送る
Contributing to the documentation is simpler for the core framework because there is a public fork of the http://github.com/grails/grails-doc project that anyone can request commit access to. So, if you want to submit patches to the documentation, simply request commit access to the following repository http://github.com/pledbrook/grails-doc by sending a GitHub message to 'pledbrook' and then commit your patches just as you would to any other GitHub repository.Building the Guide
To build the documentation, simply type:
Be warned: this command can take a while to complete and you should probably increase your Gradle memory settings by giving the GRADLE_OPTS environment variable a value like
export GRADLE_OPTS="-Xmx512m -XX:MaxPermSize=384m"
./gradlew -Dgrails.home=/home/user/projects/grails-core docs
grails.home property, then the build will fetch the Grails source - a download of 10s of megabytes. It must then compile the Grails source which can take a while too.Additionally you can create a local.properties file with this variable set:
grails.home=/home/user/projects/grails-core
grails.home=../grails-core
./gradlew -Ddisable.groovydocs=true docs
build/docs directory, with the guide sub-directory containing the user guide part and the ref folder containing the reference material. To view the user guide, simply open build/docs/index.html.Publishing
The publishing system for the user guide is the same as the one for Grails projects. You write your chapters and sections in the gdoc wiki format which is then converted to HTML for the final guide. Each chapter is a top-level gdoc file in the src/<lang>/guide directory. Sections and sub-sections then go into directories with the same name as the chapter gdoc but without the suffix.The structure of the user guide is defined in the src/<lang>/guide/toc.yml file, which is a YAML file. This file also defines the (language-specific) section titles. If you add or remove a gdoc file, you must update the TOC as well!The src/<lang>/ref directory contains the source for the reference sidebar. Each directory is the name of a category, which also appears in the docs. Hence the directories need different names for the different languages. Inside the directories go the gdoc files, whose names match the names of the methods, commands, properties or whatever that the files describe.Translations
This project can host multiple translations of the user guide, with src/en being the main one. To add another one, simply create a new language directory under src and copy into it all the files under src/en. The build will take care of the rest.Once you have a copy of the original guide, you can use the {hidden} macro to wrap the English text that you have replaced, rather than remove it. This makes it easier to compare changes to the English guide against your translation. For example:
{hidden}
When you create a Grails application with the [create-app|commandLine] command,
Grails doesn't automatically create an Ant build.xml file but you can generate
one with the [integrate-with|commandLine] command:
{hidden}Quando crias uma aplicação Grails com o comando [create-app|commandLine], Grails
não cria automaticamente um ficheiro de construção Ant build.xml mas podes gerar
um com o comando [integrate-with|commandLine]:diff will show differences on the English lines. You can then use the output of diff to see which bits of your translation need updating. On top of that, the {hidden} macro ensures that the text inside it is not displayed in the browser, although you can display it by adding this URL as a bookmark: javascript:toggleHidden(); (requires you to build the user guide with Grails 2.0 M2 or later).Even better, you can use the left_to_do.groovy script in the root of the project to see what still needs translating. You run it like so:
This will then print out a recursive diff of the given translation against the reference English user guide. Anything in {hidden} blocks that hasn't changed since being translated will not appear in the diff output. In other words, all you will see is content that hasn't been translated yet and content that has changed since it was translated. Note that {code} blocks are ignored, so you don't need to include them inside {hidden} macros.To provide translations for the headers, such as the user guide title and subtitle, just add language specific entries in the 'resources/doc.properties' file like so:
es.title=El Grails Framework
es.subtitle=...
<lang>. will override the standard ones. In the above example, the user guide title will be El Grails Framework for the Spanish translation. Also, translators can be credited by adding a '<lang>.translators' property:
fr.translators=Stéphane Maldini
publishGuide_* and publishPdf_* tasks. For example, to build both the French HTML and PDF user guides, simply execute
Each translation is generated in its own directory, so for example the French guide will end up in build/docs/fr. You can then view the translated guide by opening build/docs/<lang>/index.html.All translations are created as part of the Hudson CI build for the grails-doc project, so you can easily see what the current state is without having to build the docs yourself.
19 翻訳レポート
Document Translation Report.
- File Count - 257
- Done - 127
- TODO - 128
- Not found or new - 2
Original document updated after translation.:
./src/ja/guide/theWebLayer/controllers/modelsAndViews.gdoc102: // write some markup
111: // render a specific view
116: // render a template for each item in a collection
121: // render some text with encoding and content type
5 : … draw the navbar here…
9 : … draw the header here…
13 : … draw the footer here…
17 : … draw the body here...
76 : // Add HSQLDB as a runtime dependency
6 : // action as a method
10 : // action as a closure
4 : grails [command name]
Not done.
- ./grails-doc/src/en/guide/GORM.gdoc
- ./grails-doc/src/en/guide/GORM/advancedGORMFeatures/defaultSortOrder.gdoc
- ./grails-doc/src/en/guide/GORM/advancedGORMFeatures/eventsAutoTimestamping.gdoc
- ./grails-doc/src/en/guide/GORM/advancedGORMFeatures/ormdsl.gdoc
- ./grails-doc/src/en/guide/GORM/advancedGORMFeatures/ormdsl/caching.gdoc
- ./grails-doc/src/en/guide/GORM/advancedGORMFeatures/ormdsl/compositePrimaryKeys.gdoc
- ./grails-doc/src/en/guide/GORM/advancedGORMFeatures/ormdsl/customCascadeBehaviour.gdoc
- ./grails-doc/src/en/guide/GORM/advancedGORMFeatures/ormdsl/customHibernateTypes.gdoc
- ./grails-doc/src/en/guide/GORM/advancedGORMFeatures/ormdsl/customNamingStrategy.gdoc
- ./grails-doc/src/en/guide/GORM/advancedGORMFeatures/ormdsl/databaseIndices.gdoc
- ./grails-doc/src/en/guide/GORM/advancedGORMFeatures/ormdsl/derivedProperties.gdoc
- ./grails-doc/src/en/guide/GORM/advancedGORMFeatures/ormdsl/fetchingDSL.gdoc
- ./grails-doc/src/en/guide/GORM/advancedGORMFeatures/ormdsl/identity.gdoc
- ./grails-doc/src/en/guide/GORM/advancedGORMFeatures/ormdsl/inheritanceStrategies.gdoc
- ./grails-doc/src/en/guide/GORM/advancedGORMFeatures/ormdsl/optimisticLockingAndVersioning.gdoc
- ./grails-doc/src/en/guide/GORM/advancedGORMFeatures/ormdsl/tableAndColumnNames.gdoc
- ./grails-doc/src/en/guide/GORM/domainClasses.gdoc
- ./grails-doc/src/en/guide/GORM/domainClasses/gormAssociation.gdoc
- ./grails-doc/src/en/guide/GORM/domainClasses/gormAssociation/basicCollectionTypes.gdoc
- ./grails-doc/src/en/guide/GORM/domainClasses/gormAssociation/manyToMany.gdoc
- ./grails-doc/src/en/guide/GORM/domainClasses/gormAssociation/manyToOneAndOneToOne.gdoc
- ./grails-doc/src/en/guide/GORM/domainClasses/gormAssociation/oneToMany.gdoc
- ./grails-doc/src/en/guide/GORM/domainClasses/gormComposition.gdoc
- ./grails-doc/src/en/guide/GORM/domainClasses/inheritanceInGORM.gdoc
- ./grails-doc/src/en/guide/GORM/gormConstraints.gdoc
- ./grails-doc/src/en/guide/GORM/persistenceBasics.gdoc
- ./grails-doc/src/en/guide/GORM/persistenceBasics/cascades.gdoc
- ./grails-doc/src/en/guide/GORM/persistenceBasics/deletingObjects.gdoc
- ./grails-doc/src/en/guide/GORM/persistenceBasics/fetching.gdoc
- ./grails-doc/src/en/guide/GORM/persistenceBasics/locking.gdoc
- ./grails-doc/src/en/guide/GORM/persistenceBasics/modificationChecking.gdoc
- ./grails-doc/src/en/guide/GORM/persistenceBasics/savingAndUpdating.gdoc
- ./grails-doc/src/en/guide/GORM/programmaticTransactions.gdoc
- ./grails-doc/src/en/guide/GORM/querying.gdoc
- ./grails-doc/src/en/guide/GORM/querying/criteria.gdoc
- ./grails-doc/src/en/guide/GORM/querying/detachedCriteria.gdoc
- ./grails-doc/src/en/guide/GORM/querying/finders.gdoc
- ./grails-doc/src/en/guide/GORM/querying/hql.gdoc
- ./grails-doc/src/en/guide/GORM/querying/whereQueries.gdoc
- ./grails-doc/src/en/guide/GORM/quickStartGuide.gdoc
- ./grails-doc/src/en/guide/GORM/quickStartGuide/basicCRUD.gdoc
- ./grails-doc/src/en/guide/commandLine/interactiveMode.gdoc
- ./grails-doc/src/en/guide/conf.gdoc
- ./grails-doc/src/en/guide/conf/config.gdoc
- ./grails-doc/src/en/guide/conf/config/builtInOptions.gdoc
- ./grails-doc/src/en/guide/conf/config/configGORM.gdoc
- ./grails-doc/src/en/guide/conf/config/logging.gdoc
- ./grails-doc/src/en/guide/conf/configExternalized.gdoc
- ./grails-doc/src/en/guide/conf/dataSource.gdoc
- ./grails-doc/src/en/guide/conf/dataSource/JNDIDataSources.gdoc
- ./grails-doc/src/en/guide/conf/dataSource/automaticDatabaseMigration.gdoc
- ./grails-doc/src/en/guide/conf/dataSource/dataSourcesAndEnvironments.gdoc
- ./grails-doc/src/en/guide/conf/dataSource/databaseConsole.gdoc
- ./grails-doc/src/en/guide/conf/dataSource/multipleDatasources.gdoc
- ./grails-doc/src/en/guide/conf/dataSource/transactionAwareDataSourceProxy.gdoc
- ./grails-doc/src/en/guide/conf/docengine.gdoc
- ./grails-doc/src/en/guide/conf/environments.gdoc
- ./grails-doc/src/en/guide/conf/ivy.gdoc
- ./grails-doc/src/en/guide/conf/ivy/configurationsAndDependencies.gdoc
- ./grails-doc/src/en/guide/conf/ivy/debuggingResolution.gdoc
- ./grails-doc/src/en/guide/conf/ivy/dependencyReports.gdoc
- ./grails-doc/src/en/guide/conf/ivy/dependencyRepositories.gdoc
- ./grails-doc/src/en/guide/conf/ivy/inheritedDependencies.gdoc
- ./grails-doc/src/en/guide/conf/ivy/mavenIntegration.gdoc
- ./grails-doc/src/en/guide/conf/ivy/mavendeploy.gdoc
- ./grails-doc/src/en/guide/conf/ivy/pluginDependencies.gdoc
- ./grails-doc/src/en/guide/conf/ivy/pluginJARDependencies.gdoc
- ./grails-doc/src/en/guide/conf/ivy/providingDefaultDependencies.gdoc
- ./grails-doc/src/en/guide/conf/versioning.gdoc
- ./grails-doc/src/en/guide/contributing.gdoc
- ./grails-doc/src/en/guide/contributing/build.gdoc
- ./grails-doc/src/en/guide/contributing/issues.gdoc
- ./grails-doc/src/en/guide/contributing/patchesCore.gdoc
- ./grails-doc/src/en/guide/contributing/patchesDoc.gdoc
- ./grails-doc/src/en/guide/deployment.gdoc
- ./grails-doc/src/en/guide/hibernate.gdoc
- ./grails-doc/src/en/guide/hibernate/addingConstraints.gdoc
- ./grails-doc/src/en/guide/hibernate/mappingWithHibernateAnnotations.gdoc
- ./grails-doc/src/en/guide/hibernate/usingHibernateXMLMappingFiles.gdoc
- ./grails-doc/src/en/guide/links.yml
- ./grails-doc/src/en/guide/plugins.gdoc
- ./grails-doc/src/en/guide/plugins/addingDynamicMethodsAtRuntime.gdoc
- ./grails-doc/src/en/guide/plugins/artefactApi.gdoc
- ./grails-doc/src/en/guide/plugins/artefactApi/customArtefacts.gdoc
- ./grails-doc/src/en/guide/plugins/artefactApi/queryingArtefacts.gdoc
- ./grails-doc/src/en/guide/plugins/creatingAndInstallingPlugins.gdoc
- ./grails-doc/src/en/guide/plugins/evaluatingConventions.gdoc
- ./grails-doc/src/en/guide/plugins/hookingIntoBuildEvents.gdoc
- ./grails-doc/src/en/guide/plugins/hookingIntoRuntimeConfiguration.gdoc
- ./grails-doc/src/en/guide/plugins/participatingInAutoReloadEvents.gdoc
- ./grails-doc/src/en/guide/plugins/providingBasicArtefacts.gdoc
- ./grails-doc/src/en/guide/plugins/repositories.gdoc
- ./grails-doc/src/en/guide/plugins/understandingPluginLoadOrder.gdoc
- ./grails-doc/src/en/guide/plugins/understandingPluginStructure.gdoc
- ./grails-doc/src/en/guide/rewriteRules.txt
- ./grails-doc/src/en/guide/scaffolding.gdoc
- ./grails-doc/src/en/guide/security.gdoc
- ./grails-doc/src/en/guide/security/authentication.gdoc
- ./grails-doc/src/en/guide/security/codecs.gdoc
- ./grails-doc/src/en/guide/security/securingAgainstAttacks.gdoc
- ./grails-doc/src/en/guide/security/securityPlugins.gdoc
- ./grails-doc/src/en/guide/security/securityPlugins/shiro.gdoc
- ./grails-doc/src/en/guide/security/securityPlugins/springSecurity.gdoc
- ./grails-doc/src/en/guide/services/declarativeTransactions/transactionsRollbackAndTheSession.gdoc
- ./grails-doc/src/en/guide/spring.gdoc
- ./grails-doc/src/en/guide/spring/propertyOverrideConfiguration.gdoc
- ./grails-doc/src/en/guide/spring/propertyPlaceholderConfiguration.gdoc
- ./grails-doc/src/en/guide/spring/springdsl.gdoc
- ./grails-doc/src/en/guide/spring/springdslAdditional.gdoc
- ./grails-doc/src/en/guide/spring/theBeanBuilderDSLExplained.gdoc
- ./grails-doc/src/en/guide/spring/theUnderpinningsOfGrails.gdoc
- ./grails-doc/src/en/guide/testing.gdoc
- ./grails-doc/src/en/guide/testing/functionalTesting.gdoc
- ./grails-doc/src/en/guide/testing/integrationTesting.gdoc
- ./grails-doc/src/en/guide/testing/unitTesting.gdoc
- ./grails-doc/src/en/guide/testing/unitTesting/mockingCollaborators.gdoc
- ./grails-doc/src/en/guide/testing/unitTesting/unitTestingControllers.gdoc
- ./grails-doc/src/en/guide/testing/unitTesting/unitTestingDomains.gdoc
- ./grails-doc/src/en/guide/testing/unitTesting/unitTestingFilters.gdoc
- ./grails-doc/src/en/guide/testing/unitTesting/unitTestingTagLibraries.gdoc
- ./grails-doc/src/en/guide/testing/unitTesting/unitTestingURLMappings.gdoc
- (original file updated) ./grails-doc/src/en/guide/toc.yml
- ./grails-doc/src/en/guide/validation.gdoc
- ./grails-doc/src/en/guide/validation/constraints.gdoc
- ./grails-doc/src/en/guide/validation/validatingConstraints.gdoc
- ./grails-doc/src/en/guide/validation/validationAndInternationalization.gdoc
- ./grails-doc/src/en/guide/validation/validationNonDomainAndCommandObjectClasses.gdoc
- ./grails-doc/src/en/guide/validation/validationOnTheClient.gdoc
File not found (new file added) or empty file
- ./grails-doc/src/en/guide/gettingStarted.gdoc
- ./grails-doc/src/en/guide/theWebLayer.gdoc

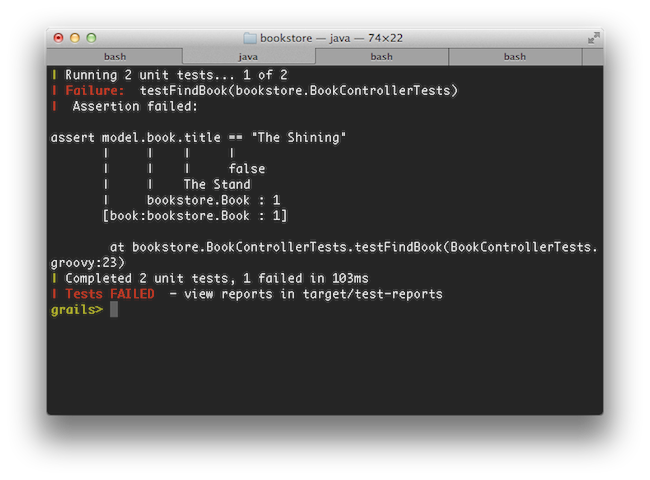 コマンド実行の際に、重要な情報のみ1行を更新表示するようになりました。例えば、以前のバージョンまでは、warコマンドを実行すると大量のログが表示されていましたが、2.0からは1行だけで表示されます。
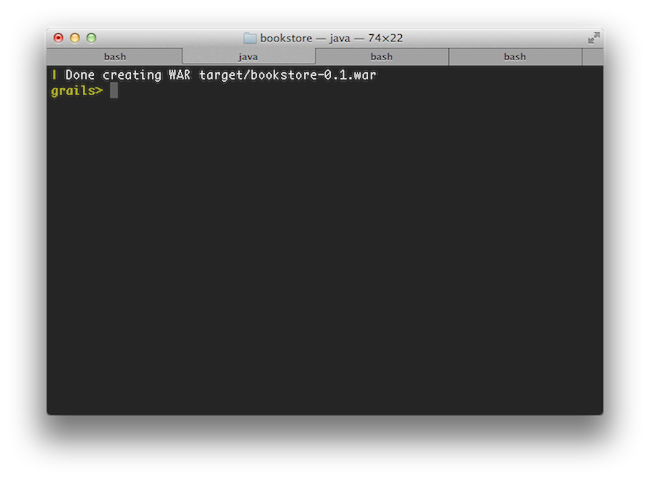 さらに、単にgrailsコマンドをコンソールで実行するだけで、新しいインタラクティブモードが開始され、JVMが起動したままとなりコマンドが迅速に実行でき、タブ補完、コマンド履歴も使用できます。
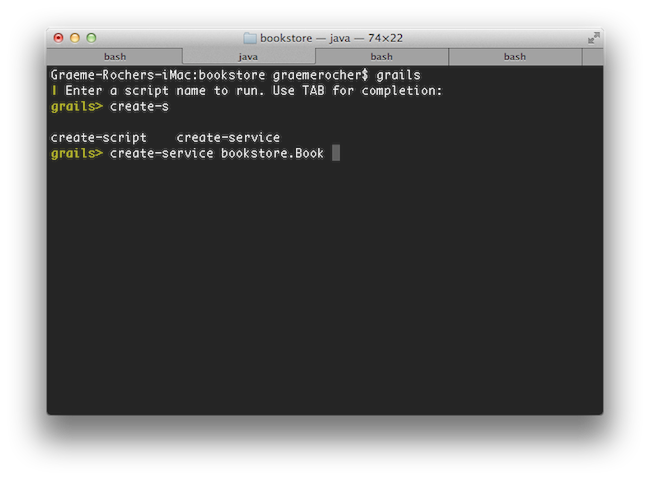 詳しい情報は、ユーザガイドのコンソールとインタラクティブモードを参照してください。 インタラクティブモード.
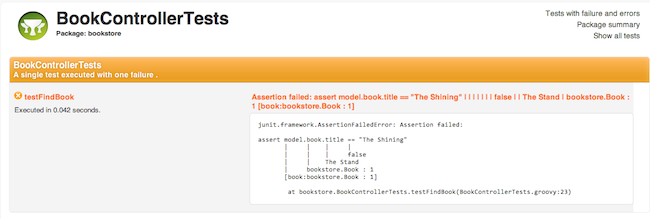 さらに、アプリケーションやプラグインで使用する、Grailsドキュメントエンジンのテンプレートもリニューアルされました:
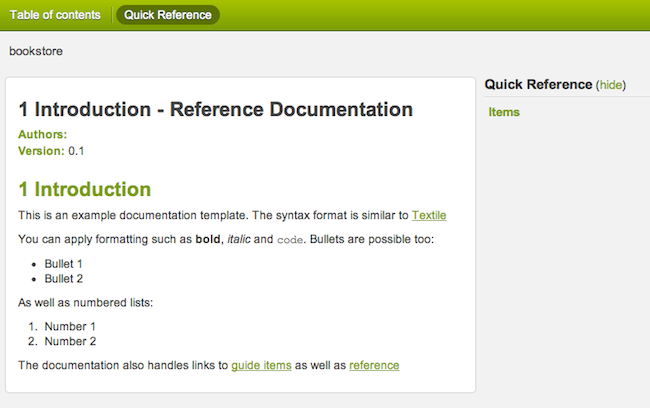 詳細はドキュメントエンジンのセクションを参照してください。 プロジェクト・ドキュメント
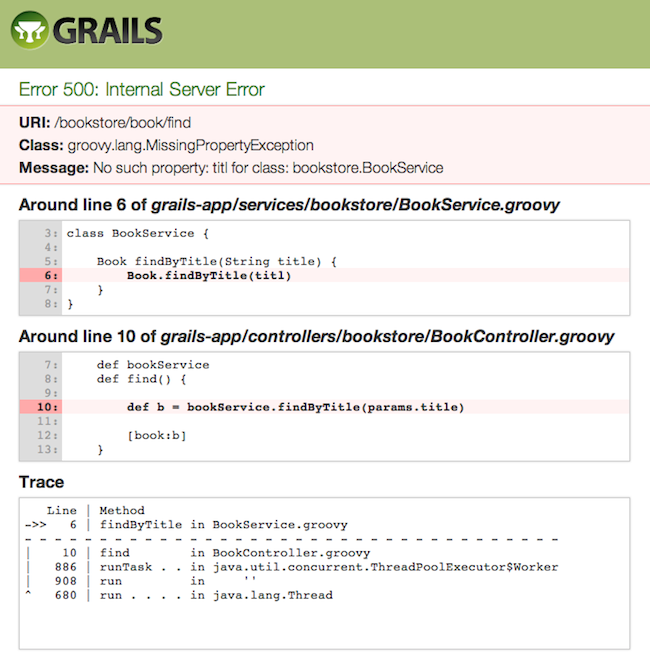 そして、さらにスタックトレースフィルターが強化され、関係のあるトレースのみが表示されるようになりました:
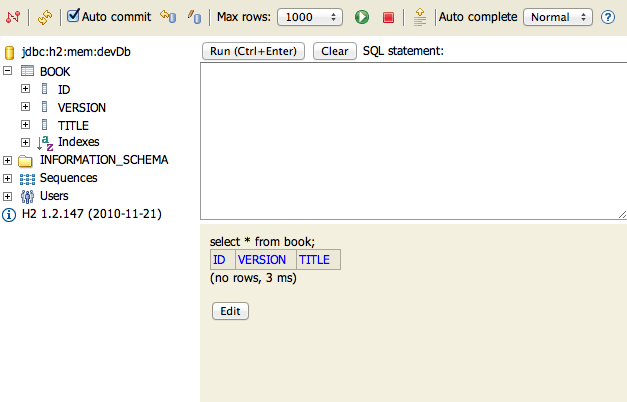
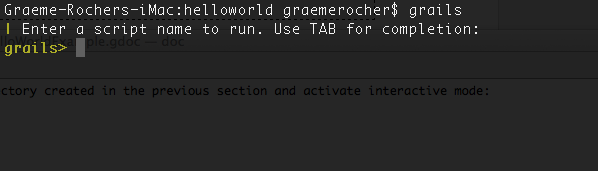 では、create-controllerコマンドを実行してみましょう:
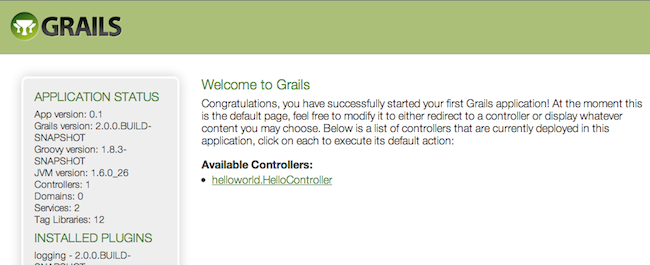 これは
これは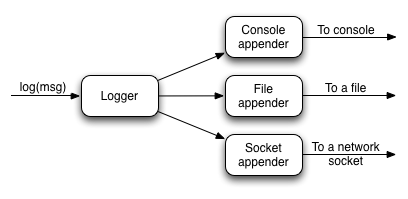 As you can see, a single logger may have several appenders attached to it. In a standard Grails configuration, the console appender named 'stdout' is attached to all loggers through the default root logger configuration. But that's the only one. Adding more appenders can be done within an 'appenders' block:
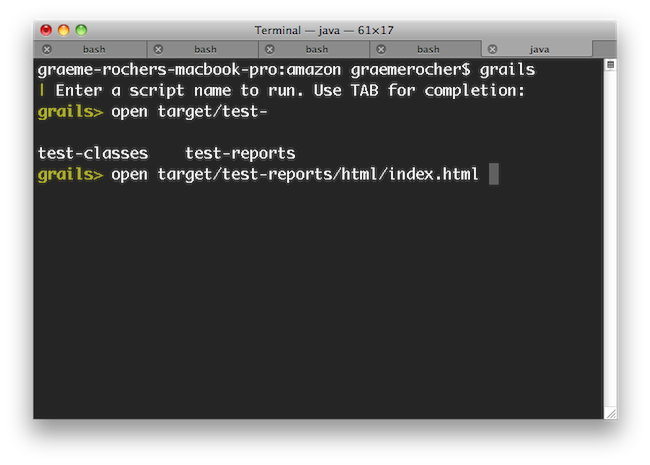 Even better, the
 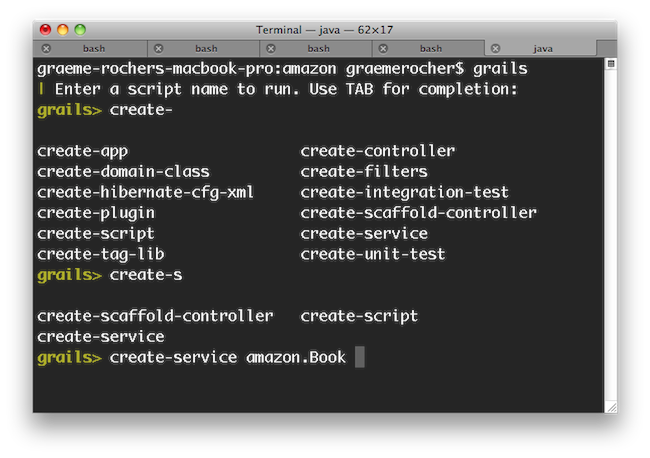 If you need to run an external process whilst interactive mode is running you can do so by starting the command with a !:
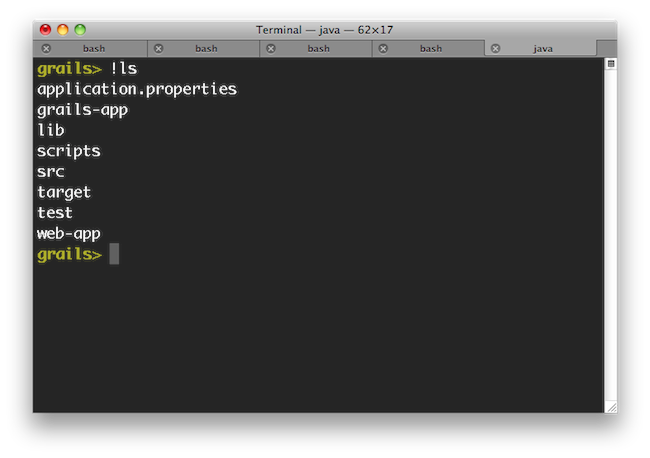 Note that with ! (bang) commands, you get file path auto completion - ideal for external commands that operate on the file system such as 'ls', 'cat', 'git', etc.