
5 コマンドライン - Reference Documentation
Authors: Graeme Rocher, Peter Ledbrook, Marc Palmer, Jeff Brown, Luke Daley, Burt Beckwith
Version: 2.3.0
Translated by: T.Yamamoto, Japanese Grails Doc Translating Team. Special thanks to NTT Software.
【注意】このドキュメントの内容はスナップショットバージョンを元に*意訳*されているため、一部現行バージョンでは未対応の機能もあります。
Table of Contents
5 コマンドライン
Grails' command line system is built on Gant - a simple Groovy wrapper around Apache Ant.
GrailsのコマンドラインシステムはGant(シンプルなApache AntのGroovyによるラッパー)によって構築されています。However, Grails takes it further through the use of convention and the
Grailsではgrails command. When you type:grailsコマンドを使用し、Gantとは少し違った実行方法になります。grails [command name]
Grails searches in the following directories for Gant scripts to execute:
このように入力した場合、GrailsはGantスクリプトを実行するために以下のディレクトリを探しに行きます。
USER_HOME/.grails/scriptsPROJECT_HOME/scriptsPROJECT_HOME/plugins/*/scriptsGRAILS_HOME/scripts
Grails will also convert command names that are in lower case form such as run-app into camel case. So typing
Grailsは "run-app" のような小文字のコマンドをキャメルケースに変換して探します。なので次のように入力すると:grails run-app
Results in a search for the following files:
結果、以下のファイルを検索するよう指定したことになります。
USER_HOME/.grails/scripts/RunApp.groovyPROJECT_HOME/scripts/RunApp.groovyPLUGINS_HOME/*/scripts/RunApp.groovyGLOBAL_PLUGINS_HOME/*/scripts/RunApp.groovyGRAILS_HOME/scripts/RunApp.groovy
If multiple matches are found Grails will give you a choice of which one to execute.
もし、複数の結果が見つかった場合はGrailsはどれを実行するかの選択肢を提示してきます。When Grails executes a Gant script, it invokes the "default" target defined in that script. If there is no default, Grails will quit with an error.
GrailsがGantスクリプトを実行するとき、デフォルトとして設定されたターゲットを起動します。デフォルト指定(setDefaultTarget(main)など)がない場合、Grailsはエラーで終了します。To get a list of all commands and some help about the available commands type:
実行可能なコマンドのヘルプとリストを表示したい場合は以下を入力します:grails help
which outputs usage instructions and the list of commands Grails is aware of:
このように入力すると、Grailsが認識しているコマンドのリストと使用方法が出力されます:Usage (optionals marked with *):
grails [environment]* [target] [arguments]*Examples:
grails dev run-app
grails create-app booksAvailable Targets (type grails help 'target-name' for more info):
grails bootstrap
grails bug-report
grails clean
grails compile
...Refer to the Command Line reference in the Quick Reference menu of the reference guide for more information about individual commands左メニューにある個別のコマンドラインリファレンス情報も参照して下さい。
It's often useful to provide custom arguments to the JVM when running Grails commands, in particular with
Grailsコマンドを実行する際に、JVMへ独自の引数を提供できると便利な場合があります。
例えば、run-app where you may for example want to set a higher maximum heap size. The Grails command will use any JVM options provided in the general JAVA_OPTS environment variable, but you can also specify a Grails-specific environment variable too:run-appをする際にヒープサイズにより大きな値を設定したいといった場合です。
Grailsコマンドは一般的なJAVA_OPTSの環境変数内で提供されているJVMオプションを使用しますが、Grails固有の環境変数を指定することもできます:export GRAILS_OPTS="-Xmx1G -Xms256m -XX:MaxPermSize=256m"
grails run-apph4. non-interactive mode
非インタラクティブモード
When you run a script manually and it prompts you for information, you can answer the questions and continue running the script. But when you run a script as part of an automated process, for example a continuous integration build server, there's no way to "answer" the questions. So you can pass the
手動でスクリプト実行する際にユーザ入力を求める場合があります。
そのような場合は質問に応答することでスクリプトの実行が継続されます。
しかし、継続的インテグレーションのビルドサーバといったように、自動化されたプロセスとしてスクリプトを実行する場合は質問に応答する方法がありません。
例えば、未インストールのプラグインをインストールするかどうかといったような質問に対し、デフォルトの値で応答するようGrailsに伝えるには、そのスクリプトコマンドへ--non-interactive switch to the script command to tell Grails to accept the default answer for any questions, for example whether to install a missing plugin.--non-interactiveを渡します。For example:
例えば:grails war --non-interactive
5.1 インタラクティブモード
Interactive mode is the a feature of the Grails command line which keeps the JVM running and allows for quicker execution of commands. To activate interactive mode type 'grails' at the command line and then use TAB completion to get a list of commands: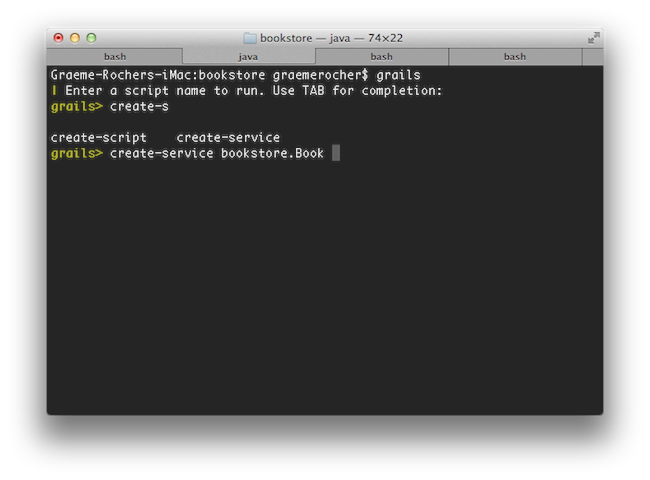 If you need to open a file whilst within interactive mode you can use the
 open command which will TAB complete file paths: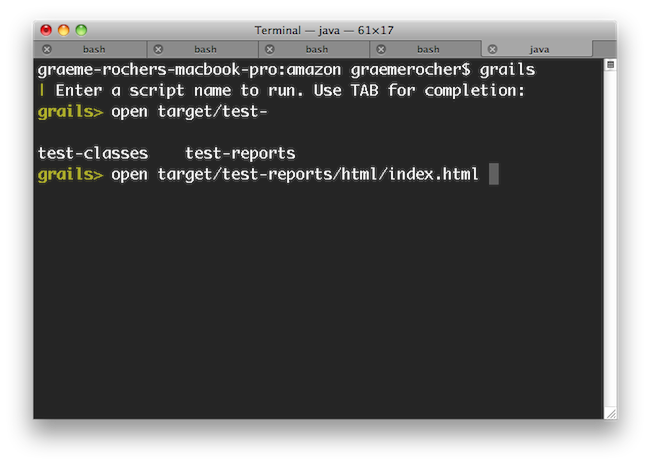 Even better, the
 open command understands the logical aliases 'test-report' and 'dep-report', which will open the most recent test and dependency reports respectively. In other words, to open the test report in a browser simply execute open test-report. You can even open multiple files at once: open test-report test/unit/MyTests.groovy will open the HTML test report in your browser and the MyTests.groovy source file in your text editor.TAB completion also works for class names after the create-* commands: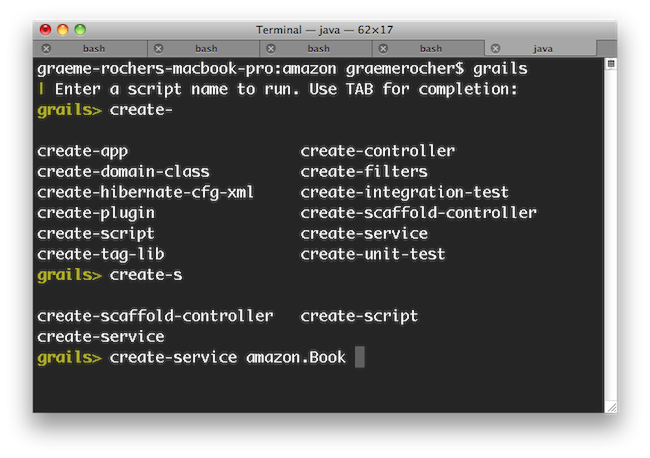 If you need to run an external process whilst interactive mode is running you can do so by starting the command with a !:
 Note that with ! (bang) commands, you get file path auto completion - ideal for external commands that operate on the file system such as 'ls', 'cat', 'git', etc.The
 stop-app command will stop an application that has been run with the run-app command.To exit interactive mode enter the exit command. Note that if the Grails application has been run with run-app normally it will terminate when the interactive mode console exits because the JVM will be terminated. An exception to this would be if the application were running in forked mode which means the application is running in a different JVM. In that case the application will be left running afer the interactive mode console terminates. If you want to exit interactive mode and stop an application that is running in forked mode, use the quit command. The quit command will stop the running application and then close interactive mode.
5.2 フォークモード
h4. Forked Execution
フォーク実行
Since Grails 2.3, the
ランタイムクラスパスからビルドクラスパスを隔離するために、Grails 2.3からrun-app, run-war, test-app and console commands are now executed in a forked JVM in order to isolate the build classpath from the runtime classpath.run-app、run-war、test-app、consoleコマンドはフォークされたJVM上で実行されます。Forked execution is configured via the
フォーク実行はgrails-app/conf/BuildConfig.groovy file. The following is the default configuration:grails-app/conf/BuildConfig.groovyファイルで設定します。
以下はデフォルト設定です:forkConfig = [maxMemory: 1024, minMemory: 64, debug: false, maxPerm: 256] grails.project.fork = [ test: [maxMemory: 768, minMemory: 64, debug: false, maxPerm: 256, daemon:true], // configure settings for the test-app JVM run: [maxMemory: 768, minMemory: 64, debug: false, maxPerm: 256], // configure settings for the run-app JVM war: [maxMemory: 768, minMemory: 64, debug: false, maxPerm: 256], // configure settings for the run-war JVM console: [maxMemory: 768, minMemory: 64, debug: false, maxPerm: 256]// configure settings for the Console UI JVM ]
The memory requirements of the forked JVM can be tweaked as per the requirements of the application.
フォークされたJVM用のメモリ容量は、アプリケーション要件に従って調整してください。h4. Forked Test Execution
フォークされたテスト実行
When running the test-app command, a separate JVM is launched to execute this tests. This will have a notable impact on the speed of execution of the tests when running the command directly:
test-appコマンドの実行時、そのテストを実行するための個別のJVMが起動されます。
この起動時間が加算されるため、直接コマンドを実行したときの実行速度はかなりの影響を受けます:grails test-app
To mitigate this, Grails 2.3 and above include a feature that launches a background JVM on standby to run tests when using interactive mode. In other words, running
これを緩和するため、Grails 2.3以上には、インタラクティブモード利用時にテスト実行に備えてバックグラウンドでJVMを起動する機能があります。
つまり、インタラクティブモードからのtest-app from interactive mode will result in faster test execution times:test-appの実行では、テスト実行時間が速くなります:$ grails $ grails> test-app
It is recommended that forked execution is used for tests, however it does require modern hardware due to the use of multiple JVMs. You can therefore disable forked execution by setting the
テストにはフォーク実行の利用をお勧めしますが、複数のJVMを利用するには最新のハードウェアが必要になります。
そのため、grails.project.fork.test setting to false:grails.project.fork.testをfalseにセットすることで、フォーク実行を無効にすることもできます。forkConfig = [maxMemory: 1024, minMemory: 64, debug: false, maxPerm: 256] grails.project.fork = [ test: false, … ]
Using the Test Runnner Deamon to Speed-up Test Execution
The defaut configuration for the testing is to activate a daemon to run tests using thedaemon argument:grails.project.fork = [ test: [maxMemory: 768, minMemory: 64, debug: false, maxPerm: 256, daemon:true], // configure settings for the test-app JVM ...
test-app the daemon will be used:$ grails $ grails> test-app
daemon to false. If the daemon becomes unresponsive you can restart it with restart-daemon:$ grails> restart-daemon
Debugging and Forked Execution (debug vs debug-fork)
An important consideration when using forked execution is that the debug argument will allow a remote debugger to be attached to the build JVM but not the JVM that your application is running in. To debug your application you should use the debug-fork argument:grails test-app --debug-fork
grails run-app --debug-fork
h4. Forked Tomcat Execution
フォークされたTomcat実行
Grails 2.2 and above support forked JVM execution of the Tomcat container in development mode. This has several benefits including:
Grails 2.2以上では、開発モードにおけるTomcatコンテナのフォーク実行をサポートしています。
これにはいくつかのメリットがあります:- Reduced memory consumption, since the Grails build system can exit
- Isolation of the build classpath from the runtime classpath
- The ability to deploy other Grails/Spring applications in parallels without conflicting dependencies
- Grailsビルドシステムを終了できるため、メモリ消費量を減らせる
- ランタイムクラスパスからビルドクラスパスを隔離できる
- 依存関係のコンフリクトなしに、他のGrails/Springアプリケーションを並列デプロイできる
To enable forked execution you can set the
フォーク実行を有効化するためには、grails.project.fork.run property to true:grails.project.fork.runプロパティをtrueにセットします:grails.project.fork.run=trueThen just us the regular
それから、いつも通り普通のrun-app command as per normal. Note that in forked mode the grails process will exit and leave the container running in the background. To stop the server there is a new stop-app command:run-appコマンドを使います。
フォークモードではgrailsプロセスは終了し、バックグラウンドで実行中のコンテナから切り離されることに注意してください。
サーバを停止するために、新しいstop-appコマンドが用意されています:grails stop-app
To customize the JVM arguments passed to the forked JVM you can specify a map instead:
フォークされたJVMに渡すJVM引数をカスタマイズするために、代わりにマップを指定できます:grails.project.fork.run= [maxMemory:1024, minMemory:64, debug:false, maxPerm:256, jvmArgs: '..arbitrary JVM arguments..']h4. Auto-deploying additional WAR files in Forked Mode
フォークモードでの追加WARファイルの自動デプロイ
Since forked execution isolates classpaths more effectively than embedded execution you can deploy additional WAR files (such as other Grails or Spring applications) to the container.
組み込み実行に比べてフォーク実行はより効果的にクラスパスを分離できるため、(他のGrails/Springアプリケーションの)追加WARファイルをコンテナへデプロイできます。The easiest way to do so is to drop the WAR files into the
最も簡単な方法は、WARファイルをsrc/autodeploy directory (if it doesn't exist you can create it).src/autodeployディレクトリに置くことです(もしディレクトリが存在していなければ、作成してください)。You can customize the location of the autodeploy directory by specifying an alternative location in
BuildConfig.groovy:BuildConfig.groovyで別のパスを指定してautodeployディレクトリの位置をカスタマイズできます:grails.project.autodeploy.dir="/path/to/my/war/files"h4. Customizing the Forked Tomcat instance
フォークされたTomcatインスタンスのカスタマイズ
If you want to programmatically customize the forked Tomcat instance you can do so by implementing a class named
フォークされたTomcatインスタンスをプログラム的にカスタマイズしたい場合は、org.grails.plugins.tomcat.ForkedTomcatCustomizer which provides a method with the following signature:org.grails.plugins.tomcat.ForkedTomcatCustomizerという名前のクラスを実装します。
このクラスは以下のシグネチャのメソッドを提供します:void customize(Tomcat tomcat) {
// your code here
}5.3 Gantスクリプトの作成
You can create your own Gant scripts by running the create-script command from the root of your project. For example the following command:
プロジェクトのルートディレクトリでcreate-scriptコマンドを実行することにより、自分でGantスクリプトを作成することができます。例えば以下のようなコマンドです:grails create-script compile-sources
Will create a script called
このコマンドによりscripts/CompileSources.groovy. A Gant script itself is similar to a regular Groovy script except that it supports the concept of "targets" and dependencies between them:scripts/CompileSources.groovyというスクリプトが作成されます。Gantスクリプト自身は通常のGroovyスクリプトと似ていますが、ターゲットという概念とそれぞれのターゲットの依存関係をサポートしています。target(default:"The default target is the one that gets executed by Grails") { depends(clean, compile) }target(clean:"Clean out things") { ant.delete(dir:"output") }target(compile:"Compile some sources") { ant.mkdir(dir:"mkdir") ant.javac(srcdir:"src/java", destdir:"output") }
As demonstrated in the script above, there is an implicit
上記で示したスクリプトのように、暗黙的な変数のantはApache Ant APIを使うことができます。
ant variable (an instance of groovy.util.AntBuilder) that allows access to the Apache Ant API.
In previous versions of Grails (1.0.3 and below), the variable was前バージョンのGrails(1.0.3以前)では、変数名はAntのように大文字始まりでした。Ant, i.e. with a capital first letter.
You can also "depend" on other targets using the
また、上記のdefaultターゲットで示したように、depends method demonstrated in the default target above.dependsメソッドを使って他のターゲットに 依存させることができます。デフォルトターゲット The default target
In the example above, we specified a target with the explicit name "default". This is one way of defining the default target for a script. An alternative approach is to use the
上記の例では"default"と明示的にターゲットを指定しました。これは、スクリプトでデフォルトターゲットを定義する方法の一つです。(最新のバージョンでは使用できません)代わりにsetDefaultTarget() method:setDefaultTarget()メソッドを使用することもできます。target("clean-compile": "Performs a clean compilation on the app source") { depends(clean, compile) }target(clean:"Clean out things") { ant.delete(dir:"output") }target(compile:"Compile some sources") { ant.mkdir(dir:"mkdir") ant.javac(srcdir:"src/java", destdir:"output") }setDefaultTarget("clean-compile")
This lets you call the default target directly from other scripts if you wish. Also, although we have put the call to
こうすることで、他のスクリプトのターゲットを直接デフォルトターゲットに指定できます。setDefaultTarget() at the end of the script in this example, it can go anywhere as long as it comes after the target it refers to ("clean-compile" in this case).setDefaultTarget()は、対象のターゲット(今回の場合は "clean-compile")の後であればどこにでも書くことができます。Which approach is better? To be honest, you can use whichever you prefer - there don't seem to be any major advantages in either case. One thing we would say is that if you want to allow other scripts to call your "default" target, you should move it into a shared script that doesn't have a default target at all. We'll talk some more about this in the next section.
どちらのアプローチが良いのでしょうか?正直なところ、あなたは好みで使い分けて使用することができます。どちらの場合も、王道の利点があるわけではありません。一つ言えることは、他のスクリプトからデフォルトターゲットを呼び出せるようにしたい場合は、デフォルトターゲットを持っていない共有スクリプトにそれを移動する必要があるということです。これについては次のセクションでも詳しく説明します。
5.4 Grailsスクリプトの再利用
Grails ships with a lot of command line functionality out of the box that you may find useful in your own scripts (See the command line reference in the reference guide for info on all the commands). Of particular use are the compile, package and bootstrap scripts.
Grailsは独自のスクリプトでも使用できる便利なコマンドライン機能を提供しています(コマンドに関する詳細はリファレンスガイド内のコマンドラインリファレンスを参照してください)。特にcompile、packageおよびbootstrapスクリプトはよく利用されます。The bootstrap script for example lets you bootstrap a Spring ApplicationContext instance to get access to the data source and so on (the integration tests use this):
bootstrapスクリプトはデータソースなどを参照可能にするSpringのApplicationContextインスタンスを生成します。(統合テストはこの機能を使っています):includeTargets << grailsScript("_GrailsBootstrap")target ('default': "Database stuff") { depends(configureProxy, packageApp, classpath, loadApp, configureApp) Connection c try { c = appCtx.getBean('dataSource').getConnection() // do something with connection } finally { c?.close() } }
他のスクリプトからターゲットを取り出す Pulling in targets from other scripts
Gant lets you pull in all targets (except "default") from another Gant script. You can then depend upon or invoke those targets as if they had been defined in the current script. The mechanism for doing this is the
Gantはターゲットを他のGantスクリプトから取り込むことができます。取り込んだターゲットは、あたかも現在のスクリプトで定義されているかのように実行することができます。この仕組みはincludeTargets property. Simply "append" a file or class to it using the left-shift operator:includeTargetsプロパティにより実現されます。単純に左シフト演算子でファイル又は使用するクラスを追加します:includeTargets << new File("/path/to/my/script.groovy") includeTargets << gant.tools.Ivy
Don't worry too much about the syntax using a class, it's quite specialised. If you're interested, look into the Gant documentation.
クラスを使用している構文はGantのルールに従って記述されたクラスを使用しています。もし興味があればGantのドキュメントを参照して下さい。Core Grailsターゲット Core Grails targets
As you saw in the example at the beginning of this section, you use neither the File- nor the class-based syntax for
この章の冒頭の例でお見せしたように、Core Grailsターゲットを含める際に利用するincludeTargets when including core Grails targets. Instead, you should use the special grailsScript() method that is provided by the Grails command launcher (note that this is not available in normal Gant scripts, just Grails ones).includeTargetsでは、ファイルベース構文、クラスベース構文のどちらも使用しません。代わりに、Grailsコマンドランチャが提供しているgrailsScript()という特別なメソッドを使用します(このメソッドはGrails専用であり、通常のGantでは利用できません)。The syntax for the
grailsScript() method is pretty straightforward: simply pass it the name of the Grails script to include, without any path information. Here is a list of Grails scripts that you could reuse:grailsScript()メソッドの構文は、単に含めたいGrailsスクリプトの名称を渡すだけです。以下に再利用できるGrailsスクリプトの一覧を示します:
| Script | Description |
|---|---|
| _GrailsSettings | You really should include this! Fortunately, it is included automatically by all other Grails scripts except _GrailsProxy, so you usually don't have to include it explicitly. |
| _GrailsEvents | Include this to fire events. Adds an event(String eventName, List args) method. Again, included by almost all other Grails scripts. |
| _GrailsClasspath | Configures compilation, test, and runtime classpaths. If you want to use or play with them, include this script. Again, included by almost all other Grails scripts. |
| _GrailsProxy | If you don't have direct access to the internet and use a proxy, include this script to configure access through your proxy. |
| _GrailsArgParsing | Provides a parseArguments target that does what it says on the tin: parses the arguments provided by the user when they run your script. Adds them to the argsMap property. |
| _GrailsTest | Contains all the shared test code. Useful if you want to add any extra tests. |
| _GrailsRun | Provides all you need to run the application in the configured servlet container, either normally (runApp/runAppHttps) or from a WAR file (runWar/runWarHttps). |
| スクリプト | 説明 |
|---|---|
| _GrailsSettings | Grailsの設定などを読み込むスクリプト。このスクリプトは他のスクリプト(_GrailsProxyなど)で自動的にインクルードされているので、通常は明示的にインクルードする必要はありません。 |
| _GrailsEvents | イベントトリガーを実装するためのメソッド(event(String eventName, List args))を使用するには、これをインクルードする必要があります。このスクリプトもほぼ全てのGrailsスクリプトでインクルードされています。 |
| _GrailsClasspath | コンパイル、テスト、およびランタイムのクラスパスを設定します。このスクリプトもほぼ全ての Grailsスクリプトでインクルードされています。 |
| _GrailsProxy | インターネットにアクセスする場合は、プロキシの解決をするためにこのスクリプトをインクルードして下さい。 |
| _GrailsArgParsing | parseArgumentsターゲットはその名の通り解析する機能を提供します。スクリプトを実行する際に指定した引数を解析します。argsMapプロパティにそれらの設定の追加します。 |
| _GrailsTest | すべてのテスト実行に使用するコードが含まれています。他の種類のテストを追加する際に便利です。 |
| _GrailsRun | アプリケーションを起動させるために必要な機能を提供します。通常は(runApp/runAppHttps)から、またはWARファイル(runWar/runWarHttps)から実行します。 |
There are many more scripts provided by Grails, so it is worth digging into the scripts themselves to find out what kind of targets are available. Anything that starts with an "_" is designed for reuse.
Grailsではもっと多くのスクリプトが提供されていますので、どんな種類のターゲットが利用可能かを調べてみる価値があるでしょう。" "で始まっているものはすべて再利用されることを考慮してデザインされています。スクリプトアーキテクチャ Script architecture
You maybe wondering what those underscores are doing in the names of the Grails scripts. That is Grails' way of determining that a script is _internal , or in other words that it has not corresponding "command". So you can't run "grails _grails-settings" for example. That is also why they don't have a default target.
アンダースコアで始まるGrailsスクリプトは、何を示しているものかを説明すると、それらはコマンドではなく、他のスクリプトから利用されるスクリプト群として認識されます。なので、それらのスクリプト(内部スクリプト)はデフォルトターゲットを持っておらず、スクリプトは実行できません。Internal scripts are all about code sharing and reuse. In fact, we recommend you take a similar approach in your own scripts: put all your targets into an internal script that can be easily shared, and provide simple command scripts that parse any command line arguments and delegate to the targets in the internal script. For example if you have a script that runs some functional tests, you can split it like this:
内部スクリプトは共有して再利用するために存在します。実際に独自のスクリプトを書く場合は、同等の手法をとることをお勧めします。簡単に共有できるターゲットは内部スクリプトにすべて置き、コマンドライン引数を解析して、内部スクリプト内のターゲットを呼び出すだけのコマンドスクリプトを提供します。例えば、いくつかのファンクショナルテストを行うスクリプトがあるという場合、以下のように分割できます。./scripts/FunctionalTests.groovy:includeTargets << new File("${basedir}/scripts/_FunctionalTests.groovy")target(default: "Runs the functional tests for this project.") { depends(runFunctionalTests) }./scripts/_FunctionalTests.groovy:includeTargets << grailsScript("_GrailsTest")target(runFunctionalTests: "Run functional tests.") { depends(...) … }
Here are a few general guidelines on writing scripts:
以下にスクリプトを書く際のガイドラインを示します:- Split scripts into a "command" script and an internal one.
- Put the bulk of the implementation in the internal script.
- Put argument parsing into the "command" script.
- To pass arguments to a target, create some script variables and initialise them before calling the target.
- Avoid name clashes by using closures assigned to script variables instead of targets. You can then pass arguments direct to the closures.
- スクリプトを"コマンドスクリプト"と"内部スクリプト"に分割します。
- 実装の大部分は"内部スクリプト"で行います。
- 引数の解析は"コマンドスクリプト"で行います。
- ターゲットに引数を渡すには、いくつかのスクリプト変数を作成し、ターゲットを呼び出す前にそれらを初期化します。
- ターゲットの代わりにスクリプト変数に割り当てられているクロージャを使用して名前の衝突を避けるようにします。そうすれば、引数をクロージャに直接渡すことができます。
5.5 イベントを取得する
Grails provides the ability to hook into scripting events. These are events triggered during execution of Grails target and plugin scripts.
Grailsはスクリプトのイベントフックを提供しています。イベントフックとは、Grailsターゲット実行時やプラグインスクリプト実行時に発行されるイベントを取得して処理を行うことができる機能です。The mechanism is deliberately simple and loosely specified. The list of possible events is not fixed in any way, so it is possible to hook into events triggered by plugin scripts, for which there is no equivalent event in the core target scripts.
仕組みはわざと単純でゆるく明記できるようになっています。起こりうるイベントは予測できないからです。なので、コアターゲットと同等のイベントが無い場合はプラグインスクリプトからトリガーされたイベントにフックする事も可能です。イベントハンドラを定義する Defining event handlers
Event handlers are defined in scripts called
イベントハンドラは_Events.groovy. Grails searches for these scripts in the following locations:_Events.groovyという名称のスクリプトで定義します。Grailsは次の場所からスクリプトを検索します:USER_HOME/.grails/scripts- user-specific event handlersPROJECT_HOME/scripts- applicaton-specific event handlersPLUGINS_HOME/*/scripts- plugin-specific event handlersGLOBAL_PLUGINS_HOME/*/scripts- event handlers provided by global plugins
USER_HOME/.grails/scripts- ユーザー固有のイベントハンドラPROJECT_HOME/scripts- アプリケーション固有のイベントハンドラPLUGINS_HOME/*/scripts- プラグイン固有のイベントハンドラGLOBAL_PLUGINS_HOME/*/scripts- グローバルプラグインによって提供されているイベントハンドラ
Whenever an event is fired, all the registered handlers for that event are executed. Note that the registration of handlers is performed automatically by Grails, so you just need to declare them in the relevant
イベントが発生するたびに登録されている すべての ハンドラが実行されます。ハンドラの登録はGrailsによって自動的に行われることに注意してください。なので、必要な作業は関連する_Events.groovy file._Events.groovyファイルにそれらを宣言するだけです。Event handlers are blocks defined in
イベントハンドラは _Events.groovy で定義されている名前が "event" で始まっているブロックです。次の例のように_Events.groovy, with a name beginning with "event". The following example can be put in your /scripts directory to demonstrate the feature:_Events.groovyを記述して、/scripts ディレクトリに配置することによって、イベントハンドラを実装することができます:eventCreatedArtefact = { type, name ->
println "Created $type $name"
}eventStatusUpdate = { msg ->
println msg
}eventStatusFinal = { msg ->
println msg
}You can see here the three handlers
ここでは三つのハンドラが指定されています。eventCreatedArtefact, eventStatusUpdate, eventStatusFinal. Grails provides some standard events, which are documented in the command line reference guide. For example the compile command fires the following events:eventCreatedArtefact、eventStatusUpdate、eventStatusFinal。Grailsはいくつかの標準的なイベントを提供しています。詳細はコマンドラインリファレンスガイドを参照してください。たとえば、 compileコマンドは、次のようなイベントを発行させます。
CompileStart- Called when compilation starts, passing the kind of compile - source or testsCompileEnd- Called when compilation is finished, passing the kind of compile - source or tests
CompileStart- sourceまたはtestsコンパイル開始時に発行されます。CompileEnd- sourceまたはtestsコンパイル終了時に発行されます。
イベントトリガー Triggering events
To trigger an event simply include the Init.groovy script and call the event() closure:
イベントを発行するには _GrailsEvents.groovy スクリプトをインクルードしてevent()クロージャを使用します:includeTargets << grailsScript("_GrailsEvents")event("StatusFinal", ["Super duper plugin action complete!"])
共通イベント Common Events
Below is a table of some of the common events that can be leveraged:
以下はいくつかの利用可能な共通イベントの一覧です:| Event | Parameters | Description |
|---|---|---|
| StatusUpdate | message | Passed a string indicating current script status/progress |
| StatusError | message | Passed a string indicating an error message from the current script |
| StatusFinal | message | Passed a string indicating the final script status message, i.e. when completing a target, even if the target does not exit the scripting environment |
| CreatedArtefact | artefactType,artefactName | Called when a create-xxxx script has completed and created an artefact |
| CreatedFile | fileName | Called whenever a project source filed is created, not including files constantly managed by Grails |
| Exiting | returnCode | Called when the scripting environment is about to exit cleanly |
| PluginInstalled | pluginName | Called after a plugin has been installed |
| CompileStart | kind | Called when compilation starts, passing the kind of compile - source or tests |
| CompileEnd | kind | Called when compilation is finished, passing the kind of compile - source or tests |
| DocStart | kind | Called when documentation generation is about to start - javadoc or groovydoc |
| DocEnd | kind | Called when documentation generation has ended - javadoc or groovydoc |
| SetClasspath | rootLoader | Called during classpath initialization so plugins can augment the classpath with rootLoader.addURL(...). Note that this augments the classpath after event scripts are loaded so you cannot use this to load a class that your event script needs to import, although you can do this if you load the class by name. |
| PackagingEnd | none | Called at the end of packaging (which is called prior to the Tomcat server being started and after web.xml is generated) |
| イベント | パラメータ | 説明 |
|---|---|---|
| StatusUpdate | message | 実行されているスクリプトのステータス、進捗メッセージを知らせる |
| StatusError | message | 実行されているスクリプトのエラーメッセージを 知らせる |
| StatusFinal | message | スクリプトの終了時に最終メッセージを知らせる。 スクリプトによっては完全終了時ではなく、コマ ンドの終了時に動作する |
| CreatedArtefact | artefactType,artefactName | create-xxxxなどのアーティファクト生成スクリプトが、アーティファクトの生成完了時にアーティ ファクトタイプとアーティファクト名を知らせる |
| CreatedFile | fileName | ファイルがスクリプトによって生成されたときに ファイル名を知らせる |
| Exiting | returnCode | スクリプトが正常に終了したときに終了コードを 知らせる |
| PluginInstalled | pluginName | プラグインのインストールが終了した後にプラグイン 名を知らせる |
| CompileStart | kind | コンパイル開始時にコンパイルする種類(source または tests)を知らせる |
| CompileEnd | kind | コンパイル終了時にコンパイルした種類(source または tests)を知らせる |
| DocStart | kind | ドキュメント生成時に、どのドキュメント生成(javadoc または groovydoc)が開始するかを知らせる |
| DocEnd | kind | ドキュメント生成完了時に、どのドキュメント生成(javadoc または groovydoc)が完了したかを知らせる |
| SetClasspath | rootLoader | クラスパス初期化中にGrailsRootLoader が渡されるので、「rootLoader.addURL( … )」でクラスをGrailsRootLoader に追加できる |
| PackagingEnd | none | Grailsアプリケーションのパッケージング完了時 (web.xml生成後、Tomcatサーバ起動前)に呼び出される |
5.6 ビルドのカスタマイズ
Grails is most definitely an opinionated framework and it prefers convention to configuration, but this doesn't mean you can't configure it. In this section, we look at how you can influence and modify the standard Grails build.
Grailsは確かにものすごく固執したフレームワークであり、設定よりも規約という方式を主張していますが、それは様々な設定をできないという意味ではありません。このセクションでは、どのようにGrailsの標準的なビルドをカスタマイズする方法を解説します。初期値 The defaults
The core of the Grails build configuration is the
ビルド設定の中心部分は、ビルド時に有用な情報が含まれている grails.util.BuildSettings class, which contains quite a bit of useful information. It controls where classes are compiled to, what dependencies the application has, and other such settings.grails.util.BuildSettingsクラスです。このクラスは、どこにコンパイルされるのか、アプリケーションが何に依存関係を持っているのか、どのような設定を保持しているのか、を制御します。Here is a selection of the configuration options and their default values:
設定オプションと初期値は以下のようになります:
| Property | Config option | Default value |
|---|---|---|
| grailsWorkDir | grails.work.dir | $USER_HOME/.grails/<grailsVersion> |
| projectWorkDir | grails.project.work.dir | <grailsWorkDir>/projects/<baseDirName> |
| classesDir | grails.project.class.dir | <projectWorkDir>/classes |
| testClassesDir | grails.project.test.class.dir | <projectWorkDir>/test-classes |
| testReportsDir | grails.project.test.reports.dir | <projectWorkDir>/test/reports |
| resourcesDir | grails.project.resource.dir | <projectWorkDir>/resources |
| projectPluginsDir | grails.project.plugins.dir | <projectWorkDir>/plugins |
| globalPluginsDir | grails.global.plugins.dir | <grailsWorkDir>/global-plugins |
| verboseCompile | grails.project.compile.verbose | false |
| プロパティ | 設定オプション | 初期値 |
|---|---|---|
| grailsWorkDir | grails.work.dir | $USER_HOME/.grails/<grailsVersion> |
| projectWorkDir | grails.project.work.dir | <grailsWorkDir>/projects/<baseDirName> |
| classesDir | grails.project.class.dir | <projectWorkDir>/classes |
| testClassesDir | grails.project.test.class.dir | <projectWorkDir>/test-classes |
| testReportsDir | grails.project.test.reports.dir | <projectWorkDir>/test/reports |
| resourcesDir | grails.project.resource.dir | <projectWorkDir>/resources |
| projectPluginsDir | grails.project.plugins.dir | <projectWorkDir>/plugins |
| globalPluginsDir | grails.global.plugins.dir | <grailsWorkDir>/global-plugins |
| verboseCompile | grails.project.compile.verbose | false |
The
BuildSettings class has some other properties too, but they should be treated as read-only:BuildSettingsクラスは、他にもいくつかの読み取り専用のプロパティを持っています:
| Property | Description |
|---|---|
| baseDir | The location of the project. |
| userHome | The user's home directory. |
| grailsHome | The location of the Grails installation in use (may be null). |
| grailsVersion | The version of Grails being used by the project. |
| grailsEnv | The current Grails environment. |
| config | The configuration settings defined in the project's BuildConfig.groovy file. Access properties in the same way as you access runtime settings: grailsSettings.config.foo.bar.hello. |
| compileDependencies | A list of compile-time project dependencies as File instances. |
| testDependencies | A list of test-time project dependencies as File instances. |
| runtimeDependencies | A list of runtime-time project dependencies as File instances. |
| プロパティ | 説明 |
|---|---|
| baseDir | プロジェクトの場所。 |
| userHome | ユーザーのホームディレクトリ。 |
| grailsHome | 使用中のGrailsのインストール先(nullの場合あり)。 |
| grailsVersion | プロジェクトで使用されているGrailsのバージョン。 |
| grailsEnv | 現在のGrails環境。 |
| config | プロジェクトの BuildConfig.groovy に定義された設定。ランタイム時と同様にプロパティにアクセスできます: grailsSettings.config.foo.bar.hello |
| compileDependencies | コンパイル時のプロジェクト依存関係のFileインスタンスのリスト。 |
| testDependencies | テスト時のプロジェクト依存関係のFileインスタンスのリスト。 |
| runtimeDependencies | 実行時のプロジェクト依存関係のFileインスタンスのリスト。 |
Of course, these properties aren't much good if you can't get hold of them. Fortunately that's easy to do: an instance of
もちろんこれらのプロパティがぴったり合うとは限りません。幸いなことに、BuildSettings is available to your scripts as the grailsSettings script variable. You can also access it from your code by using the grails.util.BuildSettingsHolder class, but this isn't recommended.BuildSettingsのインスタンスのgrailsSettingspスクリプト変数を介して利用可能です。他のコードからもgrails.util.BuildSettingsHolder@クラスを使用してアクセスすることができます。でもこれは推奨されません。初期値を上書きする Overriding the defaults
All of the properties in the first table can be overridden by a system property or a configuration option - simply use the "config option" name. For example, to change the project working directory, you could either run this command:
1つめの表内のすべてのプロパティは、システムプロパティや設定オプションで上書きすることができます。たとえば、プロジェクトの作業ディレクトリ(projectWorkDir)を変更するには、このようにコマンドを実行することができます:
grails -Dgrails.project.work.dir=work compile
or add this option to your
grails-app/conf/BuildConfig.groovy file:grails-app/conf/BuildConfig.groovyに記述します:
grails.project.work.dir = "work"Note that the default values take account of the property values they depend on, so setting the project working directory like this would also relocate the compiled classes, test classes, resources, and plugins.
注意点として、プロパティが依存しているプロパティのデフォルト値にも影響するので、このようにプロジェクトの作業ディレクトリを設定すると、コンパイルされたクラス、テストクラス、リソース、およびプラグインの場所を変更することにもなります。What happens if you use both a system property and a configuration option? Then the system property wins because it takes precedence over the
システムプロパティと設定オプションの両方を指定した場合、システムプロパティはBuildConfig.groovy file, which in turn takes precedence over the default values.BuildConfig.groovyファイルの設定よりも優先順位が高いので、システムプロパティの値が設定されます。The
BuildConfig.groovy file is a sibling of grails-app/conf/Config.groovy - the former contains options that only affect the build, whereas the latter contains those that affect the application at runtime. It's not limited to the options in the first table either: you will find build configuration options dotted around the documentation, such as ones for specifying the port that the embedded servlet container runs on or for determining what files get packaged in the WAR file.BuildConfig.groovyファイルは、grails-app/conf/Config.groovyと兄妹関係にあります。前者は、ビルド時にのみ影響を及ぼすオプションを含んでいるのに対して、後者はアプリケーションの実行時に影響を与えるオプションを含んでいます。設定オプションは、1つめの表で示したオプション以外にも、サーブレットコンテナを動かすポート指定や、WARファイルにどのファイルを格納するかを決定する指定など、他にも指定可能なビルド設定が存在します。使用可能なビルド設定 Available build settings
| Name | Description |
|---|---|
| grails.server.port.http | Port to run the embedded servlet container on ("run-app" and "run-war"). Integer. |
| grails.server.port.https | Port to run the embedded servlet container on for HTTPS ("run-app --https" and "run-war --https"). Integer. |
| grails.config.base.webXml | Path to a custom web.xml file to use for the application (alternative to using the web.xml template). |
| grails.compiler.dependencies | Legacy approach to adding extra dependencies to the compiler classpath. Set it to a closure containing "fileset()" entries. These entries will be processed by an AntBuilder so the syntax is the Groovy form of the corresponding XML elements in an Ant build file, e.g. fileset(dir: "$basedir/lib", includes: "**/*.class"). |
| grails.testing.patterns | A list of Ant path patterns that let you control which files are included in the tests. The patterns should not include the test case suffix, which is set by the next property. |
| grails.testing.nameSuffix | By default, tests are assumed to have a suffix of "Tests". You can change it to anything you like but setting this option. For example, another common suffix is "Test". |
| grails.project.war.file | A string containing the file path of the generated WAR file, along with its full name (include extension). For example, "target/my-app.war". |
| grails.war.dependencies | A closure containing "fileset()" entries that allows you complete control over what goes in the WAR's "WEB-INF/lib" directory. |
| grails.war.copyToWebApp | A closure containing "fileset()" entries that allows you complete control over what goes in the root of the WAR. It overrides the default behaviour of including everything under "web-app". |
| grails.war.resources | A closure that takes the location of the staging directory as its first argument. You can use any Ant tasks to do anything you like. It is typically used to remove files from the staging directory before that directory is jar'd up into a WAR. |
| grails.project.web.xml | The location to generate Grails' web.xml to |
| 名前 | 説明 |
|---|---|
| grails.server.port.http | 組み込みのサーブレットコンテナを実行するポート番号。("run-app" と "run-war") |
| grails.server.port.https | HTTPS用の組み込みのサーブレットコンテナを実行するポート番号。("run-app --https"と"run-war --https") |
| grails.config.base.webXml | アプリケーションで使用するカスタムのweb.xmlファイルへのパス。(web.xmlテンプレートを使用しない場合) |
| grails.compiler.dependencies | コンパイラのクラスパスに依存関係を追加する。"fileset()"を含んでいるクロージャに設定。 |
| grails.testing.patterns | テストに含まれるファイルを制御するためのAntパスのパターンリスト。パターンは、次のgrails.testing.nameSuffixに設定されているテストケースのサフィックス以外。 |
| grails.testing.nameSuffix | デフォルトでは、テストは"Tests"のサフィックスが設定されていますが、好きなようにオプション設定を変更することができます。 |
| grails.project.war.file | 生成されるWARファイルの名称(拡張子を含む)のファイルパス。例として、"target/my-app.war" 等。 |
| grails.war.dependencies | WARファイルの"WEB-INF/lib"階層に含む内容を、クロージャ内の"fileset()"でコントロール。 |
| grails.war.copyToWebApp | WARのルートディレクトリ階層に含む内容を、クロージャ内の"fileset()"でコントロール。 |
| grails.war.resources | 最初の引数としてステージングディレクトリの場所を受け取れるクロージャを指定。クロージャ内でAntタスクを使用することで、WAR化される前にステージングディレクトリの内容を変更する事ができます。 |
| grails.project.web.xml | Grailsがweb.xmlを生成する場所の指定。 |
リローディングエージェントキャッシュディレクトリReloading Agent Cache Directory
Grails uses an agent based reloading system in the development environment that allows source code changes to be picked up while the application is running. This reloading agent caches information needed to carry out the reloading efficiently. By default this information is stored under <USER_HOME_DIR>/.grails/.slcache/. The GRAILS_AGENT_CACHE_DIR environment variable may be assigned a value to cause this cache information to be stored somewhere else. Note that this is an operating system environment variable, not a JVM system property or a property which may be defined in BuildConfig.groovy. This setting must be defined as an environment variable because the agent cache directory must be configured very early in the JVM startup process, before any Grails code is executed.
5.7 AntとMaven
If all the other projects in your team or company are built using a standard build tool such as Ant or Maven, you become the black sheep of the family when you use the Grails command line to build your application. Fortunately, you can easily integrate the Grails build system into the main build tools in use today (well, the ones in use in Java projects at least).
もし、あなたのプロジェクトチームや会社でAntやMavenなどのような標準的なビルドツールを利用している場合は、アプリケーションをビルドする時にGrailsのコマンドラインを使っていると一家の厄介者にされてしまいます。幸いなことに、Grailsビルドシステムは今日使われている主なビルドツールに簡単に統合することができます。(少なくともJavaプロジェクトで使用されているものへ)Antへの統合 Ant Integration
When you create a Grails application with the create-app command, Grails doesn't automatically create an Ant
create-appコマンドでGrailsアプリケーションを作成した際に、Grailsは自動的にはApache Antのbuild.xml file but you can generate one with the integrate-with command:build.xmlを生成しません。integrate-withコマンドを使用して生成することが可能です。
grails integrate-with --antThis creates a
作成されたbuild.xml file containing the following targets:build.xmlファイルには、次のターゲットが含まれています:
clean- Cleans the Grails applicationcompile- Compiles your application's source codetest- Runs the unit testsrun- Equivalent to "grails run-app"war- Creates a WAR filedeploy- Empty by default, but can be used to implement automatic deployment
clean- Grailsアプリケーションをクリーンします。compile- アプリケーションのソースコードをコンパイルします。test- ユニットテストを実行します。run- Grailsの"run-app"コマンド相当を実行します。war- WARファイルを作成します。deploy- デフォルトでは空ですが、自動配備を実装することができます。
Each of these can be run by Ant, for example:
これらは例えば、以下のようなAntコマンドで実行できます。ant war
The build file is configured to use Apache Ivy for dependency management, which means that it will automatically download all the requisite Grails JAR files and other dependencies on demand. You don't even have to install Grails locally to use it! That makes it particularly useful for continuous integration systems such as CruiseControl or Jenkins.
ビルドファイルは Apache Ivy をの依存性管理を使う準備ができています。必要に応じてGrailsが利用したり、またはそれ以外で利用される依存関係のあるJARファイルを自動的にダウンロードしてくることができるということです。それを使うにはローカルにGrailsをインストールする必要すらありません!CruiseControlやJenkinsのような継続的インテグレーションツールを使う場合、特に便利でしょう。It uses the Grails Ant task to hook into the existing Grails build system. The task lets you run any Grails script that's available, not just the ones used by the generated build file. To use the task, you must first declare it:
これはGrailsのAntタスクを既存のGrailsビルドシステムにフックします。タスクは、Grailsの生成されたビルドファイル以外の利用可能なスクリプトの実行を許可されています。タスクを使用するには、まずこう宣言します。
<taskdef name="grailsTask"
         classname="grails.ant.GrailsTask"
         classpathref="grails.classpath"/>
This raises the question: what should be in "grails.classpath"? The task itself is in the "grails-bootstrap" JAR artifact, so that needs to be on the classpath at least. You should also include the "groovy-all" JAR. With the task defined, you just need to use it! The following table shows you what attributes are available:
ここで疑問が生じます。どれが"grails.classpath"でしょうか。タスク自体は"grails-bootstrap"JARの一部です。なので、少なくともクラスパス上にある必要があります。また、"groovy-all" JARを含める必要があります。タスク宣言ではこれらを仕使用する必要があります!次の表は、どんな属性が利用可能かを示しています。
| Attribute | Description | Required |
|---|---|---|
| home | The location of the Grails installation directory to use for the build. | Yes, unless classpath is specified. |
| classpathref | Classpath to load Grails from. Must include the "grails-bootstrap" artifact and should include "grails-scripts". | Yes, unless home is set or you use a classpath element. |
| script | The name of the Grails script to run, e.g. "TestApp". | Yes. |
| args | The arguments to pass to the script, e.g. "-unit -xml". | No. Defaults to "". |
| environment | The Grails environment to run the script in. | No. Defaults to the script default. |
| includeRuntimeClasspath | Advanced setting: adds the application's runtime classpath to the build classpath if true. | No. Defaults to true. |
| 属性 | 説明 | 必須 |
|---|---|---|
| home | ビルドに使用するGrailsのインストールディレクトリの場所。 | パスが指定されている場合を除き必須です。 |
| classpathref | Grailsがロードする基点となるクラスパス。"grails-bootstrap"を含めなければなりません。また、"grails-scripts"を含めるべきです。 | homeが設定されていなかったり、classpath要素を使う場合は必須です。 |
| script | Grailsスクリプトの実行名。例えば "TestApp"。 | 必須です。 |
| args | スクリプトに渡す引数。例えば "-unix -xml"。 | 必須ではありません。デフォルトは "" です。 |
| environment | スクリプト実行時のGrails環境変数。 | 必須ではありません。デフォルトはスクリプトのデフォルトになります。 |
| includeRuntimeClasspath | 高度な設定です。 trueの場合、アプリケーション実行時クラスパスをクラスパスに追加します。 | 必須ではありません。 デフォルトはtrueです。 |
The task also supports the following nested elements, all of which are standard Ant path structures:
タスクネスト要素をサポートします。こられの全ては標準的なAntの構造となっています。classpath- The build classpath (used to load Gant and the Grails scripts).compileClasspath- Classpath used to compile the application's classes.runtimeClasspath- Classpath used to run the application and package the WAR. Typically includes everything in @compileClasspath.testClasspath- Classpath used to compile and run the tests. Typically includes everything inruntimeClasspath.
classpath- ビルド時のクラスパス。(GantとGrailsスクリプトロード時に使用)compileClasspath- アプリケーションコンパイル時のクラスパス。runtimeClasspath- アプリケーションとWARパッケージ実行時のクラスパス。通常compileClasspathに全てが含まれます。testClasspath- コンパイル時と、テスト実行時のクラスパス。通常runtimeClasspathに全てが含まれます。
How you populate these paths is up to you. If you use the
どうやってパスを追加するかはあなた次第です。もし、home attribute and put your own dependencies in the lib directory, then you don't even need to use any of them. For an example of their use, take a look at the generated Ant build file for new apps.homeを利用しており、自分自身の依存関係をlibディレクトリに設定している場合は、これらを使う必要はありません。こららの利用例としては、生成された新しいアプリケーションのAntビルドファイルを見てみましょう。Maven統合 Maven Integration
Grails provides integration with Maven 2 with a Maven plugin.
GrailsはMavenプラグインを介して Maven 2":http://maven.apache.org との統合を提供しています。準備 Preparation
In order to use the Maven plugin, all you need is Maven 2 installed and set up. This is because you no longer need to install Grails separately to use it with Maven!
Mavenプラグインを使用するにあたって必要な手順は、Maven2をインストールし設定するだけです。MavenでGrailsを使用する場合、使用方法によっては別途Grailsをインストールする必要がありません。The Maven 2 integration for Grails has been designed and tested for Maven 2.0.9 and above. It will not work with earlier versions.GrailsのMaven2統合は、Maven 2.0.9以上を対象として設計・テストされています。それ以前のバージョンでは動作しません。
The default mvn setup DOES NOT supply sufficient memory to run the Grails environment. We recommend that you add the following environment variable setting to prevent poor performance:既定のmvnコマンド設定ではGrails環境で実行するための十分なメモリを供給できません。パフォーマンス低下を防止するため、次の環境変数を追加することをお勧めします:export MAVEN_OPTS="-Xmx512m -XX:MaxPermSize=256"
GrailsのMavenのプロジェクトを作成する Creating a Grails Maven Project
Using the
create-pom command you can generate a valid Maven pom.xml file for any existing Grails project. The below presents an example:create-pom コマンドを使用することで、既存のGrailsプロジェクトに対して、Mavenの pom.xml を作成する事ができます。次のように実行します:$ grails create-app myapp $ cd myapp $ grails create-pom com.mycompany
The
create-pom command expects a group id as an argument. The name and the version are taken from the application.properties of the application. The Maven plugin will keep the version in the pom.xml in sync with the version in application.properties.create-pom コマンドには引数としてグループIDを指定することができます。バージョン番号は、アプリケーションの application.properties から取得します。 Mavenプラグインは、常に pom.xml のバージョンと application.properties のバージョンを同期します。The following standard Maven commands are then possible:
以下のMaven標準コマンドが使用可能です:compile- Compiles a Grails projectpackage- Builds a WAR file from the Grails project.install- Builds a WAR file (or plugin zip/jar if a plugin) and installs it into your local Maven cachetest- Runs the tests of a Grails projectclean- Cleans the Grails project
compile- Grailsプロジェクトをコンパイルpackage- GrailsプロジェクトのWARファイルをビルドするinstall- WARファイル(又はプラグインの場合はZIPかJAR)をビルドしてMavenローカルキャッシュにインストールしますtest- Grailsプロジェクトのテストを実行しますclean- Grailsプロジェクトをクリーンします
Other standard Maven commands will likely work too.
その他のMaven標準コマンドも動作します。You can also use some of the Grails commands that have been wrapped as Maven goals:
さらに、一部のGrailsコマンドもMavenゴールとしてラップされています:grails:create-controller- Calls the create-controller commandgrails:create-domain-class- Calls the create-domain-class commandgrails:create-integration-test- Calls the create-integration-test commandgrails:create-pom- Creates a new Maven POM for an existing Grails projectgrails:create-script- Calls the create-script commandgrails:create-service- Calls the create-service commandgrails:create-taglib- Calls the create-tag-lib commandgrails:create-unit-test- Calls the create-unit-test commandgrails:exec- Executes an arbitrary Grails command line scriptgrails:generate-all- Calls the generate-all commandgrails:generate-controller- Calls the generate-controller commandgrails:generate-views- Calls the generate-views commandgrails:install-templates- Calls the install-templates commandgrails:list-plugins- Calls the list-plugins commandgrails:package- Calls the package commandgrails:run-app- Calls the run-app command
grails:create-controller- create-controllerコマンドを呼び出しますgrails:create-domain-class- create-domain-classコマンドを呼び出しますgrails:create-integration-test- create-integration-testコマンドを呼び出しますgrails:create-pom- 既存のGrailsプロジェクトにMaven POMを新規作成しますgrails:create-script- create-scriptコマンドを呼び出しますgrails:create-service- create-serviceコマンドを呼び出しますgrails:create-taglib- create-tag-libコマンドを呼び出しますgrails:create-unit-test- create-unit-testコマンドを呼び出しますgrails:exec- 任意のGrailsコマンドラインスクリプトを実行しますgrails:generate-all- generate-allコマンドを呼び出しますgrails:generate-controller- generate-controllerコマンドを呼び出しますgrails:generate-views- generate-viewsコマンドを呼び出しますgrails:install-templates- install-templatesコマンドを呼び出しますgrails:list-plugins- list-pluginsコマンドを呼び出しますgrails:package- packageコマンドを呼び出しますgrails:run-app- run-appコマンドを呼び出します
For a complete, up to date list, run
最新のリストを見るには、 mvn grails:helpmvn grails:help を実行してください。Archetypeを使用したGrails Mavenプロジェクトの作成 Creating a Grails Maven Project using the Archetype
You can create a Maven Grails project without having Grails installed, simply run the following command:
Grailsのインストール無しでMaven Grailsプロジェクトの作成が可能です。次のコマンドを実行します:
mvn archetype:generate -DarchetypeGroupId=org.grails \
    -DarchetypeArtifactId=grails-maven-archetype \
    -DarchetypeVersion=2.1.0.RC1 \
    -DgroupId=example -DartifactId=my-app
Choose whichever grails version, group ID and artifact ID you want for your application, but everything else must be as written. This will create a new Maven project with a POM and a couple of other files. What you won't see is anything that looks like a Grails application. So, the next step is to create the project structure that you're used to.
アプリケーションで使用するGrailsバージョン、グループID、アーティファクトIDを指定するだけで必要な内容が書き込まれます。このコマンドで新規にMavenプロジェクトのPOMと他のファイルが生成されます。生成された内容を見るとGrailsアプリケーションで必要なものが見つかりません。次のステップでいつも通りの物が出来上がります。
But first, to set target JDK to Java 6, do that now. Open my-app/pom.xml and change
はじめに、ターゲットJDKをJava 6にセットします。my-app/pom.xmlを開いて、次のように変更します:<plugin>
<artifactId>maven-compiler-plugin</artifactId>
<configuration>
<source>1.5</source>
<target>1.5</target>
</configuration>
</plugin>to
上記を、以下のように変更します。
<plugin>
  <artifactId>maven-compiler-plugin</artifactId>
  <configuration>
    <source>1.6</source>
    <target>1.6</target>
  </configuration>
</plugin>
Then you're ready to create the project structure:
これでプロジェクト構造を作成する環境が整いました。cd my-app mvn initialize
プラグイン依存を定義する Defining Plugin Dependencies
All Grails plugins are published to a standard Maven repository located at . When using the Maven plugin for Grails you must ensure that this repository is declared in your list of remote repositories:
全ての公式Grailsプラグインは、のMavenリポジトリに公開されています。Mavenプラグインを使用する場合は、リモートリポジトリの定義にリポジトリが追加されている必要があります。<repository> <id>grails-plugins</id> <name>grails-plugins</name> <url>http://repo.grails.org/grails/plugins</url> </repository>
With this done you can declare plugin dependencies within your
この設定が完了したら、 pom.xml file:pom.xml ファイルに、プラグイン依存定義を行います:<dependency> <groupId>org.grails.plugins</groupId> <artifactId>database-migration</artifactId> <version>1.1</version> <scope>runtime</scope> <type>zip</type> </dependency>
Note that the
注意点としては、 type element must be set to zip.type エレメントの定義は zip となる部分です。Grailsフォーク実行 Forked Grails Execution
By default the Maven plugin will run Grails commands in-process, meaning that the Grails process occupies the same JVM as the Maven process. This can put strain on the Maven process for particularly large applications.In this case it is recommended to use forked execution. Forked execution can be configured in the configuration element of the plugin:<plugin>
<groupId>org.grails</groupId>
<artifactId>grails-maven-plugin</artifactId>
<version>${grails.version}</version>
<configuration>
<!-- Whether for Fork a JVM to run Grails commands -->
<fork>true</fork>
</configuration>
<extensions>true</extensions>
</plugin>forkDebug element:<!-- Whether for Fork a JVM to run Grails commands --> <fork>true</fork> <forkDebug>true</forkDebug>
forkMaxMemory- The maximum amount of heap (default 1024)forkMinMemory- The minimum amount of heap (default 512)forkPermGen- The amount of permgen (default 256)
Multi Module Maven Builds
The Maven plugin can be used to power multi-module Grails builds. The easiest way to set this is up is with thecreate-multi-project-build command:$ grails create-app myapp $ grails create-plugin plugin1 $ grails create-plugin plugin2 $ grails create-multi-project-build org.mycompany:parent:1.0
mvn install will build all projects together. To enable the 'grails' command to read the POMs you can modify BuildConfig.groovy to use the POM and resolve dependencies from your Maven local cache:grails.project.dependency.resolution = {
…
pom true
repositories {
…
mavenLocal()
}
}pom.xml file you can do an initial mvn install from the parent project to build all plugins and install them into your local maven cache and then cd into your project and use the regular grails run-app command to run your application. All previously built plugins will be resolved from the local Maven cache.Grailsコマンドをフェーズに追加する Adding Grails commands to phases
The standard POM created for you by Grails already attaches the appropriate core Grails commands to their corresponding build phases, so "compile" goes in the "compile" phase and "war" goes in the "package" phase. That doesn't help though when you want to attach a plugin's command to a particular phase. The classic example is functional tests. How do you make sure that your functional tests (using which ever plugin you have decided on) are run during the "integration-test" phase?
Grailsが作成した標準のPOMファイルは、Grailsのビルドフェーズに対応したコアコマンドに適切に付属しています。"compile" は "compile"フェーズに、"war" は "package"フェーズに。特定のフェーズにプラグインコマンドを付属させたい場合には役立ちません。古典的な例は、ファンクショナルテストです。どうやってファンクショナルテストが統合テストフェーズの間に(あなた使用しているどんなプラグインを使った場合でも)実行されるのかを確かめるのでしょうか?Fear not: all things are possible. In this case, you can associate the command to a phase using an extra "execution" block:
恐れる必要はありません、すべて可能です。この場合には、"execution"ブロックを追加してフェーズに関連付けることができます。
<plugin>
    <groupId>org.grails</groupId>
    <artifactId>grails-maven-plugin</artifactId>
    <version>2.1.0.RC2</version>
    <extensions>true</extensions>
    <executions>
        <execution>
            <goals>
            …
            </goals>
        </execution>
        <!-- Add the "functional-tests" command to the "integration-test" phase -->
        <execution>
            <id>functional-tests</id>
            <phase>integration-test</phase>
            <goals>
                <goal>exec</goal>
            </goals>
            <configuration>
                <command>functional-tests</command>
            </configuration>
        </execution>
    </executions>
</plugin>
This also demonstrates the
またこれは grails:exec goal, which can be used to run any Grails command. Simply pass the name of the command as the command system property, and optionally specify the arguments with the args property:grails:exec goal の実演にもなっています。Grailsのどんなコマンドも実行できるのです。単にコマンド名を渡すcommandシステムプロパティと、オプションで引数を渡すargsプロパティがあります:mvn grails:exec -Dcommand=create-webtest -Dargs=Book
GrailsのMavenプロジェクトのデバッグ Debugging a Grails Maven Project
Maven can be launched in debug mode using the "mvnDebug" command. To launch your Grails application in debug, simply run:
Mavenは "mvnDebug" コマンドを使用して、デバッグモードで起動することができます。デバッグでGrailsアプリケーションを起動するには、単純に以下のコマンドを実行します:mvnDebug grails:run-app
The process will be suspended on startup and listening for a debugger on port 8000.
プロセスは起動時に停止して、デバッガをポート8000上で待ち受けます。If you need more control of the debugger, this can be specified using the MAVEN_OPTS environment variable, and launch Maven with the default "mvn" command:
デバッガのより詳細に制御する必要がある場合は、環境変数のMAVEN_OPTSを指定して標準の "mvn" コマンドを使用してMavenを起動させます。MAVEN_OPTS="-Xdebug -Xrunjdwp:transport=dt_socket,server=y,suspend=y,address=5005"
mvn grails:run-app問題提起 Raising issues
If you come across any problems with the Maven integration, please raise a JIRA issue.
Maven統合を使っている際になにか問題に直面した場合、JIRA issueに問題を提起して下さい。
5.8 Grailsラッパー
The Grails Wrapper allows a Grails application to built without having to install Grails and configure a GRAILS_HOME environment variable. The wrapper includes a small shell script and a couple of small bootstrap jar files that typically would be checked in to source code control along with the rest of the project. The first time the wrapper is executed it will download and configure a Grails installation. This wrapper makes it more simple to setup a development environment, configure CI and manage upgrades to future versions of Grails. When the application is upgraded to the next version of Grails, the wrapper is updated and checked in to the source code control system and the next time developers update their workspace and run the wrapper, they will automatically be using the correct version of Grails.Generating The Wrapper
The wrapper command can be used to generate the wrapper shell scripts and supporting jar files. Execute the wrapper command at the top of an existing Grails project.grails wrapper
grailsw shell script and grailsw.bat batch file at the top of the project. In addition to those, a wrapper/ directory (the name of the directory is configurable via command line options) is generated which contains some support files which are necessary to run the wrapper. All of these files should be checked into the source code control system along with the rest of the project. This allows developers to check the project out of source code control and immediately start using the wrapper to execute Grails commands without having to install and configure Grails.Using The Wrapper
The wrapper script accepts all of the same arguments as the normal grails command../grailsw create-domain-class com.demo.Person ./grailsw run-app ./grailsw test-app unit:etc...