
2 スタートガイド - Reference Documentation
Authors: Graeme Rocher, Peter Ledbrook, Marc Palmer, Jeff Brown, Luke Daley, Burt Beckwith
Version: 2.3.0
Translated by: T.Yamamoto, Japanese Grails Doc Translating Team. Special thanks to NTT Software.
【注意】このドキュメントの内容はスナップショットバージョンを元に*意訳*されているため、一部現行バージョンでは未対応の機能もあります。
Table of Contents
2 スタートガイド
2.1 インストール必要条件
Before installing Grails you will need as a minimum a Java Development Kit (JDK) installed version 1.6 or above. Download the appropriate JDK for your operating system, run the installer, and then set up an environment variable called
Grailsをインストールする前に、Java Development Kit (JDK) 1.6以上がインストール済みで、JAVA_HOME pointing to the location of this installation. If you're unsure how to do this, we recommend the video installation guides from grailsexample.net:JAVA_HOMEが指定されている必要があります。一部のプラットフォームでは(OS Xの例で言うと)、自動的にJavaのインストール先を認識します。手動で定義する場合等、必要に応じて次のようにJavaの設定を行ってください。方法がわからない場合は、コチラの動画も参考にしてください。grailsexample.net
These will show you how to install Grails too, not just the JDK.
これらの動画は、JDKのセットアップのみではなく、Grailsのインストールまで解説しています。A JDK is required in your Grails development environment. A JRE is not sufficient.
JDKがGrailsの開発時に必須になります。JREでは十分ではありません。
On some platforms (for example OS X) the Java installation is automatically detected. However in many cases you will want to manually configure the location of Java. For example:
一部のOS環境(OSX等)では、自動的にJavaが認識されます。別途設定したい場合は、次のように設定してください:export JAVA_HOME=/Library/Java/Home
export PATH="$PATH:$JAVA_HOME/bin"if you're using bash or another variant of the Bourne Shell.
Bashやその他のBourne Shellでの例です。
2.2 ダウンロードとインストール
The first step to getting up and running with Grails is to install the distribution. To do so follow these steps:
まず最初にGrailsをインストールすることから始めましょう。手順は次のようになります:- Download a binary distribution of Grails and extract the resulting zip file to a location of your choice
- Set the GRAILS_HOME environment variable to the location where you extracted the zip
- On Unix/Linux based systems this is typically a matter of adding something like the following
export GRAILS_HOME=/path/to/grailsto your profile - On Windows this is typically a matter of setting an environment variable under
My Computer/Advanced/Environment Variables - Then add the
bindirectory to yourPATHvariable: - On Unix/Linux based systems this can be done by adding
export PATH="$PATH:$GRAILS_HOME/bin"to your profile - On Windows this is done by modifying the
Pathenvironment variable underMy Computer/Advanced/Environment Variables
- Grailsをダウンロードし、任意の場所にzipファイルを解凍します。
- zipファイルを解凍した場所にGRAILS_HOME環境変数を設定します。
- Unix/Linuxベースのシステムでは、次のようなものをプロファイル(.profileなど)に追加します。
export GRAILS_HOME=/path/to/grails - Windowsでは、マイコンピュータ>詳細>環境変数に設定します。
- さらに、
PATH変数にbinディレクトリを追加する必要があります。 - Unix/Linuxベースのシステムでは、このように設定します。
export PATH="$PATH:$GRAILS_HOME/bin" - Windowsでは、マイコンピュータ>詳細>環境変数の
Pathに%GRAILS_HOME%binを追加します。
If Grails is working correctly you should now be able to type
ターミナルでgrails -version in the terminal window and see output similar to this:grailsと入力し実行することで下記のような出力がされれば、Grailsが正常に動作しています:
Grails version: 2.0.02.3 アプリケーション作成
To create a Grails application you first need to familiarize yourself with the usage of the
Grailsアプリケーションを作成する前に、基本的なgrails command which is used in the following manner:grailsコマンドの使用法に慣れておきましょう。
grails command name
grails [コマンド名]
Run create-app to create an application:
アプリケーションを作成するコマンドはcreate-appです。
grails create-app helloworldThis will create a new directory inside the current one that contains the project. Navigate to this directory in your console:
このコマンドを実行することにより、現在のディレクトリ内にプロジェクトが含まれる新しいディレクトリが作成されます。コンソールで、このディレクトリに移動してください。
cd helloworld2.4 Hello Worldの例
Let's now take the new project and turn it into the classic "Hello world!" example. First, change into the "helloworld" directory you just created and start the Grails interactive console:
それではさっそく、この新たなプロジェクトで、おなじみの「Hello World!」を構築していきましょう。
はじめに、作成したhelloworldディレクトリへ移動し、Grailsのインタラクティブコンソールを起動します:
$ cd helloworld
$ grails
You should see a prompt that looks like this:
次のようなプロンプトが表示されます:
What we want is a simple page that just prints the message "Hello World!" to the browser. In Grails, whenever you want a new page you just create a new controller action for it. Since we don't yet have a controller, let's create one now with the create-controller command:
はじめに作るのはブラウザへ「Hello World!」というメッセージを表示するシンプルなページです。
Grailsで新しいページが必要な場合は、新たにコントローラのアクションを作成します。
まだコントローラが存在しない場合は、create-controllerコマンドで新たに作成しましょう:
grails> create-controller hello
Don't forget that in the interactive console, we have auto-completion on command names. So you can type "cre" and then press <tab> to get a list of all
インタラクティブコンソールではコマンド名の自動補完が効きます。
そのためcreate-* commands. Type a few more letters of the command name and then <tab> again to finish.
creと入力し、そしてすべてのcreate-*コマンド一覧を表示するために<tab>を押します。
さらにいくつかのコマンド名を入力し、そして補完を完了するために<tab>をもう1度押します。
The above command will create a new controller in the
上記のコマンドはgrails-app/controllers/helloworld directory called HelloController.groovy. Why the extra helloworld directory? Because in Java land, it's strongly recommended that all classes are placed into packages, so Grails defaults to the application name if you don't provide one. The reference page for create-controller provides more detail on this.
grails-app/controllers/helloworldディレクトリにHelloController.groovyという名前で新たなコントローラを作成します。
なぜhelloworldディレクトリに作成されるのでしょうか?
これはJavaの世界では、すべてのクラスはパッケージに所属することが推奨されているためです。
もしパッケージが明示的に指定されなかった場合、Grailsはパッケージ名のデフォルトにアプリケーション名を使用します。
create-controllerのリファレンスページではより詳細な情報を提供しています。
We now have a controller so let's add an action to generate the "Hello World!" page. The code looks like this:
さてコントローラが作成できたので、「Hello World!」ページを生成するアクションを追加しましょう。
次のようなコードになります:package helloworldclass HelloController { def index() { render "Hello World!" } }
The action is simply a method. In this particular case, it calls a special method provided by Grails to render the page.
このアクションはシンプルなメソッドになっています。
ここでは、Grailsによって提供されているページを表示するrenderメソッドを呼んでいます。
Job done. To see your application in action, you just need to start up a server with another command called run-app:
これで準備は完了です。
アプリケーションの動作を確認するには、run-appと呼ばれる他のコマンドを使いサーバを起動する必要があります:
grails> run-app
This will start an embedded server on port 8080 that hosts your application. You should now be able to access your application at the URL http://localhost:8080/helloworld/ - try it!
これはアプリケーションが動作する組み込みサーバを8080ポートで起動します。
これによりhttp://localhost:8080/helloworld/というURLからアプリケーションにアクセス可能になっています。さっそくアクセスしてみましょう!
If you see the error "Server failed to start for port 8080: Address already in use", then it means another server is running on that port. You can easily work around this by running your server on a different port using -Dserver.port=9090 run-app. '9090' is just an example: you can pretty much choose anything within the range 1024 to 49151.
もし「Server failed to start for port 8080: Address already in use」というエラーが表示された場合は、他のサーバがそのポートで起動していることを意味します。 これは-Dserver.port=9090 run-appのように異なるポートを使ってサーバを起動することで簡単に回避できます。 この9090は単なる例で、1024から49151の間で任意のポートを指定できます。
The result will look something like this:
ブラウザでは次のように表示されます: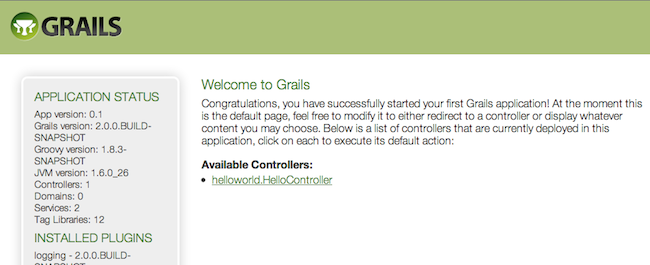
This is the Grails intro page which is rendered by the
これはgrails-app/view/index.gsp file. It detects the presence of your controllers and provides links to them. You can click on the "HelloController" link to see our custom page containing the text "Hello World!". Voila! You have your first working Grails application.
grails-app/view/index.gspファイルによって表示されるGrailsのイントロページです。
このページ内に作成したコントローラが表示され、そのコントローラへのリンクが提供されていることに気が付いたでしょうか?
「Hello World!」というテキストを含むカスタムページを表示するために、「HelloController」リンクをクリックします。
じゃじゃーん!これで初めてのGrailsアプリケーションが完成です。
One final thing: a controller can contain many actions, each of which corresponds to a different page (ignoring AJAX at this point). Each page is accessible via a unique URL that is composed from the controller name and the action name: /<appname>/<controller>/<action>. This means you can access the Hello World page via /helloworld/hello/index, where 'hello' is the controller name (remove the 'Controller' suffix from the class name and lower-case the first letter) and 'index' is the action name. But you can also access the page via the same URL without the action name: this is because 'index' is the default action . See the end of the controllers and actions section of the user guide to find out more on default actions.
最後にもうひとつ。
コントローラは異なるページ(ここではAJAXは置いといて)を表示する複数のアクションを含むことができます。
これらのページは、それぞれ固有のURLを通じてアクセスできます。このURLは/<appname>/<controller>/<action>の形式でコントローラ名、アクション名から構成されます。
/helloworld/hello/indexを通してHello Worldページにアクセスできますが、これはhelloがコントローラ名(クラス名からサフィックスのControllerを削除して、最初の文字を小文字する)、indexがアクション名になります。
ですが、ここではアクション名を削除したURLでも同じページにアクセスできます。これはindexが デフォルトアクション であるためです。
このデフォルトアクションの詳細はユーザガイドのコントローラとアクションセクションの最後を参照してください。
2.5 インタラクティブモードの利用
Grails 2.0 features an interactive mode which makes command execution faster since the JVM doesn't have to be restarted for each command. To use interactive mode simple type 'grails' from the root of any projects and use TAB completion to get a list of available commands. See the screenshot below for an example:
Grails 2.0では、コマンドの起動を速くするために、コマンド毎にJVMに再起動が必要無いインタラクティブモードを提供しています。インタラクティブモードを使用するには、プロジェクトルートで単に'grails'と入力するだけです。使用可能なコマンドをタブ補完することもできます。例としてスクリーンショットを参照してください: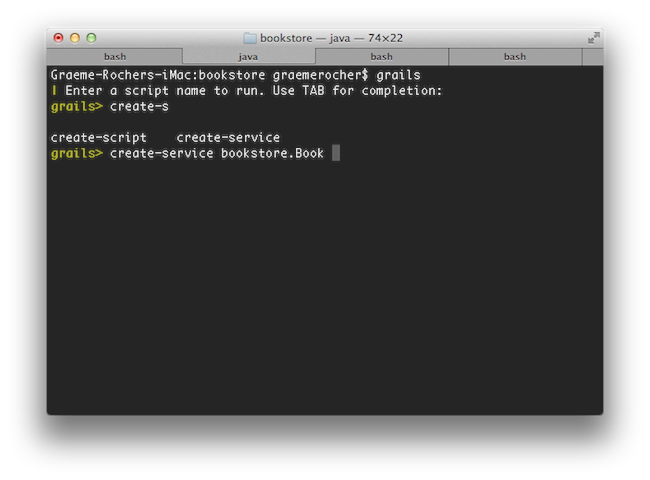
For more information on the capabilities of interactive mode refer to the section on Interactive Mode in the user guide.
さらなるインタラクティブモードの能力と情報に関しては、ユーザガイドのインタラクティブモードセクションを参照してください。
2.6 IDEの設定
IntelliJ IDEA
IntelliJ IDEA and the JetGroovy plugin offer good support for Groovy and Grails developers. Refer to the section on Groovy and Grails support on the JetBrains website for a feature overview.
IntelliJ IDEAとJetGroovyプラグインは、Groovy&Grailsの開発者に十分な機能を提供します。機能概要については、JetBrainsのウェブサイトのGroovy and Grailsを参照してください。IntelliJ IDEA comes in two flavours; the open source "Community Edition" and the commercial "Ultimate Edition".
IntelliJ IDEAには、オープンソース版の"Community Edition"と商用版の"Ultimate Edition"という2種類のバージョンが存在します
Both offers support for Groovy, but only Ultimate Edition offers Grails support.
両方Groovyをサポートしていますが、Grailsは、"Ultimate Edition"のみの対応となります。With Ultimate Edition, there is no need to use the
Ultimate Editionでは、 grails integrate-with --intellij command, as Ultimate Edition understands Grails projects natively. Just open the project with File -> New Project -> Create project from existing sources.grails integrate-with --intellij コマンドを実行する必要がありません。Ultimate Editionでは、Grailsにネイティブ対応しています。プロジェクトを File -> New Project -> Create project で開くだけで良いです。You can still use Community Edition for Grails development, but you will miss out on all the Grails specific features like automatic classpath management, GSP editor and quick access to Grails commands.
Community EditionでもGrails開発に使用できますが、Grails向けの機能や自動クラスパス管理、GSPエディタ、Grailsコマンドへの対応が存在しません。To integrate Grails with Community Edition run the following command to generate appropriate project files:
GrailsでCommunity Editionの設定をするには、次のコマンドを実行してプロジェクトファイルを生成します。grails integrate-with --intellij
Eclipse
We recommend that users of Eclipse looking to develop Grails application take a look at Groovy/Grails Tool Suite, which offers built in support for Grails including automatic classpath management, a GSP editor and quick access to Grails commands. See the STS Integration page for an overview.
Eclipse ユーザーがGrailsアプリケーションの開発をする際は、Groovy/Grails Tool Suiteを探して取得することをお勧めします。それは自動クラスパス管理機能、GSPエディタやGrailsコマンドへの迅速なアクセス機能を含んだGrailsのためのサポートが組み込まれて提供されています。概要については、STS Integrationのページを参照してください。NetBeans
NetBeans provides a Groovy/Grails plugin that automatically recognizes Grails projects and provides the ability to run Grails applications in the IDE, code completion and integration with the Glassfish server. For an overview of features see the NetBeans Integration guide on the Grails website which was written by the NetBeans team.
他にも良好なオープンソースのIDEとしてSunのNetBeansがあります。NetBeansはGroovy/Grailsプラグインで自動的にGrailsプロジェクトを認識します。また、IDEでのGrailsアプリケーションの実行、コード補完、SunのGlassfishサーバとの連携などの機能も提供しています。機能概要については、NetBeansチームによって記述されたGrails公式サイト上のNetBeans Integrationガイドを参照してください。TextMate
Since Grails' focus is on simplicity it is often possible to utilize more simple editors and TextMate on the Mac has an excellent Groovy/Grails bundle available from the TextMate bundles SVN.
単純さに焦点があたっているGrailsは、より単純なエディタを利用することが可能です。そしてMac上の TextMate はTextmateにバンドルされたSVNから優秀なGroovy/Grailsバンドルを利用可能です。To integrate Grails with TextMate run the following command to generate appropriate project files:
GrailsでTextMateの設定をするには、次のコマンドを実行してTextMate用のプロジェクトファイルを生成します。grails integrate-with --textmate
Alternatively TextMate can easily open any project with its command line integration by issuing the following command from the root of your project:
またTextMateはプロジェクトのルートから次のコマンドを発行することによりコマンドラインと統合し、任意のプロジェクトを簡単に開くことができます:mate .
2.7 Convention over Configuration 設定より規約
Grails uses "convention over configuration" to configure itself. This typically means that the name and location of files is used instead of explicit configuration, hence you need to familiarize yourself with the directory structure provided by Grails.
Grailsは、"convention over configuration"を使用して、自動的に設定をおこないます。一般的に、名前とファイルの位置が明確な構成の代わりに使われることを意味します。それゆえに、Grailsによって提供されるディレクトリ構造に慣れ親む必要があります。Here is a breakdown and links to the relevant sections:
概要と関連するセクションへのリンクです。:grails-app- top level directory for Groovy sourcesconf- Configuration sources.controllers- Web controllers - The C in MVC.domain- The application domain.i18n- Support for internationalization (i18n).services- The service layer.taglib- Tag libraries.utils- Grails specific utilities.views- Groovy Server Pages - The V in MVC.scripts- Gant scripts.src- Supporting sourcesgroovy- Other Groovy sourcesjava- Other Java sourcestest- Unit and integration tests.
grails-app- Groovyのソースディレクトリの最上位conf- 設定ソースcontrollers- Webコントローラ - MVCのCdomain- アプリケーションドメインi18n- 国際化(i18n)のサポートservices- サービス層taglib- タグライブラリutils- Grails特化なユーティリティviews- Groovy Server Pagesscripts- Gantスクリプトsrc- サポートソースgroovy- その他のGroovyのソースjava- その他のJavaソースtest- ユニットテストと統合テスト
2.8 アプリケーションの起動
Grails applications can be run with the built in Tomcat server using the run-app command which will load a server on port 8080 by default:
Grailsアプリケーションは、run-appコマンドを使用することで組み込みTomcatで実行することができます。デフォルトポートは8080番です。grails run-app
You can specify a different port by using the
起動オプションにserver.port argument:server.portを指定して別のポートで起動することもできます。grails -Dserver.port=8090 run-app
$ grails
grails> run-app
| Server running. Browse to http://localhost:8080/helloworld
| Application loaded in interactive mode. Type 'stop-app' to shutdown.
| Downloading: plugins-list.xml
grails> stop-app
| Stopping Grails server
grails> run-app
| Server running. Browse to http://localhost:8080/helloworld
| Application loaded in interactive mode. Type 'stop-app' to shutdown.
| Downloading: plugins-list.xml
More information on the run-app command can be found in the reference guide.
run-appコマンドの詳細は、リファレンスガイドを参照してください。
2.9 アプリケーションのテスト
The
Grailsのcreate-* commands in Grails automatically create unit or integration tests for you within the test/unit or test/integration directory. It is of course up to you to populate these tests with valid test logic, information on which can be found in the section on Testing.create-*コマンドは、自動的にユニットテストまたは統合テストをそれぞれtest/unitまたtest/integrationディレクトリに生成します。スケルトンのテストのロジックは各自で実装してください。テストの詳細についてはTestingを参考にしてください。To execute tests you run the test-app command as follows:
テストを実行する場合は、test-appコマンドを使用します:grails test-app
2.10 アプリケーションのデプロイ
Grails applications are deployed as Web Application Archives (WAR files), and Grails includes the war command for performing this task:
GrailsアプリケーションはWebアプリケーションアーカイブ(WARファイル)としてデプロイされます。Grailsにはアーカイブを作成するためのwarコマンドがあります:grails war
This will produce a WAR file under the
コンテナにデプロイ可能なWarファイルがtarget directory which can then be deployed as per your container's instructions.targetディレクトリ以下に生成されます。Unlike most scripts which default to the
他のほとんどのスクリプトと違い、development environment unless overridden, the war command runs in the production environment by default. You can override this like any script by specifying the environment name, for example:warコマンドでは、環境がdevelopmentにオーバーライドされて、productionがデフォルトになります。他のスクリプトと同じく環境名を指定することで変更可能です。grails dev war
NEVER deploy Grails using the run-app command as this command sets Grails up for auto-reloading at runtime which has a severe performance and scalability implicationsGrailsを本番運用する際はWARをデプロイしてください。run-appコマンドでの運用は基本的に自動リロードなどが設定されているため、パフォーマンスやスケーラビリティに影響します。
When deploying Grails you should always run your containers JVM with the
Grailsをデプロイする場合は、-server option and with sufficient memory allocation. A good set of VM flags would be:-serverオプションと十分なメモリを割り当てて、Webコンテナを動作させましょう。JVM起動オプションの良い設定は次のようになります:-server -Xmx512M -XX:MaxPermSize=256m
2.11 サポートされている Java EE コンテナ
Grails runs on any container that supports Servlet 2.5 and above and is known to work on the following specific container products:
GrailsはServlet 2.5をサポートする任意のWebコンテナで動作します。次の製品で動作することが確認されています。
- Tomcat 7
- Tomcat 6
- SpringSource tc Server
- Eclipse Virgo
- GlassFish 3
- GlassFish 2
- Resin 4
- Resin 3
- JBoss 6
- JBoss 5
- Jetty 8
- Jetty 7
- Jetty 6
- IBM Websphere 7.0
- IBM Websphere 6.1
- Oracle Weblogic 10.3
- Oracle Weblogic 10
- Oracle Weblogic 9
- IBM WebSphere 8.5
- IBM WebSphere 8.0
- IBM WebSphere 7.0
- IBM WebSphere 6.1
It's required to set "-Xverify:none" in "Application servers > server > Process Definition > Java Virtual Machine > Generic JVM arguments" for older versions of WebSphere. This is no longer needed for WebSphere version 8 or newer.古いバージョンのWebSphereでは、"Application servers > server > Process Definition > Java Virtual Machine > Generic JVM arguments"に、"-Xverify:none"を設定する必要があります。WebSphere 8 以降では不要です。
Some containers have bugs however, which in most cases can be worked around. A list of known deployment issues can be found on the Grails wiki.
一部のWebコンテナにはバグがありますが、ほとんどの場合では回避することができます。既知の開発時における課題の一覧は、GrailsのWikiにあります。
2.12 アプリケーション生成
To get started quickly with Grails it is often useful to use a feature called Scaffolding to generate the skeleton of an application. To do this use one of the
Grailsでは、アプリケーションのスケルトンを生成するスカッフォールディングの機能を使用することにより、素早く開発することができます。Grailsにはアプリケーションのスケルトンを生成するスカッフォールディングという機能があります。これをするには、コントローラと関連するビューを生成するgenerate-allなどを使用します。generate-* commands such as generate-all, which will generate a controller (and its unit test) and the associated views:grails generate-all Book
2.13 アーテファクトの作成
Grails ships with a few convenience targets such as create-controller, create-domain-class and so on that will create Controllers and different artefact types for you.
Grailsにはコントローラや様々なアーテファクトを生成するcreate-controllerやcreate-domain-classなどのコマンドが存在します。
These are just for your convenience and you can just as easily use an IDE or your favourite text editor.アーテファクト生成は便利機能です。IDEやテキストエディタを使用してもかまいません。
For example to create the basis of an application you typically need a domain model:
例としてドメインモデルを生成するには:grails create-domain-class book
This will result in the creation of a domain class at
このコマンドを実行すると、grails-app/domain/Book.groovy such as:grails-app/domain/Book.groovyに以下のようなドメインクラスが作成されます:class Book {
}There are many such
他にもcreate-* commands that can be explored in the command line reference guide.create-*コマンドがあります。詳しくはコマンドライン・リファレンス・ガイドを参照しましょう。To decrease the amount of time it takes to run Grails scripts, use the interactive mode.interactiveモードを使用することでGrailsスクリプトの起動時間を減らすことができます。